We recently came across an OG customer who had all three catalogs that King created in the late 80s / early 90s. Each of these hand-assembled catalogs was called a Volume and included a carefully curated collection of Mugen parts, King parts, information about Mugen, and information about King's racecars and services. Each include thoughtful introductory letters written by King's CEO Scott and are a terrific snapshot of Honda/Acura performance culture at the time.
Because we don't spend much time looking in the rear view, we actually didn't have these Volumes anymore in our own library of literature. In fact we only printed about 1000 of each Volume. So Bill Yoon generously loaned the Volumes to us (including the price list inserts) for us to scan and make available to share with our friends!
Click an item below to download the PDF scan.
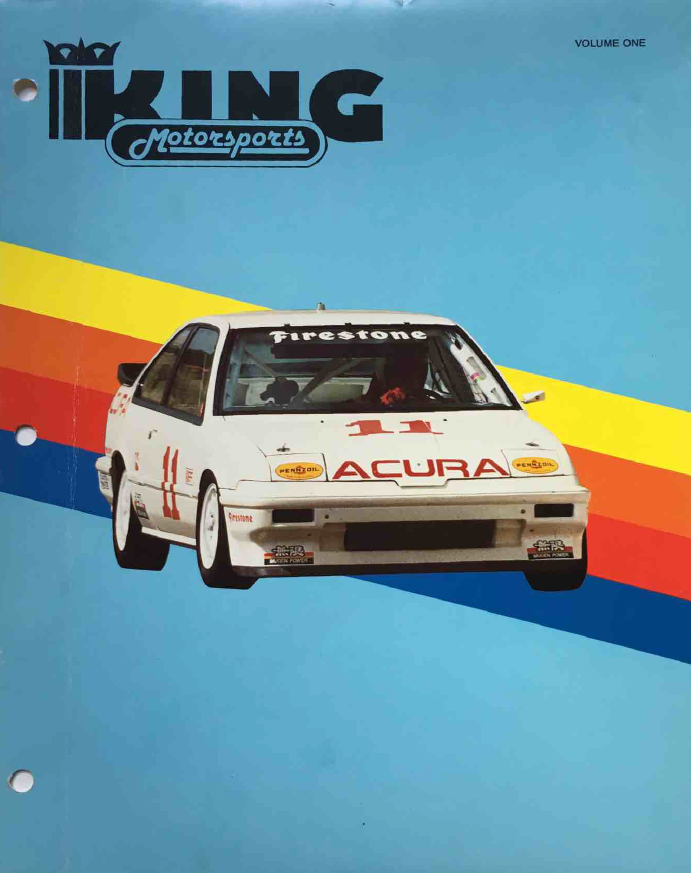
KMS Volume 1.pdf (4.43 mb), Circa 1989
KMS Volume 1 Price List.pdf (1.11 mb)
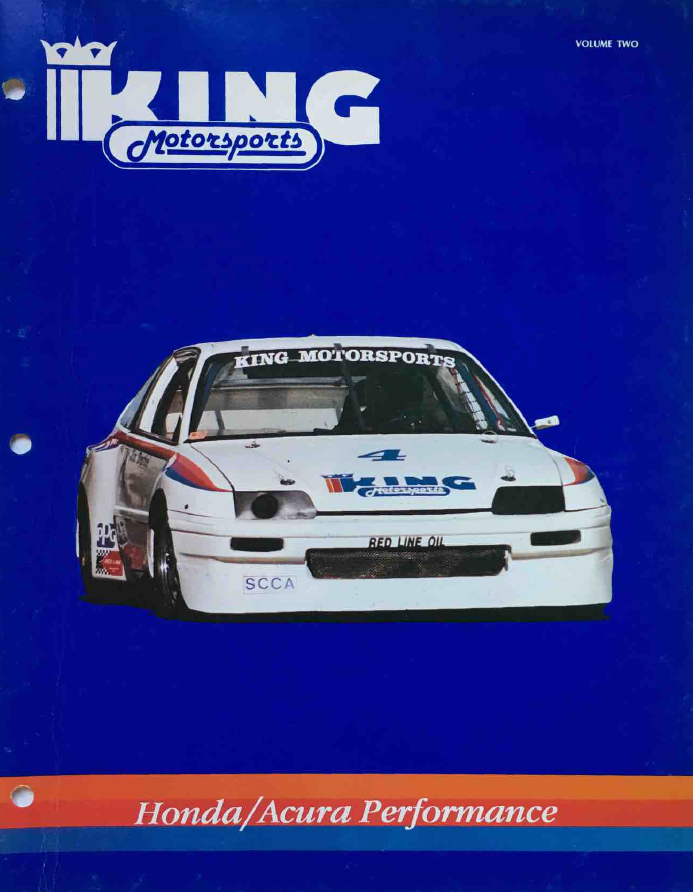
KMS Volume 2.pdf (5.24 mb), Circa 1991
KMS Volume 2 Price List.pdf (909.23 kb)
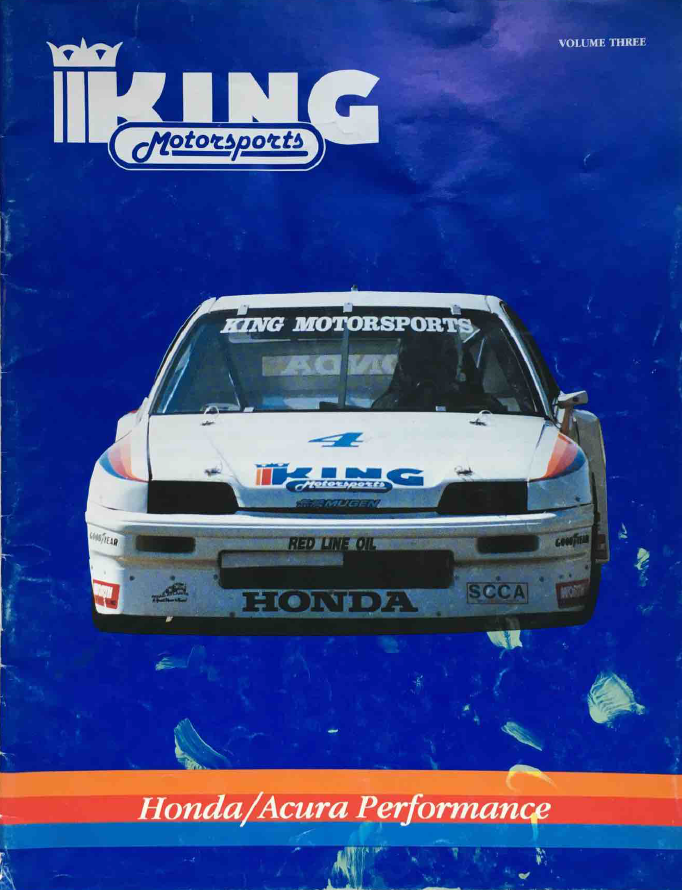
KMS Volume 3.pdf (3.79 mb), Circa 1993
KMS Volume 3 Price List.pdf (2.24 mb)
No detail was overlooked by Soichiro Honda -- right down to a seemingly minor design element on the Acura logo. In the late 80s, the Acura brand would be new to the world. Soichiro felt every emblem on Honda's luxury lineup must have a visible connection to Honda's heritage and engineering roots. So when hundreds of "incorrect" emblems were already installed on every brand new Stateside NSX, a unique recall was performed.
The following story about Acura's last minute NSX emblem change comes to us via Ed Somers, an NSX owner who originally posted this story on the Facebook group Honda Toys & Collectibles. Many thanks to Ed for sharing it and letting us re-post it here!
****

Several years ago when I purchased my first NSX and drove it back home 1500 miles, I got stuck in Louiseville, KY due to a master and slave cylinder problem. While I was waiting, I walked into a book store and purchased a Hemming’s Sports & Exotic Car Magazine. I happened to spot a letter to the editor in response to a past article on Acura’s history. It was from an employee of the ad agency that helped develop the Acura logo. In 1989, with the role out of the NSX quickly approaching, the agency had already printed brochures with the logo on the prototype cars and incorporated in the text. These brochures were printed early. In fact, so early that Soichiro Honda, who was retired but was still the “Supreme Advisor” of the company that bears his name, hadn't approved the logo which resembled calipers without the cross member of the Honda H. When he saw it he went ballistic and had it changed to the current logo of the Honda H pinched at the top to resemble the letter A to symbolize the connection of Honda to Acura and calipers of precision engineering.
However, some printed brochures had already gone out. And the NSX prototype used in the brochures had the unapproved hood logo as well. The first printing of the silver and black table book also had the wrong logo and the reprint of the August 1990 Road & Track First Test article had the wrong logo also. Most were returned before they were given out. There are also supposed to be some hood emblems out there with the wrong logo that the ad agency had. This story is per the letter to the editor.
Now, move to a year ago when a thread was posted on the NSX Prime forum about the first brochures. I posted that I happen to have two brochures with the incorrect logo. Told the story from the letter to the editor. And I mentioned how cool it would be to have one of those hood emblems.
“Well ask and ye shall receive.” Prime member LMR (Les), who is also the NSXCA southwest rep, posted, that a week earlier, he was contacted by a gentleman that worked for Honda/Acura in Torrance, Ca. And that the gentleman had one of the "original" emblems for the NSX. He wanted to sell it to an NSX owner who would appreciate the history behind them. He told Les, basically the same story I had posted. Les got me in contact with the owner of the emblem and I got the emblem in its original package, part number 75700-SL0-A02 which no longer exists. The current emblem for 91 to 01 NSXs part number is 75700-SL0-A03.
I spoke at length to the seller who retired from Honda/Acura after 27 years service. He told me that few people know that the first load of NSXs (300 of them) that came to America had the wrong emblem and the Honda president in Tokyo ordered the emblems taken off the cars as they left the boat and replaced with the correct emblem. The incorrect emblems were to be sent back to Japan and all had to be accounted for. He told me that they were pried off with a screwdriver and most all of them broke but all were sent back. I asked him how he got this emblem and he said he worked in the parts division. All of the spare parts were sent back to Japan except for the one he has and one that the now retired Honda PR director Kurt Antonius showed in an interview with Honda Tuning Magazine in August last year. He (the seller) said there may be a few at the ad agency and one or two in Japan but it was his understanding that the rest were all destroyed. I also found a small blurb on Wikipedia that verifies the story:
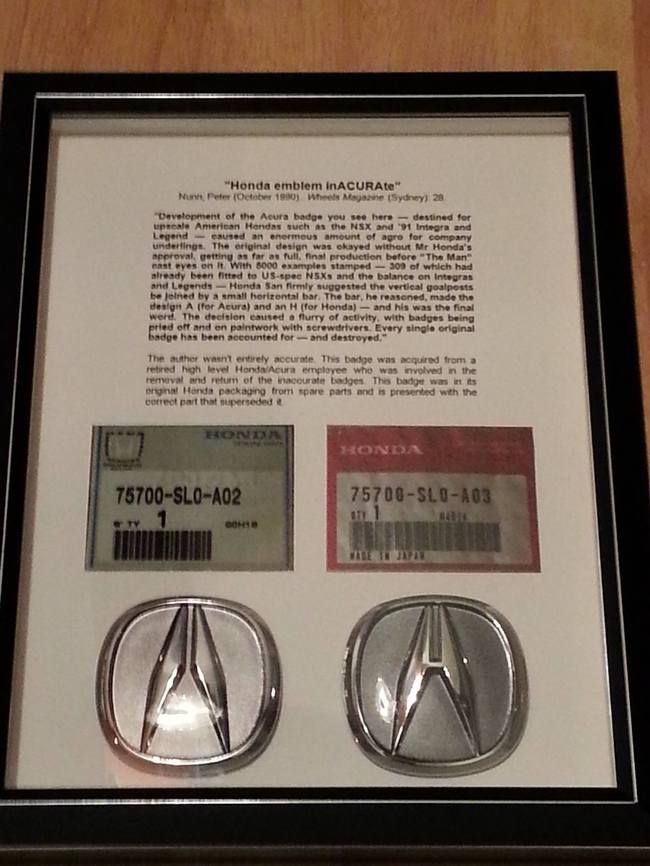
"Honda emblem inACURAte"
Peter, Nunn (October 1990) Wheels (Sydney): 28.
"Development of the Acura badge you see here — destined for upscale American Hondas such as the NSX and '91 Integra and Legend — caused an enormous amount of agro for company underlings. The original design was okay-ed without Mr Honda's approval, getting as far as full, final production before “The Man” cast eyes on it. With 5000 examples stamped — 309 of which had already been fitted to US-spec NSXs and the balance on Integras and Legends — "Honda San" firmly suggested the vertical goal posts be joined by a small horizontal bar. The bar, he reasoned, made the design A (for Acura) and an H (for Honda) — and his was the final word. The decision caused a flurry of activity, with badges being pried off and on paintwork with screwdrivers. Every single original badge has been accounted for — and destroyed." [Mr. Nunn wasn’t entirely accurate.]
The timing of all of this is just incredible to me as I hadn’t given much thought to “emblemgate” since I read that letter to the editor. I couldn’t imagine seeing one of these much less actually owning one. I’m not sure but it just could be one of the rarest of Honda/Acura NSX artifacts. I found out later that some of the Honda executives have emblems that were pried off the cars-- and one of those sold to another NSX owner but it has damage from its removal.
The following post comes to us courtesy of Mugen aficionado Jerimiah Styles! In this post he shares his experience cleaning up his new-to-him Mugen header. Many thanks to him for another contribution of his time and insight!
== ==
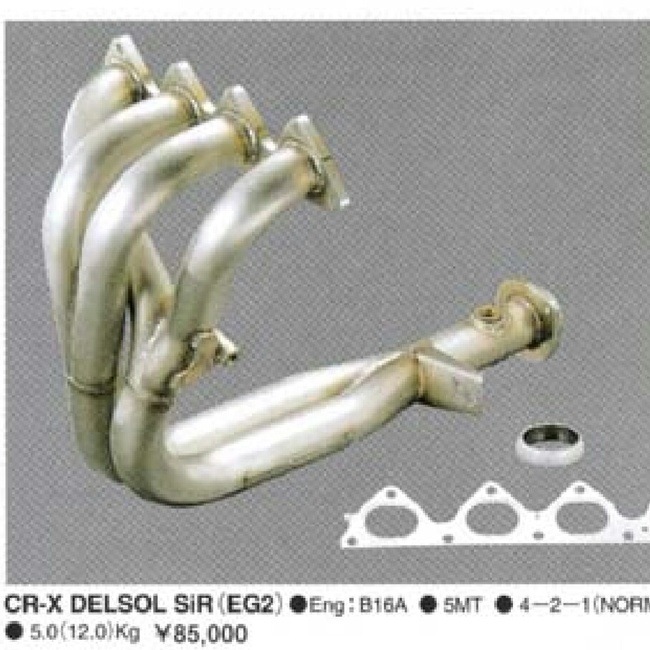
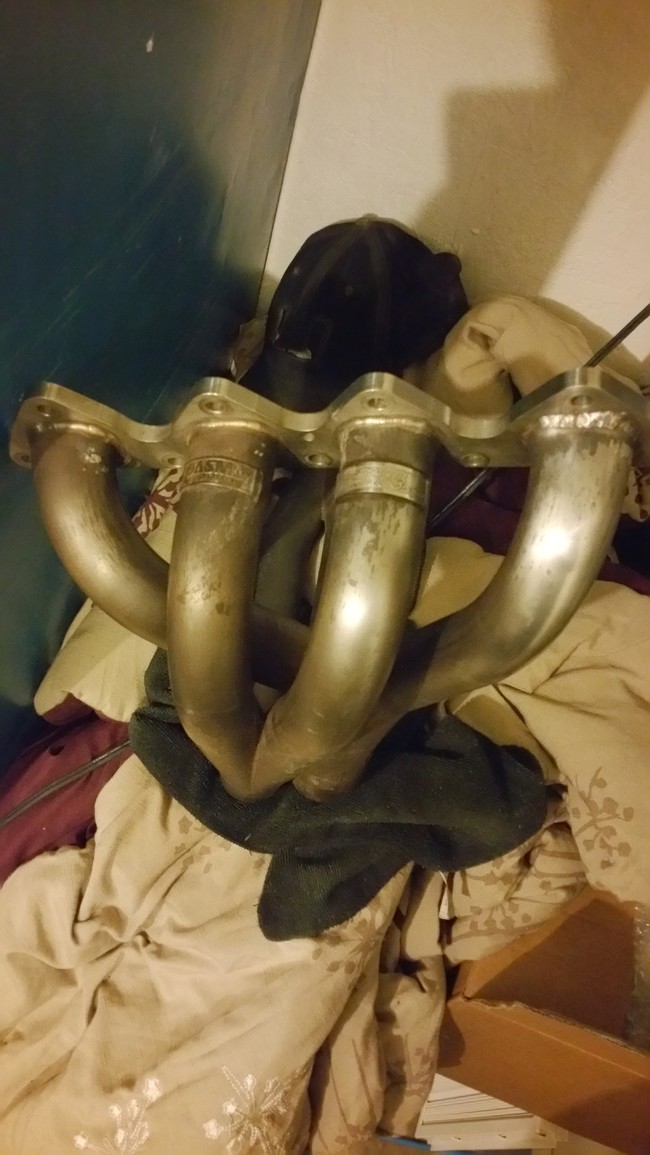
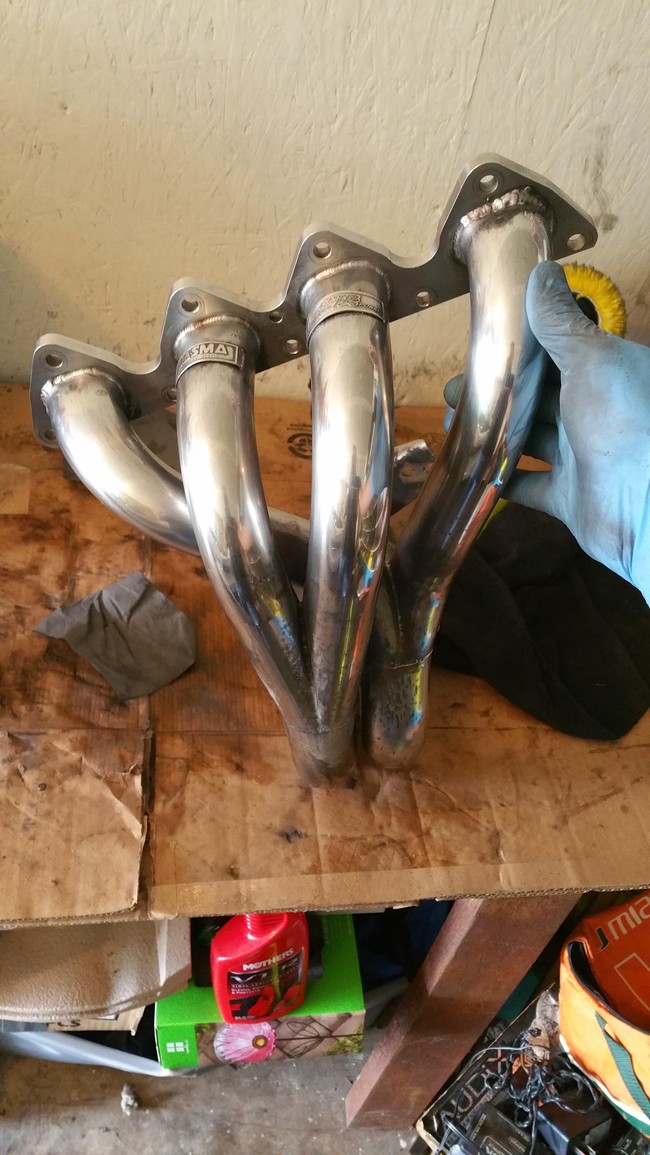
I recently picked up a pre-owned Mugen B16A 4-2-1 header from a buddy of mine. He'd offered this header to me many times, but I had until recently declined, as the header needed a little bit of work (cleaning and welding a crack on the bracket). I had always been intimidated to attempt such a project until I received this header. I did a bit of research and decided I was going to sand it up and attempt to polish it. However, I didn't want a high polished "chrome" look, I opted for the original polished raw metal route, the way this beauty came from Mugen.
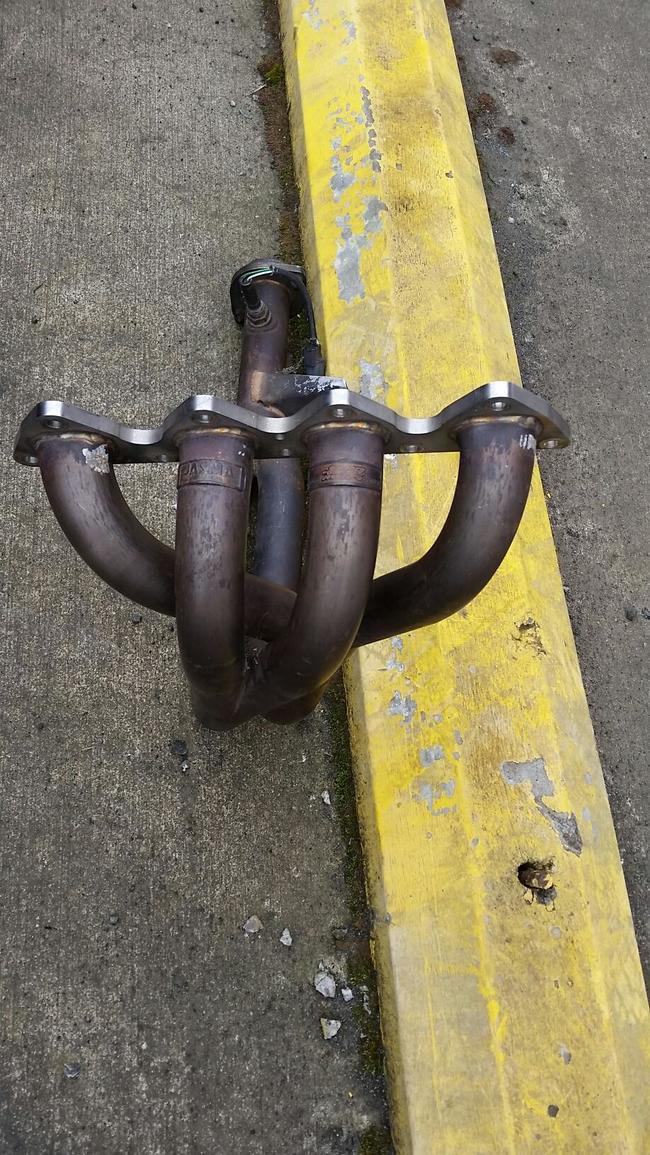
Here's how it looked when I first picked it up.
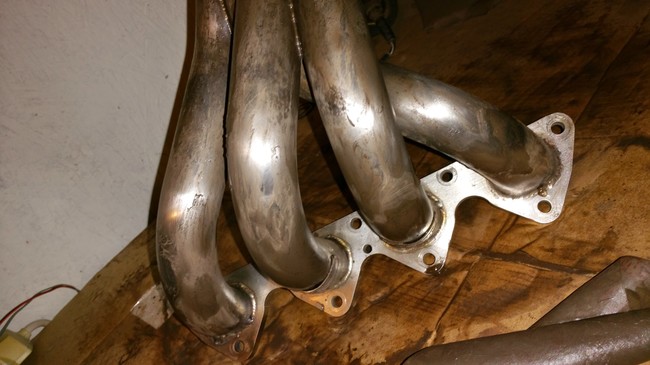
One of my good friends is a woodworker and suggested that I try synthetic sand paper. It lasts much longer than conventional sand paper and is easier to use. Unfortunately the finest grit I could find it was 350, but this is needed to really get all of the oxidization off. As you can see just seconds into wet sanding and I was already seeing results. (below)
For this project I wet sanded the entire time. Here is with the 350 grit. Make sure the residue (seen pictured) is constantly wiped down with a rag and kept clean. This not only allows you to see your results, and where you need to sand, but also assures that you aren't damaging the header by getting any pieces of dirt in there that could potentially scratch the surface of the header. (below)
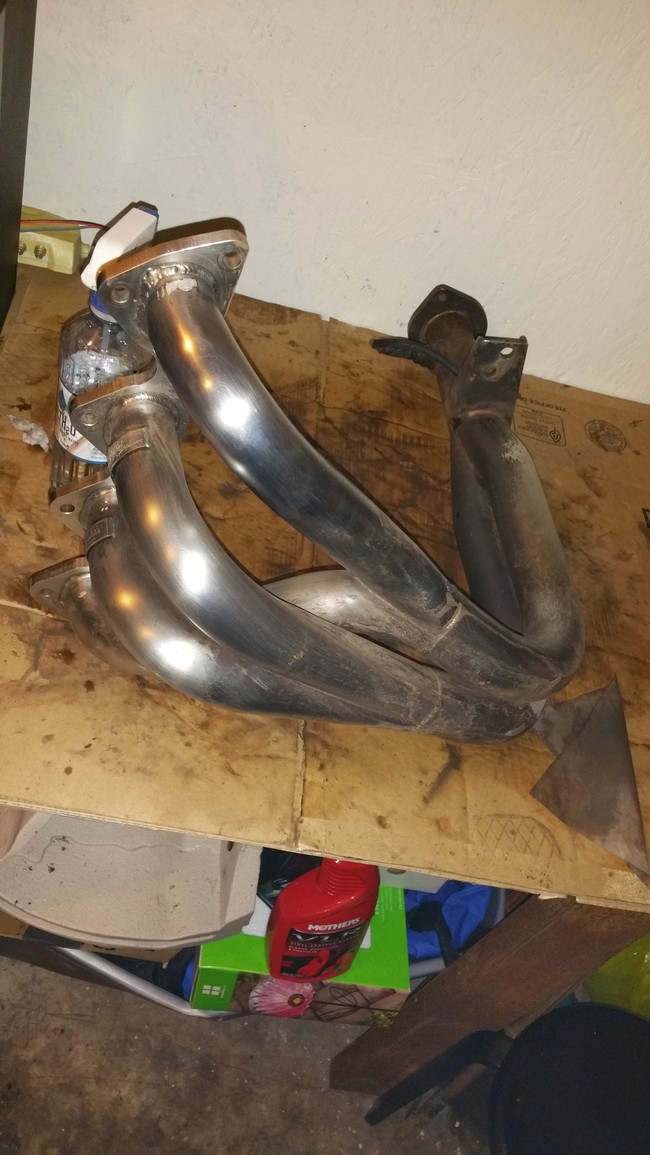
I used a small spray bottle to keep the sand paper wet, and also to keep the header clean throughout the process. This is about halfway through. You can take each step as far as you would like per your own personal preference. (below)
Next I switched to 1500 fine grit, again repeating the same process as above getting progressively finer with 2000, grit, and then 3000. This was as far as I wanted to take it. Again if you'd like a higher polished header go for it, and keep on sanding. After you're happy with the luster that you have achieved, you can take a metal polishing compound and add as much gleam as you'd like. (below)
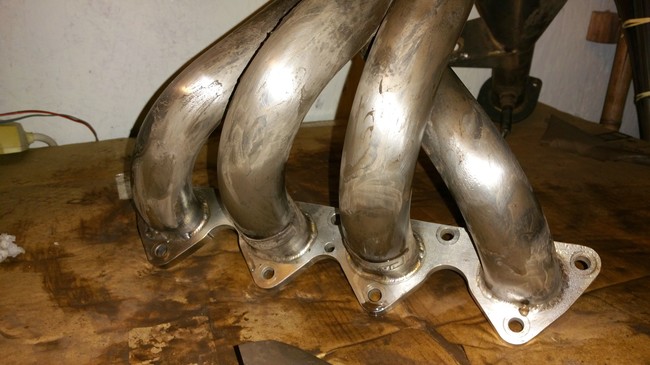
Here is after sanding. Again repeating the steps and taking each as far as you'd like, 350 fine grit, 1500, 2000, 3000 Before doing any kind of polishing.(below)
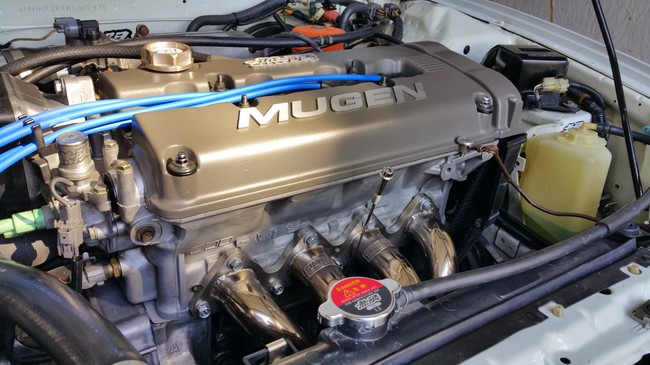
A critical step in making sure that your header turns out beautiful is to wipe it down with 99% rubbing alcohol: after polishing, after installation, and before starting your engine. This will remove any remaining polishing materials and oil from the fingers of whom ever installed it. As the header ages it takes on a gorgeous golden hue that adds a touch of Mugen class to any engine bay.
The following post comes to us courtesy of Mugen aficionado Jerimiah Styles! Many thanks to him for another contribution of his time and insight!
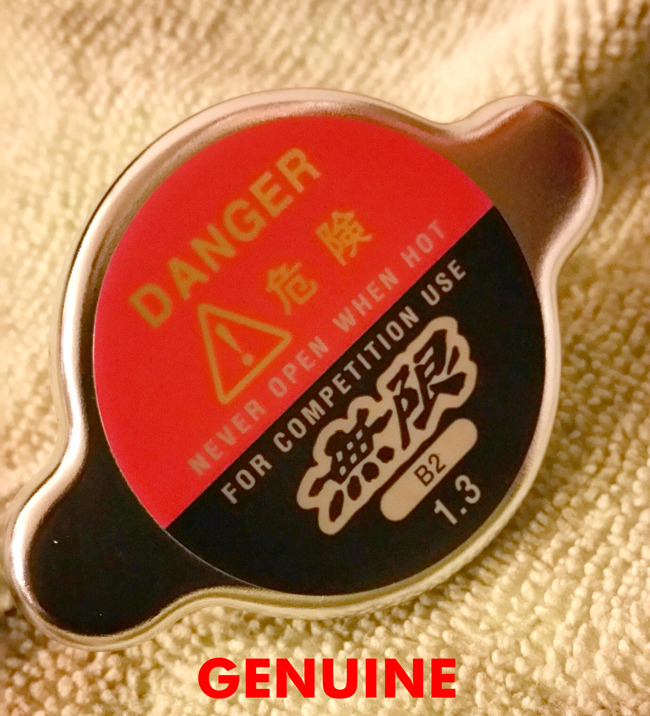
In this post Jerimiah covers some of the differences he's observed with the Mugen Hi-Pressure Radiator Cap. Note that there are two genuine versions of this cap:
19045-XGER-0000:
Civic (1992-1995)
Civic (1996-2000)
Civic (2001-2005)
Civic (2006-2007)
Del Sol (1993-1997)
RSX Type-S (02-04)
S2000 (2000-2003)
S2000 (2004-2008)
TSX (2004-2007)
Integra (1994-2001)
Fit (2007)
RSX Base (02-06)
RSX Type-S (05-06)
19045-XGER-0000-B2:
Civic (1988-1991)
CRX (1988-1991)
Integra (1990-1993)
Prelude (1992-1996)
Prelude (1997-2001)
(this version displays "B2" on the decal and fits Koyo radiators)
This is the way the part is described in our King Motorsports / Mugen 1999 Mugen Pricelist for Integra (19045-XGER-0000):
This radiator cap is a high-pressure type that increases the pressure inside the radiator, thus raising the coolant boiling point and increasing the cooling efficiency. The open valve pressure is 1.3 kg/cm2 compared to the normal 1.1 kg/cm2. It demonstrates its power under high-load situations such as circuit driving.
== ==
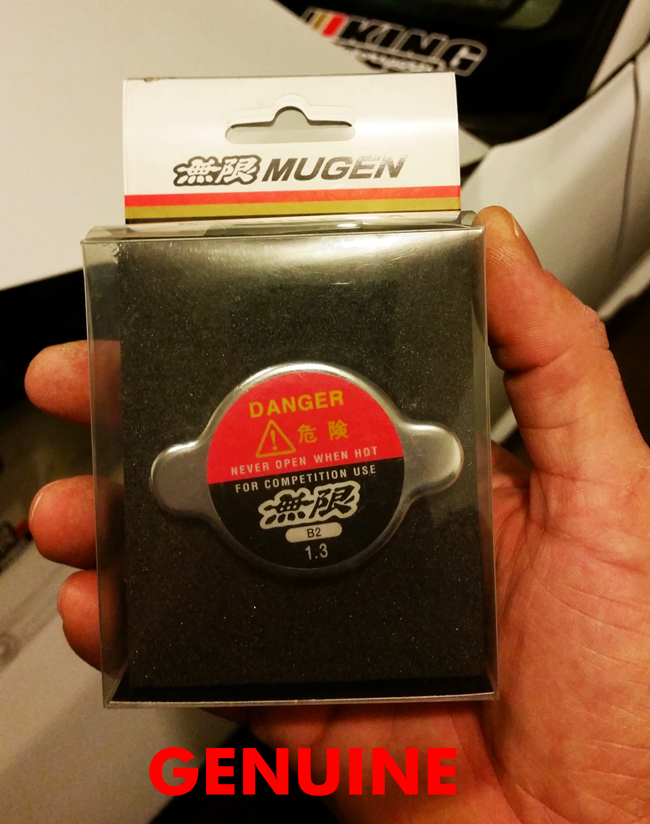
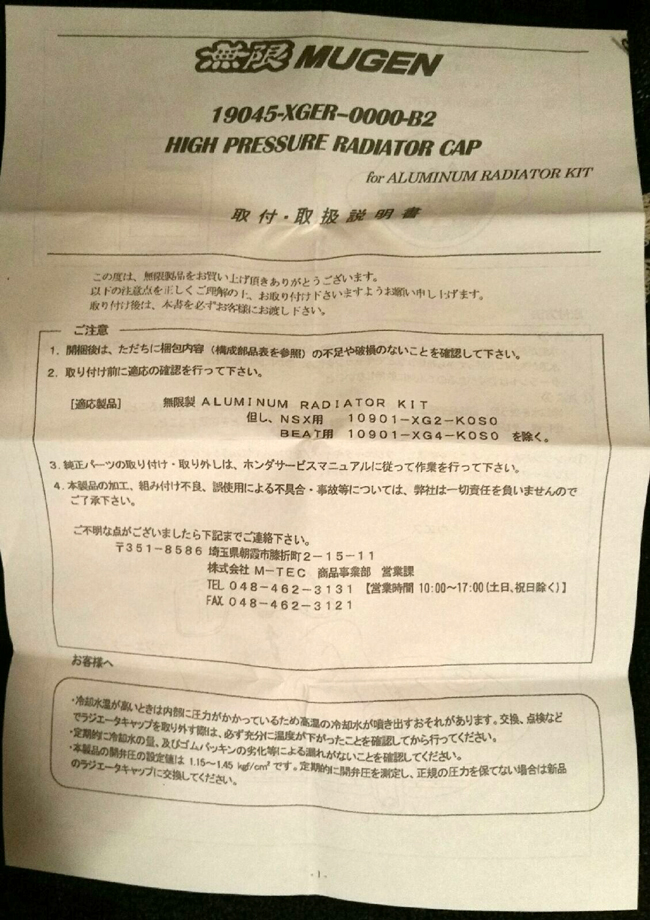
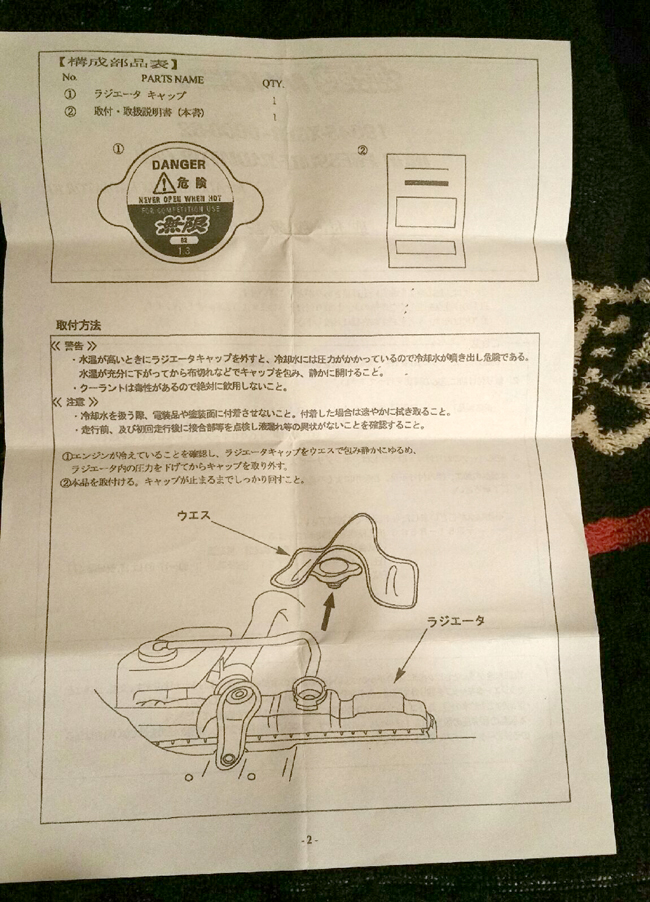
The genuine Mugen cap comes in the traditional Mugen window box with Mugen stripes across the top, and high quality foam to protect the product. Printed Japanese instructions are included.
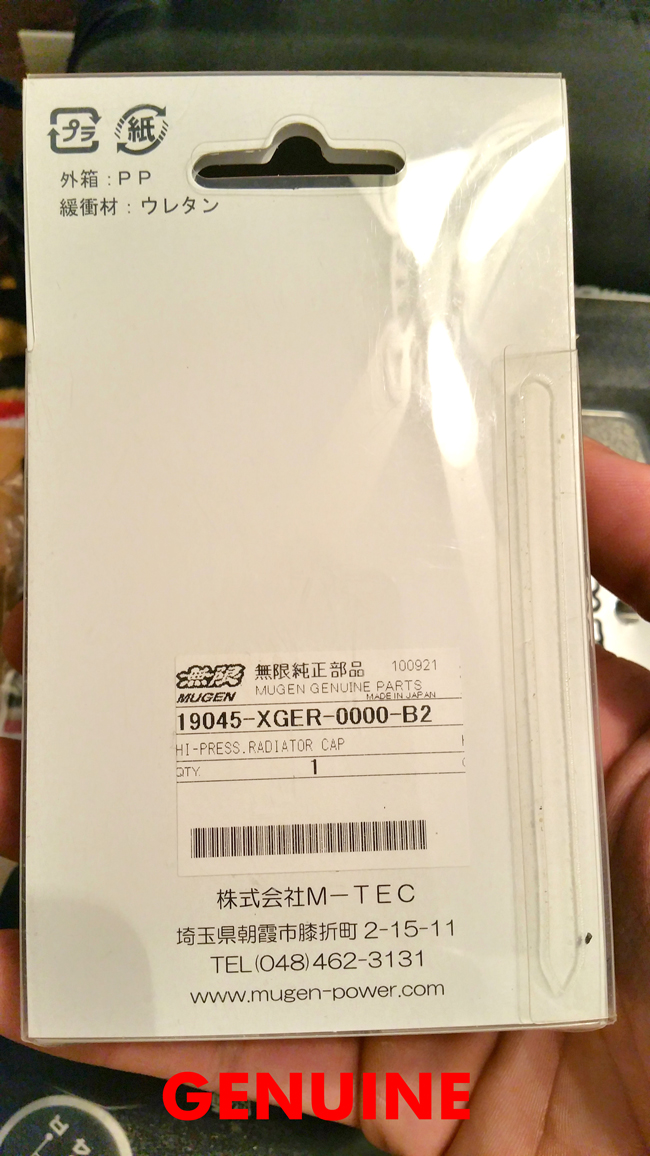
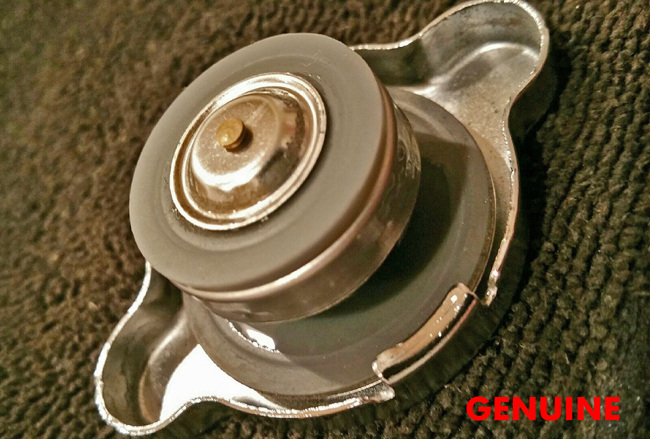
The back of the genuine part has the typical characteristics of all genuine Mugen parts, kanji in the top left corner and sticker with part number and M-Tec information.
In this below image, this fake window box is entirely different from its genuine counterpart. These knock off companies are always evolving and continually getting better at their packaging, getting closer and closer to the authentic Mugen boxes. Always look at the part itself and its distinguishing signs to discern if the part you are buying is indeed real.

Here is a close up of the genuine cap. The authentic Mugen cap is high quality metal, nicely polished, but not a chrome finish. There are no indentations or stampings on this cap. The decal has a metallic foil quality with golden letters in the red area along with "NEVER OPEN WHEN HOT" printed in white, and a brushed metal look to the script in the black portion.
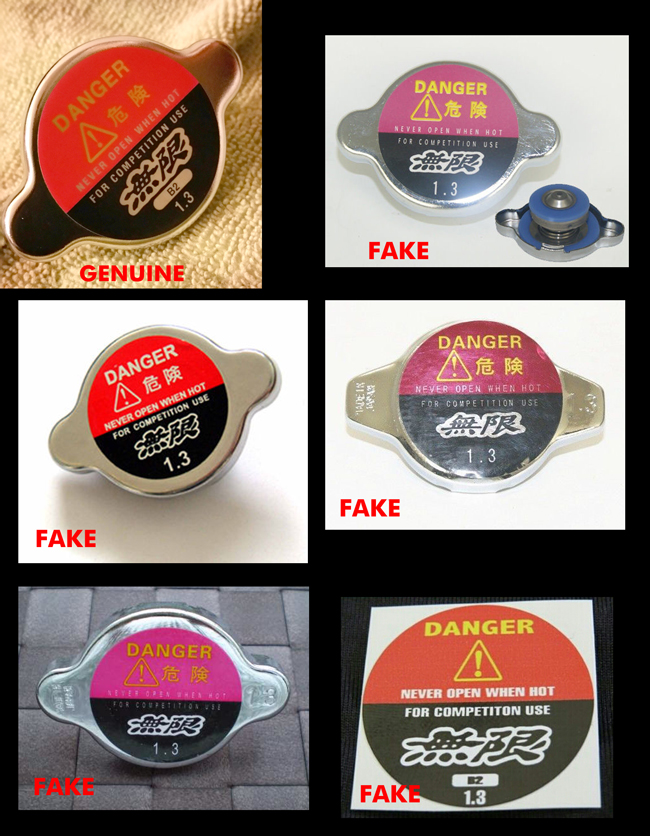
Now here are a sample of the many fakes that are out there. Fonts, font colors, printing quality, decal size, decal placement, and stamping on the metal are all indicators of a fake. We recently discovered a company on eBay selling just the decal!
Here are a few pictures of the genuine cap's bottom and the included instruction sheet:
Why does it matter?
The Mugen Hi-Pressure Radiator Cap is more than just engine dress-up. It's a functioning part that increases your open valve pressure to a specific 1.3 kg/cm2 for performance reasons. Those that use fakes are not only missing out on performance benefits, but have no idea if the cap has even been manufactured to meet OEM standards. The open valve pressure can be too high, too low, or inconsistent. Fakes can come apart due to bad seals and assembly, causing nasty spills and other headaches.
== ==
Visit the King Motorsports store for genuine Mugen hi-pressure radiator caps!
http://www.kingmotorsports.com/p-38-mugen-radiator-cap.aspx
The following post comes to us courtesy of Mugen aficionado Jerimiah Styles! Many thanks to him for another contribution of his time and insight!
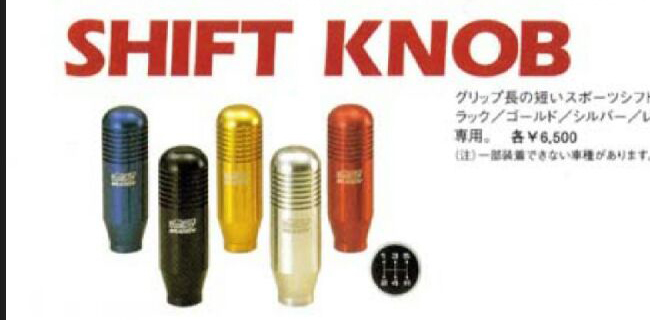
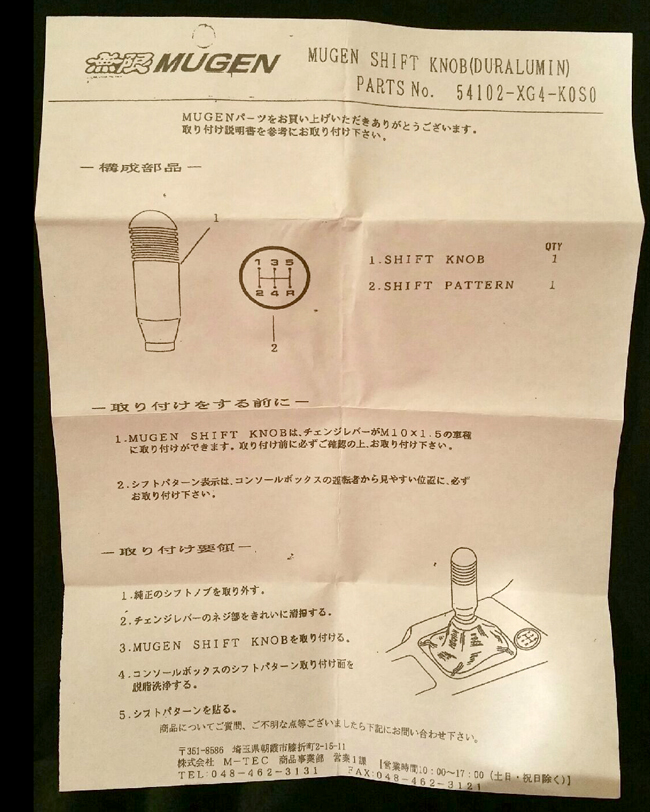
In this post Jerimiah covers some of the differences he's observed with the Mugen "Formula" Shift Knob:
54102-XG4-K0S0-BU/BL/G/S/R
This is the way the shift knob is described in our King Motorsports / Mugen 1999 Mugen Pricelist for Integra:
"Formula Quality" is the essence of Mugen's approach to production, since we also manufacture components for formula engines. This machined shift knob exemplifies our high manufacturing precision. Each product is machined individually from aluminum, and then given an alumite hard-coat finish before the Mugen logo is imprinted by laser. This is a sports-type shift knob for the discerning eye. Available in five colors: blue, black, gold, silver, and red. Supplied with a shift pattern plate. For five-speed manual transmission only.
== ==
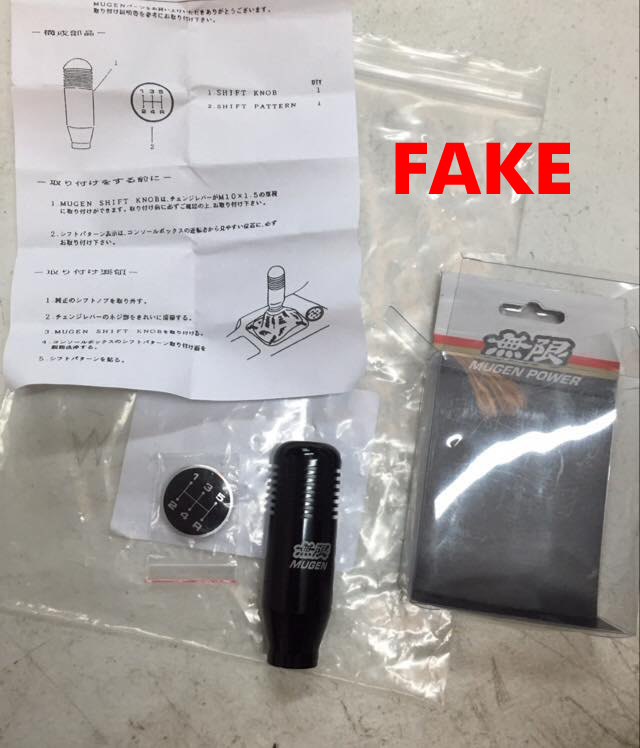
The Mugen formula shift knob (discontinued) is a commonly replicated item that comes up often on Mugen part searches. While this knob was made in five colors by Mugen, I am going to stick to the black knob for this blog.
Comparing the window box package, they are basically identical from the front. One important thing to look for is the inclusion of the round shift guide badge. Fakes will not include this badge.

The back of the packaging shows more tell tale signs. While the top left corners appear identical, the bottoms are different. The Mugen package has a sticker with printed description and the fake does not. The fake is also missing the Mugen part number.

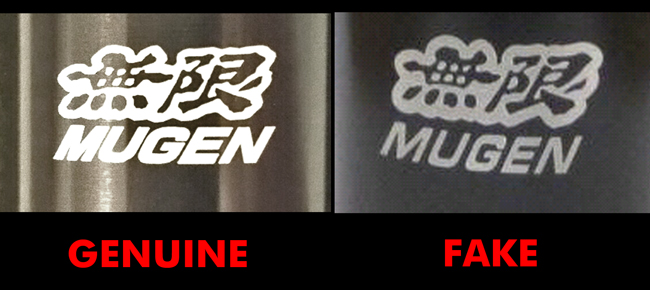
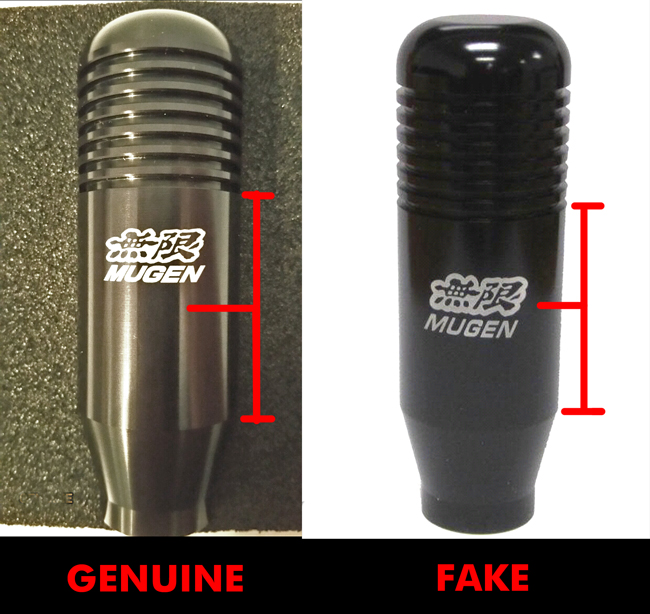
Comparing the knobs themselves, the first thing to look for is the shape at the top. The Mugen is smooth and rounded. The fake is usually flat and often shows rings from poor machine work. The hard-anodizing of the genuine Mugen part is stunning and shows a depth that the painted surface on the fake can not compare to. A closer look at the Mugen logo/kanji shows that the fake uses a thinner font for the MUGEN logotype.
The genuine shift knob's logo/kanji come in both a raw-metal engraved version ("gen 1") and in white ("gen 2"). Below is an image of two genuine shift knobs. You can see the silver knob has a raw-metal logo/kanji.

In the image below you can see how the genuine knob is domed/rounded on top, while the fake has a flat spot. Flat spot = fake.
One more thing to look for is the vertical placement of the Mugen logo/kanji. On the genuine knob, it sits higher than half way on that section of the knob. On the fake, the logo/kanji is vertically centered within that section.
Here are instructions that are included with the genuine shift knob. Fakes do not include instructions:
Why does it matter?
Because of the slipshod manufacturing on the fakes, they are known to actually cut driver's fingers. Needless to say that's a nasty surprise. The authentic knob is far better quality that will pass the test of time and add a touch of class to any enthusiast's build. While the hard-anodized finish on the genuine knobs can unfortunately fade over time, it is another way to determine authenticity when buying a used part. The painted finish on the fake knob very easily scars, resulting in an unsightly eyesore in your interior.
Minor update: As you might expect, even fakes have their exceptions. Vivian R. shared this fake knob and package that even includes knock off shift badge and instructions!
== ==
Visit the King Motorsports store for genuine Mugen shift knobs!
http://www.kingmotorsports.com/advsearch.aspx?ctl00%24HeaderControl%24SearchBox%24searchterm=&IsSubmit=true&SearchTerm=mugen+shift+knob&SubmitSearch=Search
The following post comes to us courtesy of Mugen aficionado Jerimiah Styles! Many thanks to him for another contribution of his time and insight!
== ==
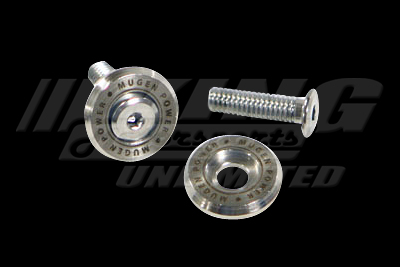
A beautiful touch to any Mugen equipped vehicle, Mugen Number Plate Bolts (75700-XG8-K0S0) combine high-quality stainless steel construction with decorative Mugen Power engraved washers. The bolts are 3mm hex head, 20mm long, and are designed to be used as a garnish for the license plate frames of your car. However, clever tuners have discovered that they can be used for enigine bay aesthetics and also fit perfectly with the Mugen K-Series Carbon Fiber Ignition Cover (12500-XK2B-K0S0). Anywhere a 3mm bolt can fit, you can decorate it with a Mugen number plate bolt.
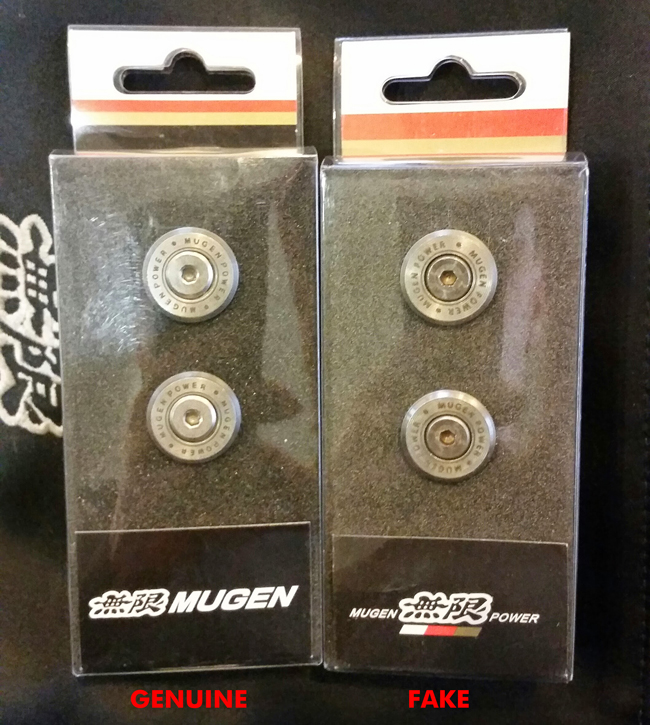
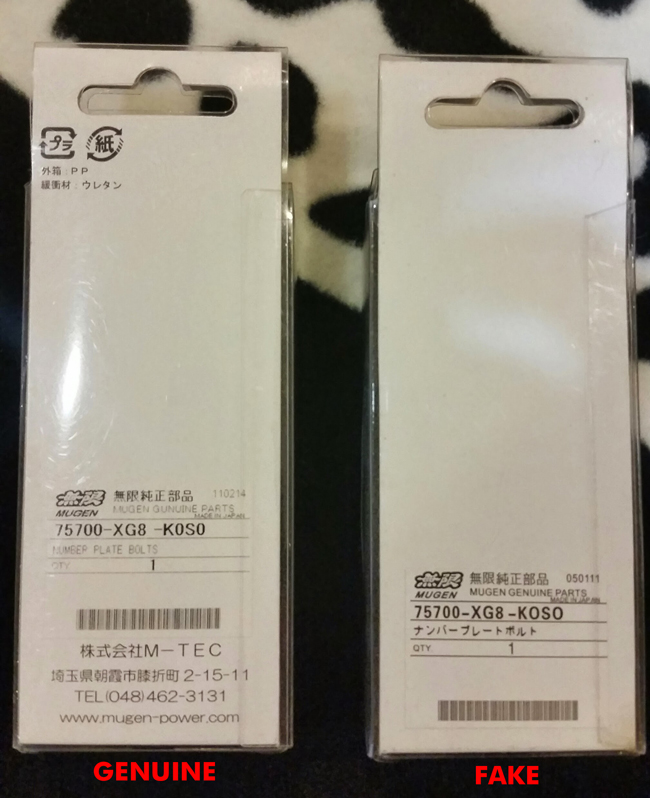
A look at the window boxes shows the extremes that these companies are going to replicate these items. The front of the boxes appear to be the same, but are they? The colored flag at the top of the box is mis-proportioned on the fake, with fatter color bands, and the Mugen logo at the bottom of the box is noticeably altered.
A look at the back of the boxes shows that the two products are labeled entirely different. Kanji appear at the top the genuine product and the bottom lists M-TEC contact information. The fake window box shows just a portion of the original, and the description is in Japanese (instead of English).
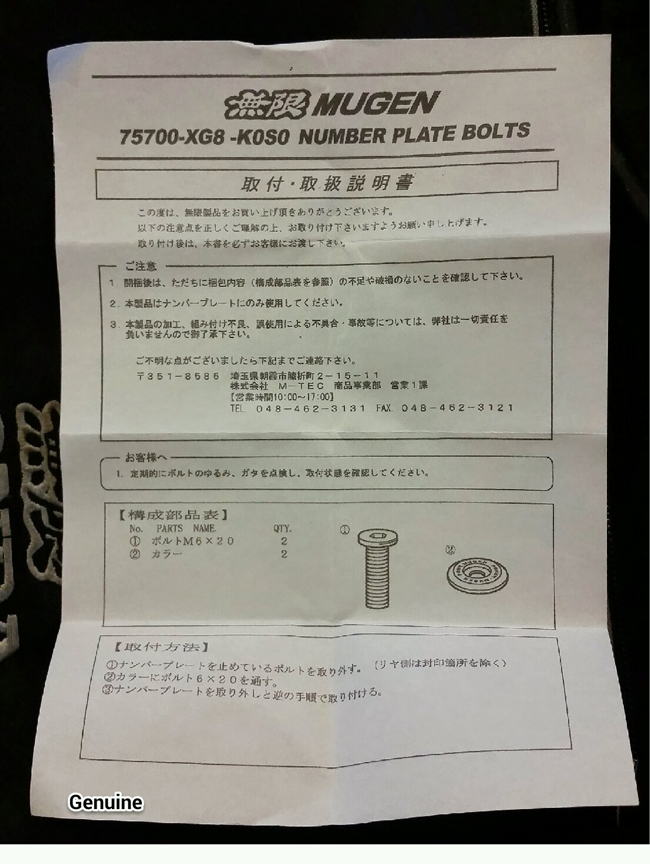
The Japanese printed instructions inside of the original Mugen number plate bolts is a gray print. The product illustrations are placed on the right of the page.
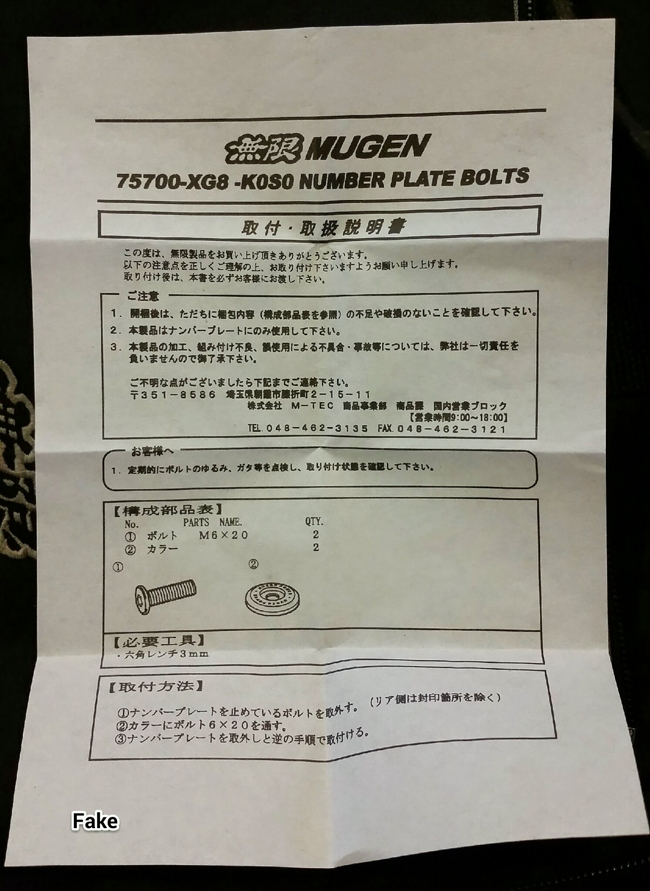
The instructions inside of the fake box are a much darker, bolder, black print and the product illustrations are placed on the left side of the page. The printed area also takes up less of the page.
A close look at the washer shows the high quality stainless steel and engraved Mugen Power logo. The hex bolt has a slight bezel around it, allowing you to tighten them down without scarring or stripping the finely detailed surface. The bolt itself sits slightly elevated from the washer with clear cut jewelery-like edges.
The fake bolt is much less refined. The logo appears to be printed or painted (not etched) and the bolt sits flush with the washer, unlike the genuine part.
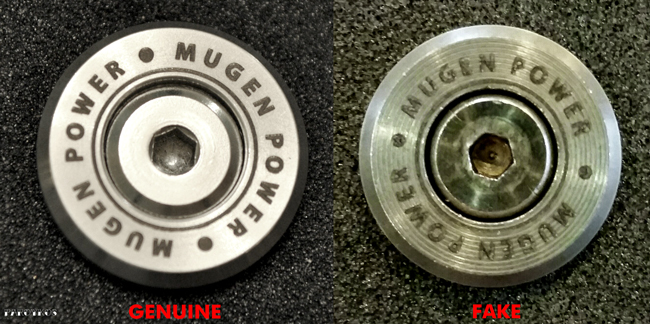
Photo courtesy of Paroykos
Why does it matter?
Replica Mugen parts built with subpar methods result in a far inferior product. In the case of the Mugen number plate bolts, an allen wrench does not fit properly into the bolt. The bolts become damaged and stripped over time, potentially seizing to wherever they have been placed.
The following post comes to us courtesy of Mugen aficionado Jerimiah Styles! Many thanks to him for another contribution of his time and insight!
== ==
Back again for some more Fakespotting. This time we will discuss the first generation Mugen oil filler cap.
Mugen Formula engines, including those for Formula 1, naturally require components manufactured with high precision. Mugen meets such requirements by machining to exacting specifications at its factories. These oil filler caps are manufactured individually from aluminum at the same factories in the same way. "Formula Quality" is a result of the attention to detail that Mugen pays to its vehicles and products.
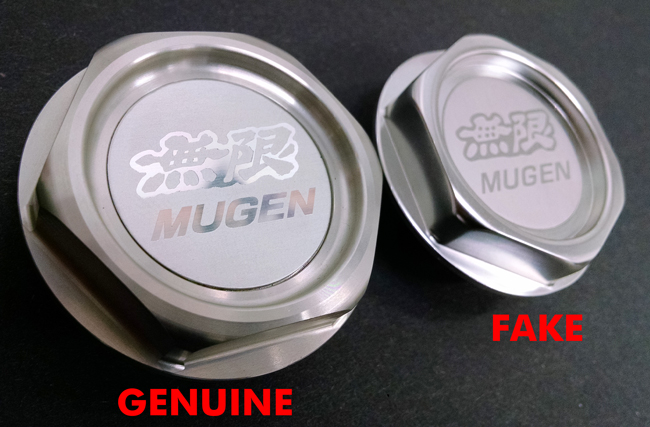
Upon first inspection of these caps they appear to be very similar, but a closer look tells a different story. The first thing you'll notice is the quality craftsmanship of the genuine piece. The replica is oddly shiny and lacks the brushed aluminum finish of the original.
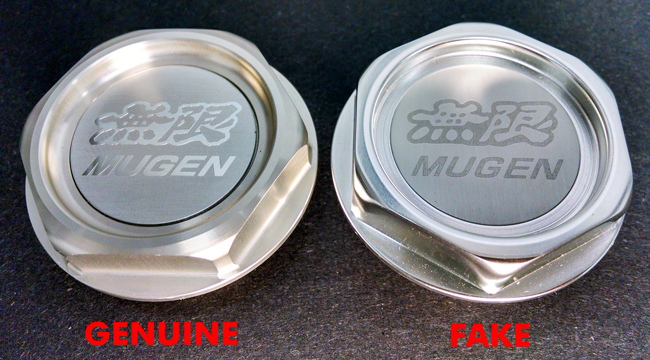
The center medallion of the genuine Mugen piece is etched aluminum. The medallion comes from Mugen Scotch-taped (not yet attached) to the oil cap. The medallion has an adhesive on the back and is to be applied by the user after the cap has been screwed into place so the Mugen logo appears straight in your engine bay.
The "medallion" of the fake cap is more of a print, and comes pre-installed from the manufacturer. So fake caps may end with crooked Mugen logos once screwed into the head cover.
The underside of the cap reveals some more secrets. The genuine cap again shows top notch machine work seen in genuine Mugen craftsmanship. The fake cap has noticeable ring marks where the inside of the cap appears to have been shaved away, far from the quality of the genuine Mugen part.
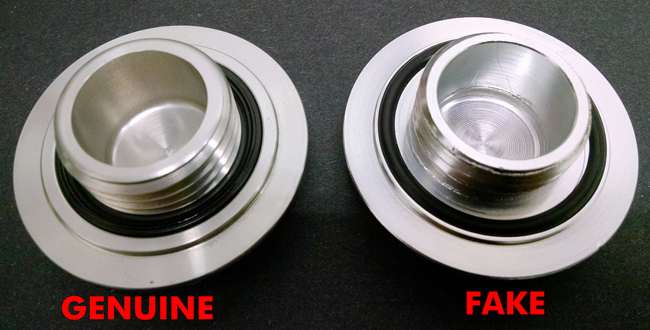
The black sealing rings around the base of the two are also noticeably different. The grooved, flat seal of the genuine cap has more surface area, creating a better seal than just the o-ring of the fake part. Also the material and heat-resistant properties of the fake o-ring are unknown. Also notice the rough edges around the threading of the fake cap as opposed to the smooth precise edges of the Mugen oil filler cap.

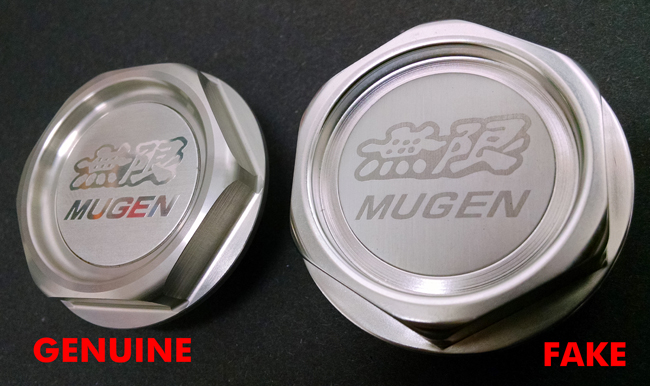
The side profiles of the two oil caps shows more of the differences in quality. The edges of the real Mugen are much more defined. The brushed look of the genuine cap is very evident in this photo as opposed to the cast look of the replica.
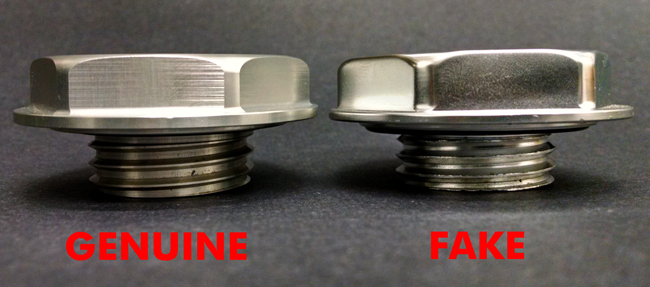
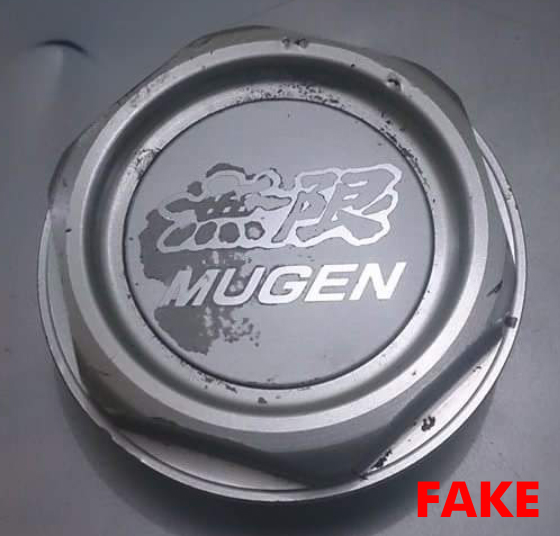
Below is another version of a replica Mugen oil filler cap that I recently saw. This one has an obvious ring around the base, suggesting that it is more than one piece. This as well as the inferior finish should be obvious signs of a fake. The high quality of the Mugen cap will not oxidize over time -- it should retain its original luster if kept after properly.
Why does it matter?
Fake parts are passed off as genuine every day, knowing how to identify real from fake could mean saving you potential headache down the road. In the case of an oil cap, an improper or inferior seal could cause oil to leak from the top of your head cover, potentially causing harm to your engine. Always buy genuine Mugen products from an authorized dealer such as King Motorsports Unlimited.
I would like to thank Roy Brantley for providing photos.
****
Visit the King Motorsports store to get your genuine Mugen oil filler cap!
http://www.kingmotorsports.com/advsearch.aspx?ctl00%24HeaderControl%24SearchBox%24searchterm=&IsSubmit=true&SearchTerm=mugen+oil+filler+cap&SubmitSearch=Search
The following article comes to us via King customer Andy Thompson - thanks Andy for this deep dive into a Honda classic!
****
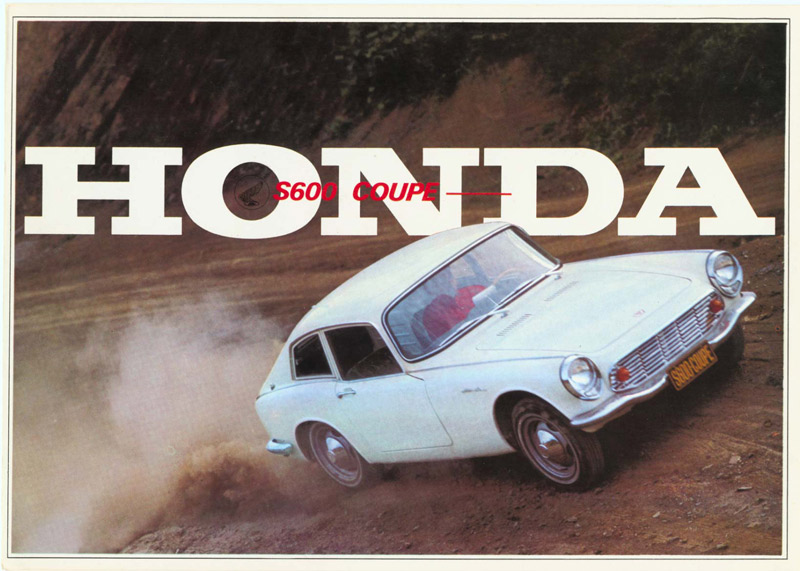
Honda has historically produced some of the most intriguing small sporty cars: the CR-X, Beat, and City Turbo to name a few. I’d like to take a step back and look at the car that started the trend, the Honda S600. I have grown a great appreciation for this car and will focus on some of the closer details that make this car so special.
In a time where British and Italian companies such as MG, Triumph and Fiat were the primary producers of roadsters, Honda dared to enter the competition with almost no history in automotive design besides the Honda T360. Although the first actual car produced by Honda was the S360 -- unveiled on June 5th, 1962 -- it was never actually put into production due to lack of power. The S500 followed very shortly after in 1963 as a full production model. Although these preceded the S600, I will focus specifically on the S600 -- produced between 1964 and 1966 -- as it was the first majorly successful automobile by Honda.
Chassis
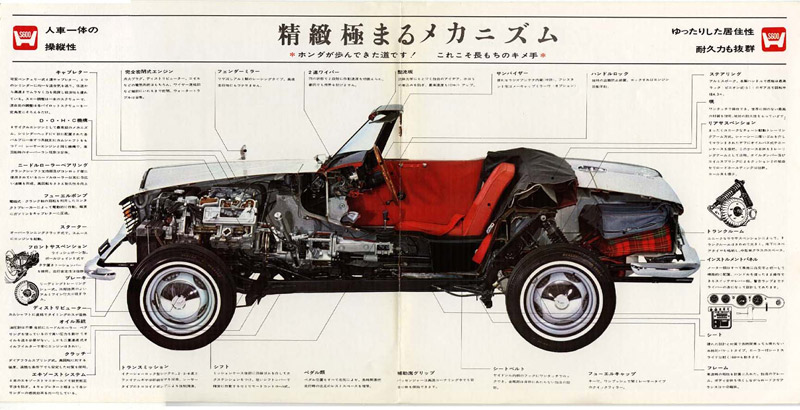
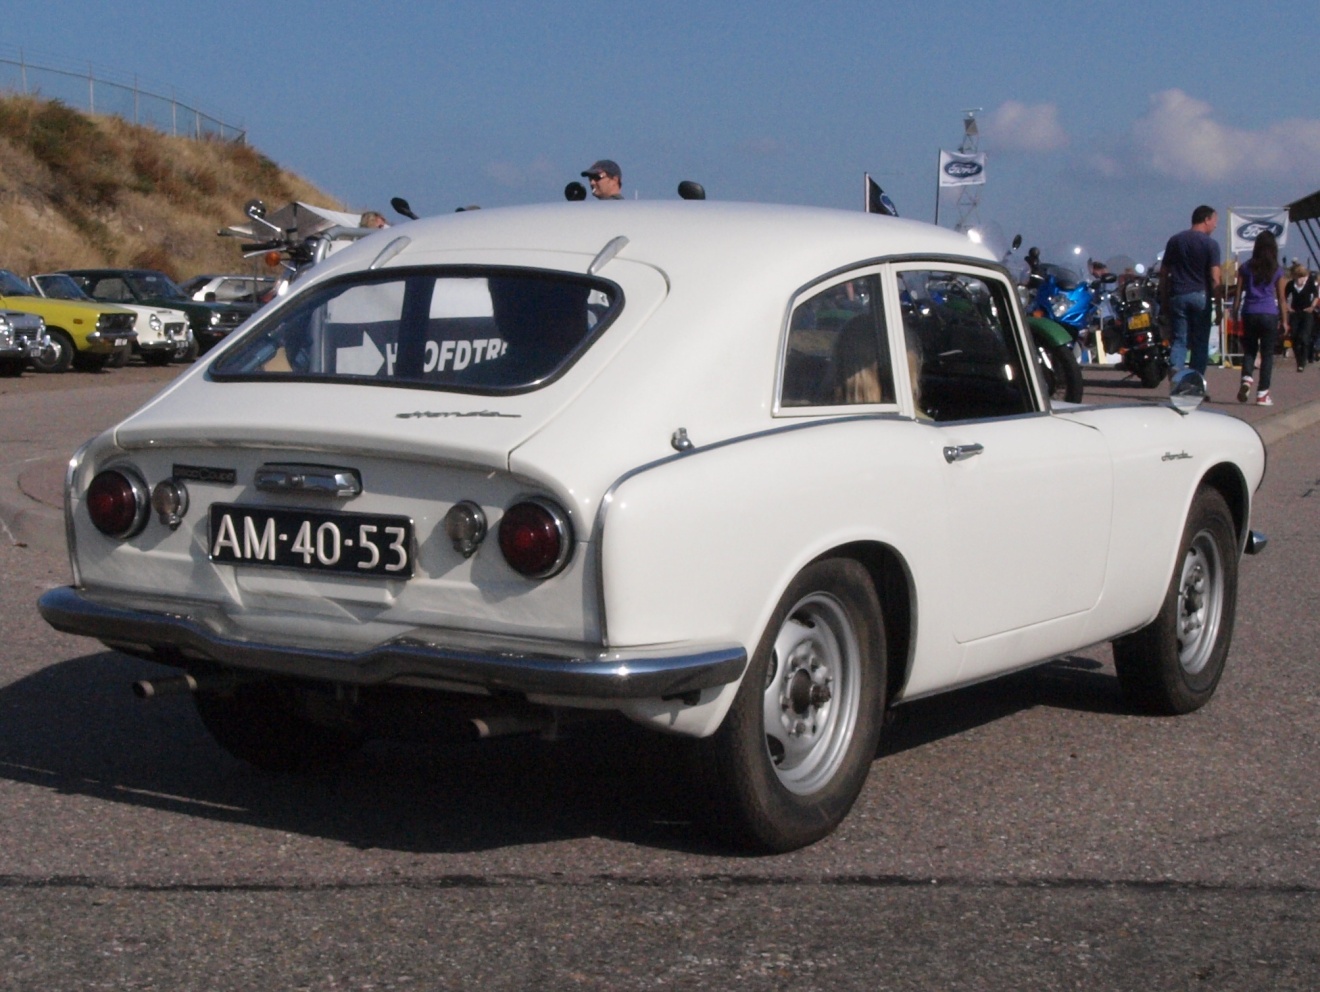
Roadsters of the 1960s were completely different vehicles than what we know of as a car today. The S600 consisted of a lightweight steel unibody with almost no safety features. Vehicles of this time hardly ever used plastic body panels. This roadster’s delicate chrome bumpers wrapped tightly around the chassis. The slightly arched rear quarter panels offered just enough contour, without disrupting a functional shape. This design style was found on other roadsters of the time and is quite pronounced in the popular Triumph Spitfire.
The S600 was not designed to be the fastest car of the time, but instead to offer the joy of driving in what has been called a motorcycle in car form. The convertible top offered the option to enjoy the world around the driver. The small body was similar to other roadsters of the time, such as the MG Midget. This popular style pushed the focus of automotive travel towards driving and experiencing the car, rather than just getting to a destination.
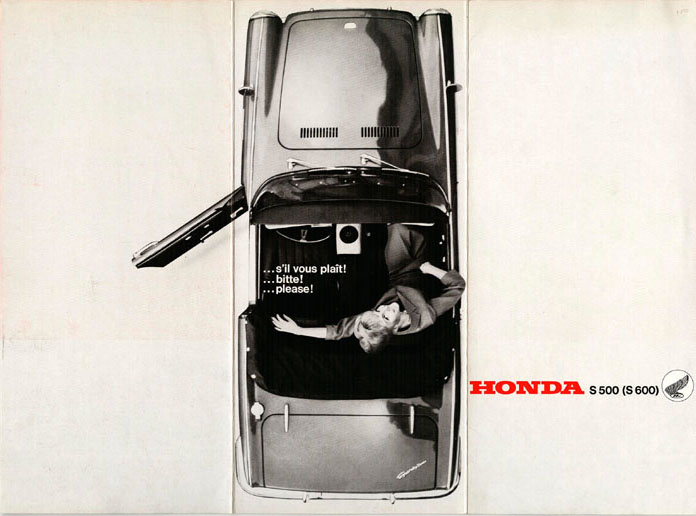
The S600 was offered as a traditional roadster as well as a “coupe” in standard and SM trim levels. Having various body styling and trim options is somewhat expected in today’s age -- but in the 60s, it was quite rare!
The concept of converting a performance-oriented roadster into a hard top fast back variant gave birth to a styling design that can today be referred to as a shooting brake. Shooting brakes are an uncommon but intriguing body style, as they add a sort of unbalanced complexity to the rear region of an otherwise streamline styled roadster. With this they bring a sort of exotic shape which offers better aerodynamics and generally allows the manufacture to extrude the quarter panels out far past the rear quarter windows.
Shooting brake cars never took the spotlight as only 1,800 S600 coupes were produced as compared to 11,284 convertibles. Similar sales trends can be seen between the Triumph Spitfire and its coupe counterpart the GT6. Honda didn’t pay any less attention to the coupe, as it offered the “SM” trim line to both body styles.
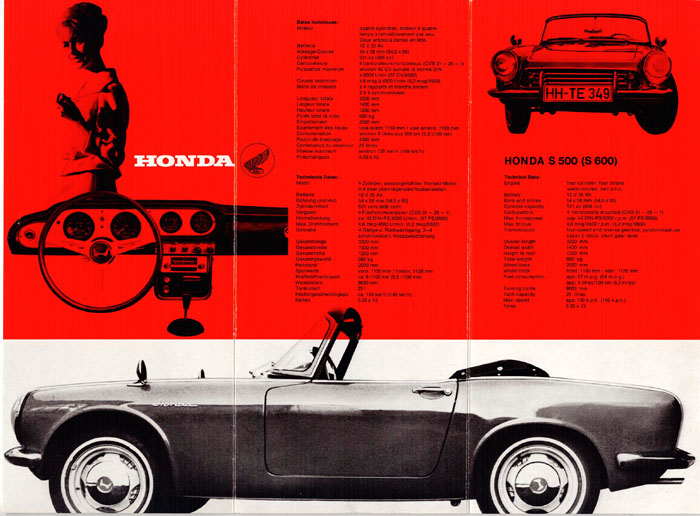
Engine
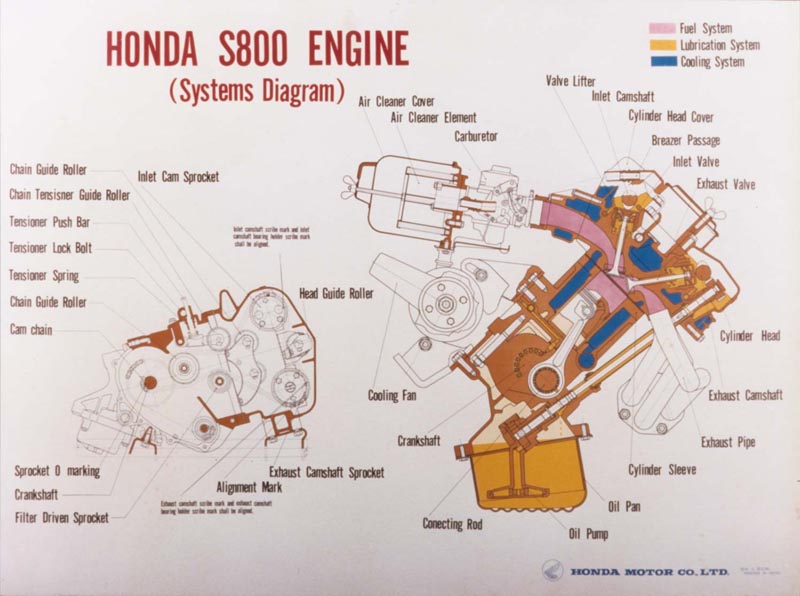
Honda engines are known for their efficiency through such small displacement. The S600’s 606cc engine was no exception. The engine consisted of a DOHC, all aluminum, water-cooled, quad Keihin carb, inline four producing 57 hp. Almost 100 HP per liter! This sounds quite familiar to what Honda has become known to produce, and was quite an accomplishment for 1964 as other competing cars were using much larger displacement engines such as the 1.8 liter found in the MG B and the 2.1 liter engine found in the Triumph TR4.
It goes without saying that for Honda to produce enough horsepower out of an engine one-third the size of its competition, it had to rev. In this case, the magic number was 8500 rpm. Which continued to a redline of 9500 rpm.
In order to keep the hood low, the engine was designed to sit in the bay at an extreme slant. I have included a diagram of the similar S800 engine to show how pronounced this slant is. This slant is similar to that of a four cylinder motorcycle.
Drivetrain
The drivetrain may very well be my favorite part of this little car. Like other roadsters of the time, the S600 consisted of a front engine, rear wheel drive platform equipped with a four-speed transmission. In order to achieve power to the wheels out of such a small engine, they chose to use a 6.42:1 final drive -- extremely short gearing. Short enough to cause complaints of seeing 7000 rpm cruising at 70 mph on the freeway and causing quite a bit of noise. Keep in mind this car was originally designed for the tight city streets of Japan.
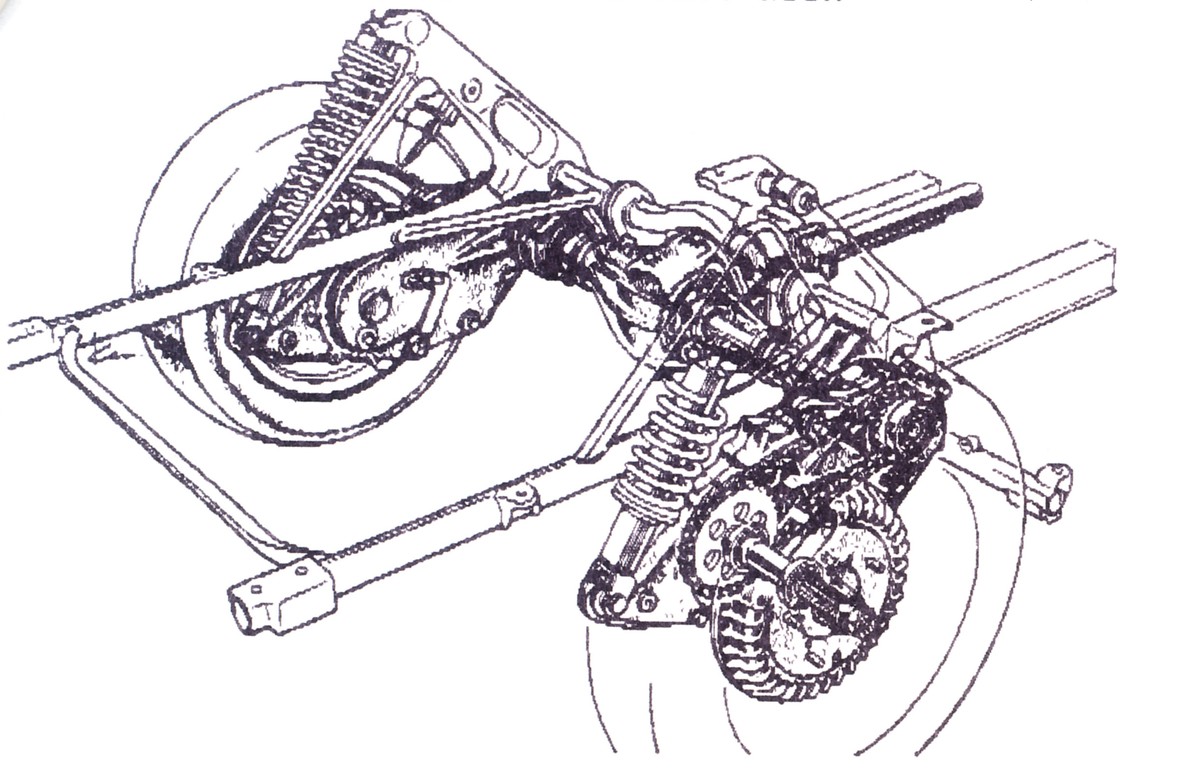
In the 60s, many automotive manufactures were tinkering with ways to offer independent rear suspension in their performance vehicles instead of a traditional solid rear axle. At the time, the constant velocity joints found in modern axles were very uncommon.
Honda had a solution. Instead of placing the rear transfer case in parallel with the rear wheels. They set it forward in line with the hinge point of the rear trailing arms. The driveshaft would turn into the transfer case and two straight shafts exited the case on either side. A chain drive system connected the exit shafts to the rear wheels. Thus allowing for a fully independent suspension with no constant velocity joints. This system is very similar to how a motorcycle transfers power to the rear wheel, but applied to a car. I have always thought this to be an amazing adaption of design and quite ingenious for the time. This mechanical genius makes the S chassis unique to the rest.
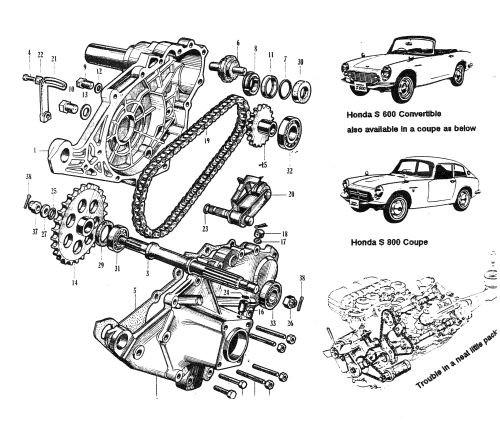
Complimenting the fully independent suspension was a very modern spring-on-strut shock absorber system. The rear shock were mounted at a drastic angle, moving the suspension lower and yielding more trunk space.
The S600 is a beautiful little machine that really shows that exotic ideas can be incorporated into an intriguing package. Although it is said that Honda never turned a profit off their early sports cars, they set a foundation of what is expected out of a small, sporty Japanese sports car: Light weight, proper handling, and a flexible high revving engine. The original S Chassis truly is a machine of another time.
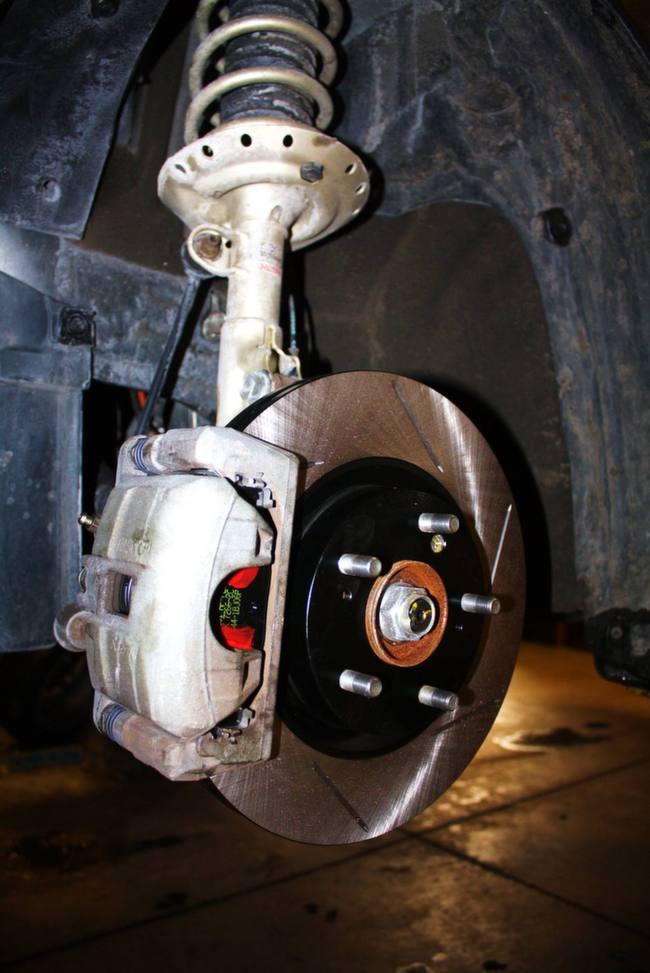
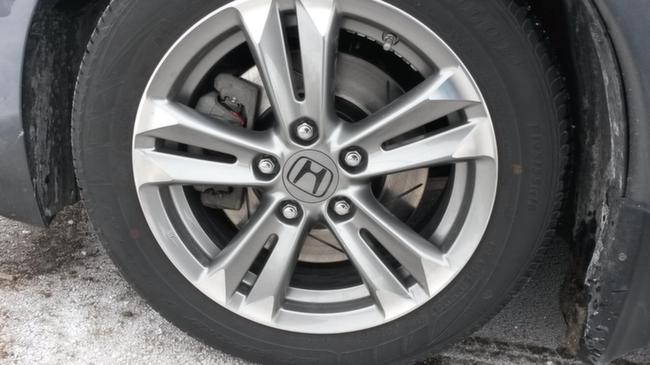
At King we love adding performance to the CR-Z. We even had the one-of-a-king Mugen CR-Z: RR Concept Vehicle shipped out from Tokyo for our 2012 Dyno Day.
In our shop recently: We made this CR-Z go fast with an HPD supercharger. Now it's time to make it stop fast as well! On go a pair of rebuilt RSX calipers, Powerslot rotors and Hawk HP+ pads. Rotor size goes from the stock 10.3" to 11.81" with the RSX rotors. Now it stops as well as it goes!!! This is a great upgrade for any CR-Z.