The following post comes to us courtesy of Mugen aficionado Jerimiah Styles!
== ==
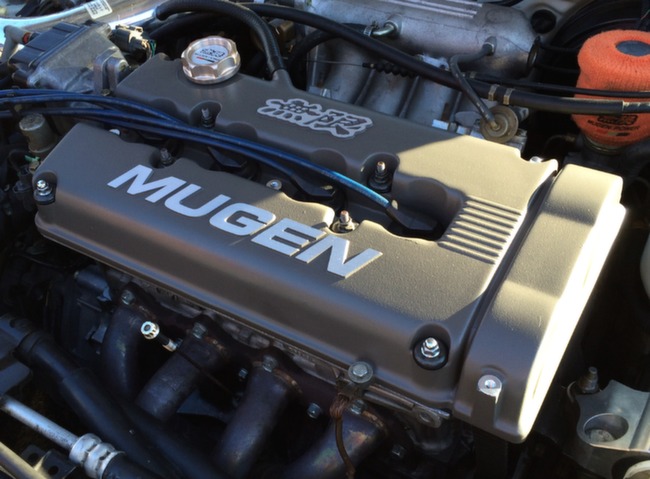
In this installment of Fakespotting I discuss the discontinued Mugen Formula Head Cover for B Series VTEC DOHC engines found in the Integra, Civic, CRX and others.
Mugen Formula Head Cover: 12310-XF0-K1S0
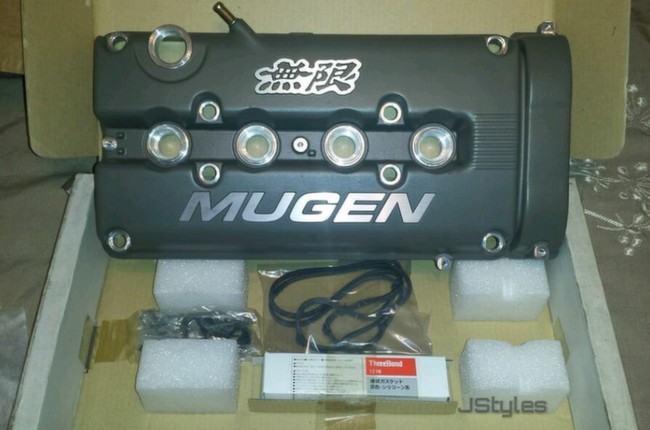
These aluminum engine head covers are manufactured individually using sand casts in the same way as covers for Mugen Formula engines. The genuine cover comes with a new gasket kit, shortened studs for the center four bolts of the cover, a fresh new tube of Hondabond, brand new washers, and printed Japanese instructions.
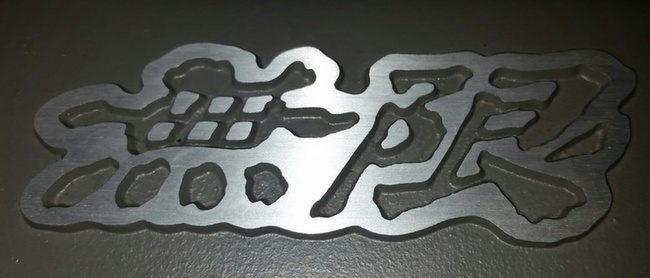
The Mugen letters are stretched across the length of the bottom two bolt holes (the 'N' begins at the hole) and the high quality of the aluminum is as gorgeous as a Rolex watch!
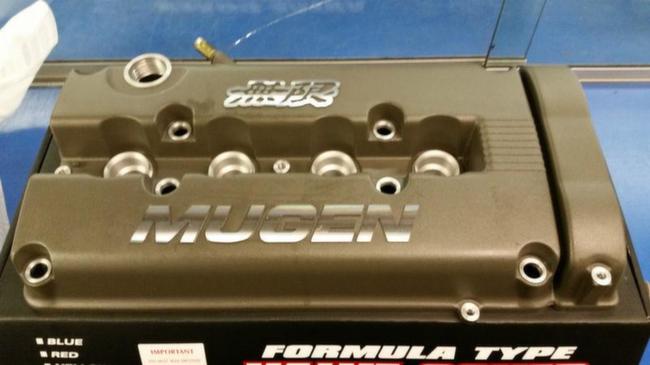
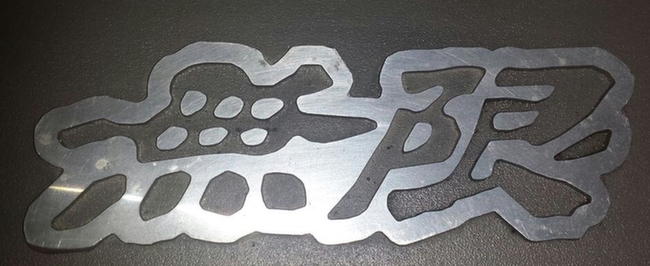
Next we have the fake head cover. The first obvious difference between the two is the Mugen lettering, it's not quite as stretched out (less "italic" or slanted) -- a different font if you will. The finish on the lettering is polished, as opposed to the brushed look of the authentic Mugen cover. Below is the fake:
The quickest way to spot a fake: Compare where the start of the letter N in MUGEN lines up to the bolt hole above it:
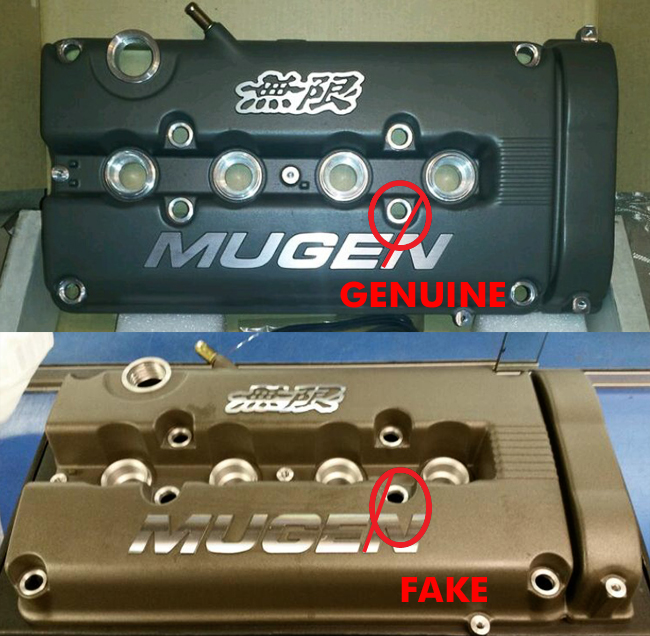
A closer look at the kanji is another sign; smooth, well-defined edges and the fine craftsmanship of genuine Mugen products is evident here. I count a total of eight bumps at the bottom of the genuine Mugen kanji.
The fake cover's kanji is far more angular and less defined. I counted seven bumps, not the eight of the genuine one. A closer look shows a polished finish which is more susceptible to oxidation and discoloration as opposed to the superior quality of the Mugen piece.
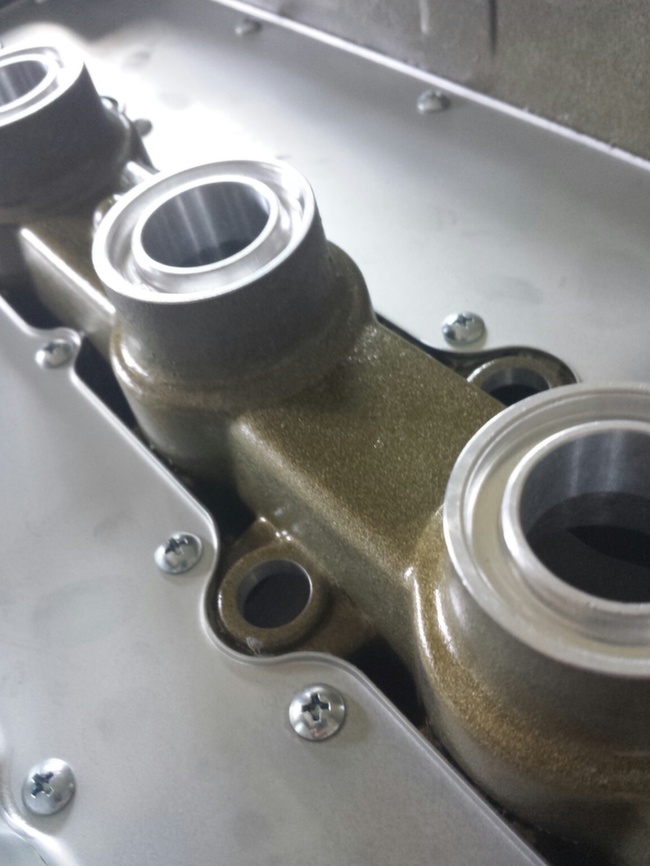
A look underneath the authentic cover looks like something you would expect to see on an F1 race car. The baffles are screwed in place and the product is clean enough to eat off of.
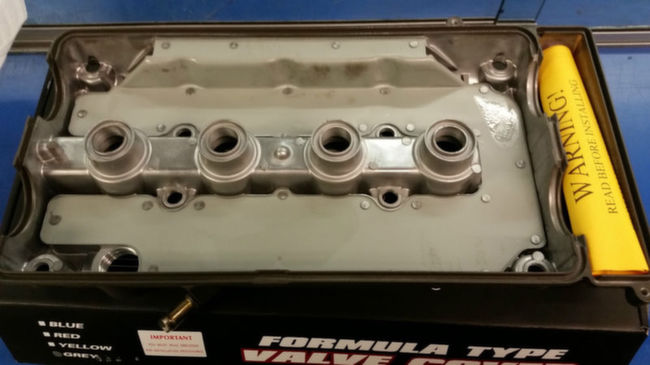
Underneath the replica it's an entirely different story. The baffle is riveted on, and the center piece is a different color, not the bronze color of the real one. Notice the included printed yellow WARNING insert? It instructs the unlucky owner to wash the inside of the cover before installing because METAL SHARDS MAY BE PRESENT-- potentially causing damage to your VTEC engine!
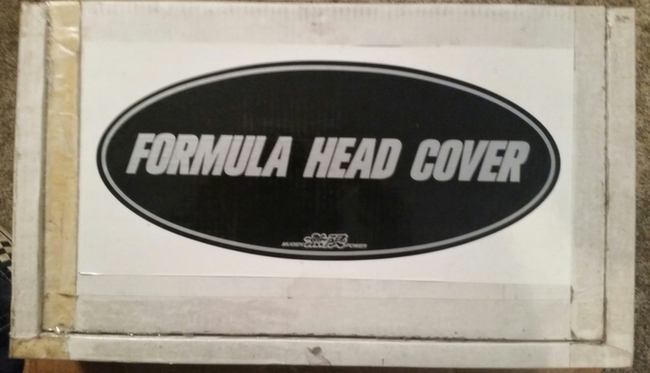
The packaging really needs no explanation. Here's the genuine box:
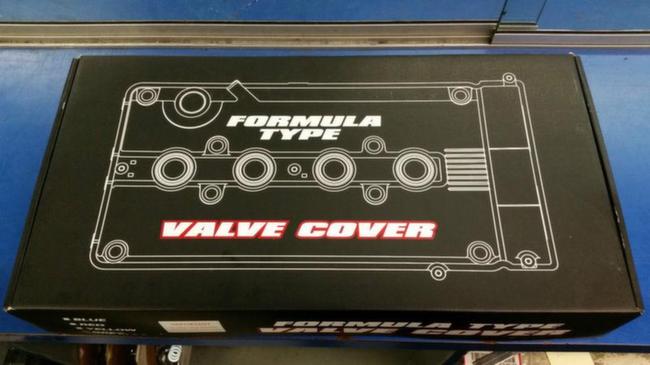
And the box for the fake:
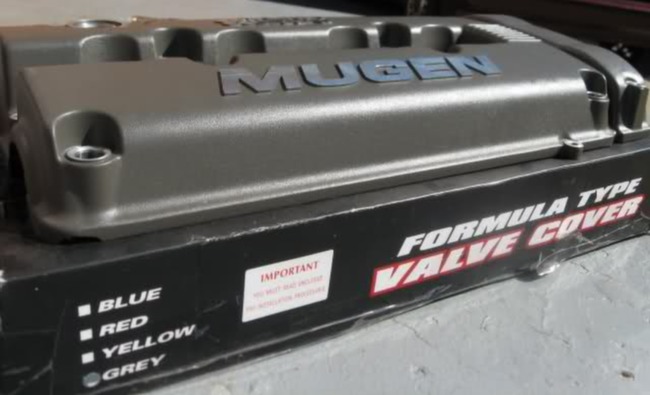
On the side of the box, you'll see various color options. Replica valve covers were available in multiple colors, not something Mugen offered.
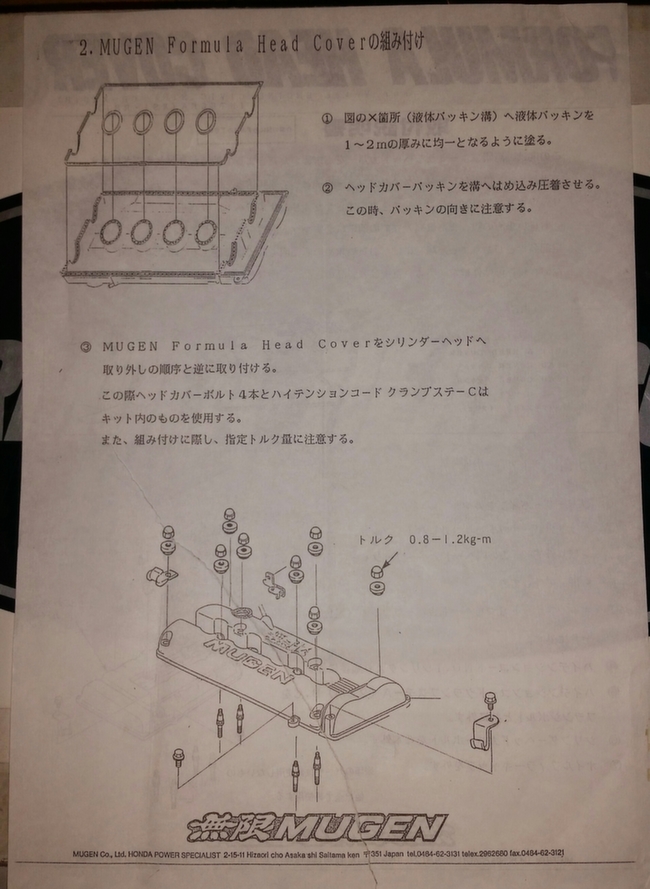
A very rare look at the installation instructions from the genuine packaging. (Front)
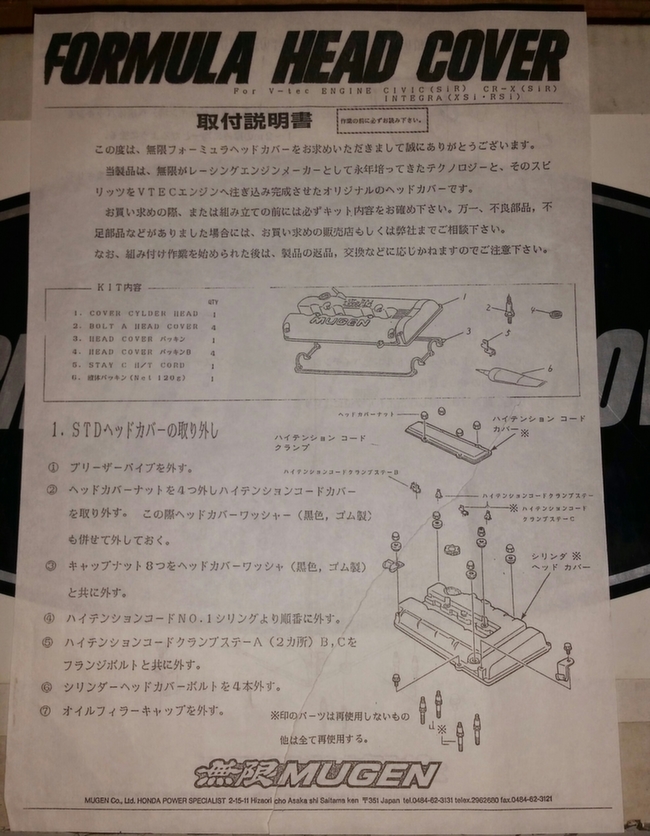
(back)
Why does it matter?
Replica parts made with inferior materials could potentially warp, resulting in an improper seal to the head and causing oil leakage. The possibility of metal shavings being inside of the fake cover is another very dangerous hazard to your engine-- one that could ultimately lead to some very expensive damage down the road.
Knowing what you're looking for when purchasing a Mugen Formula Head Cover is important. These are now discontinued and can no longer be purchased new from an authorized dealer such as King Motorsports. Finding them with the original packaging is becoming harder and harder. It's not uncommon for these head covers to fetch a premium, and there are sharks out there trying to sell fakes for those prices. Know what you're looking for and you can save yourself from a potential scam.
The following post comes to us courtesy of Mugen aficionado Jerimiah Styles!
== ==
The Mugen sport pedal kit is one of the more commonly replicated parts found on the market today. Let's go over some tell tale signs to identify real from fake. In this post we'll look at a specific pedal kit that is available for the CRX, Del Sol, '90-'05 Civic, Integra, RSX, TSX and a few more. Suffice it to say this is a very common pedal kit:
Mugen Sports Pedal Kit (MT): 46545-XG5-K2S0
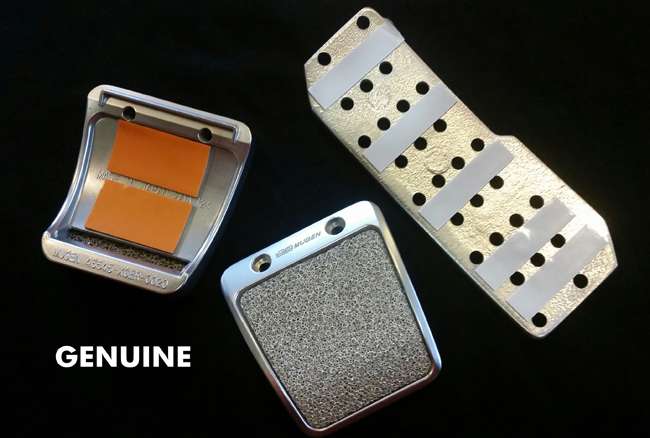
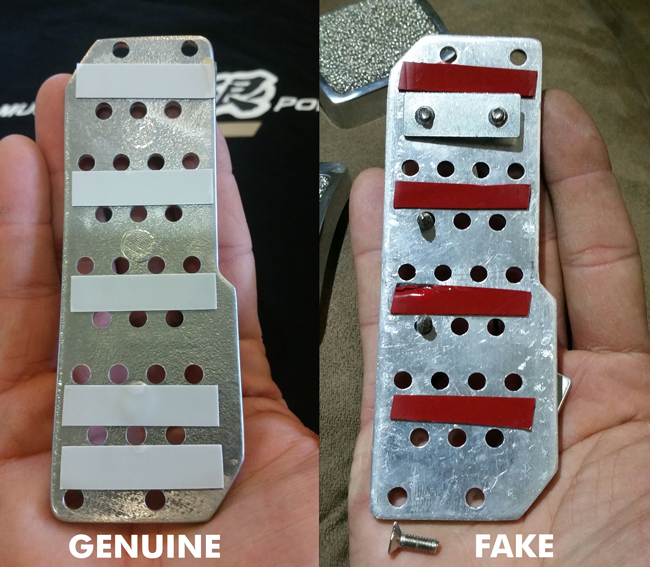
We'll start with the authentic Mugen kit. Notice the orange tape on the clutch and brake pedals and white tape on the gas pedal. The high quality of the aluminum is also a sign that you have a genuine Mugen product. Notice the Mugen logo on the brake/cluth is a single line with kanji and MUGEN.
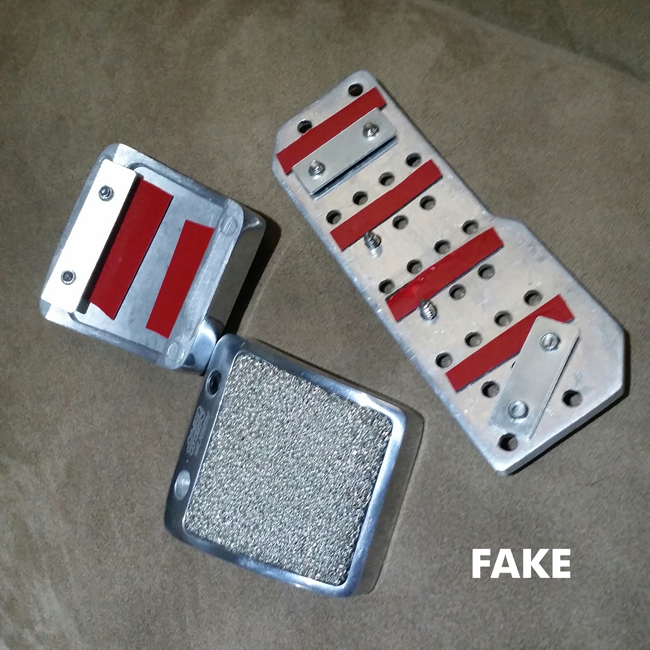
Now, let us compare the replica version. Red tape has replaced the orange, and we have a finish on these that is noticeably different than the genuine Mugen set. You will also notice that the logo is different on the brake/clutch -- kanji is stacked above MUGEN -- however this does not determine authenticity. The older sets of genuine Mugen sport pedals did indeed have this insignia on them. They are referred to by some as first generation sport pedal kits, highly sought after by Mugen collectors.
A look at the authentic Mugen accelerator pedal shows the high quality of the aluminum.
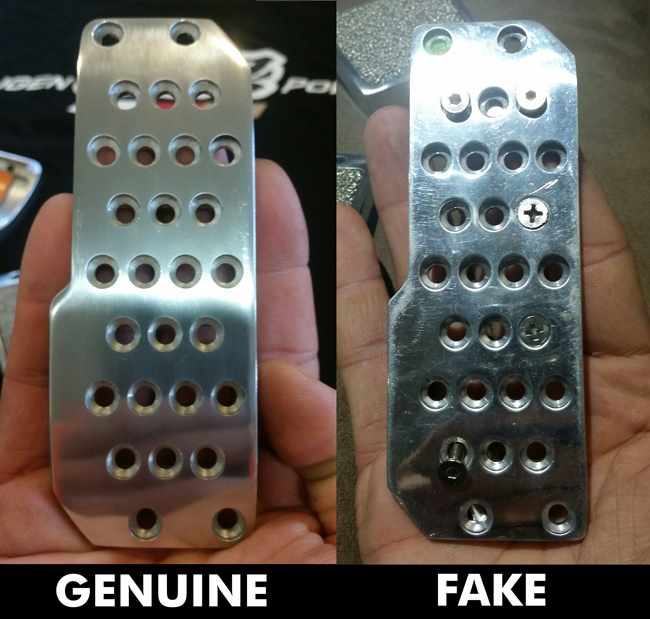
A look at the back of the replica accelerator pedal shows the difference in quality and tell tale red tape of the replicas (versus white tape on the genuine). The overall shape of the fake pedal is more jagged and slightly larger. The fake pedal does not install the same as the Mugen -- which is riveted or screwed on. Keep in mind the fake is a brand new, out of the box set -- far from the craftsmanship of its authentic counterpart.
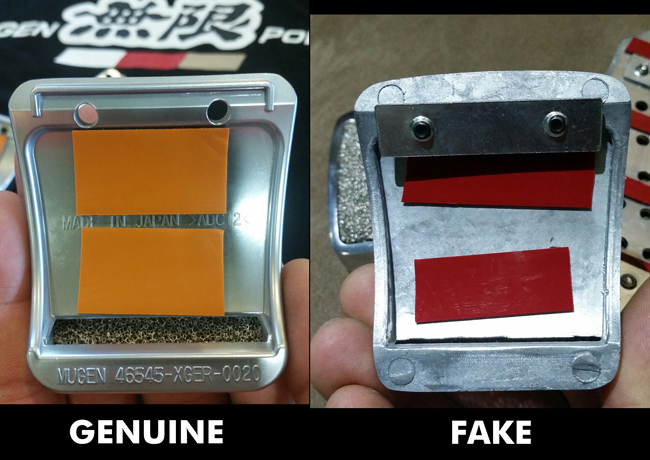
Next let's look at the Mugen brake and clutch pedal (these two Mugen pedals appear to be identical). Again the orange tape and the part number is on the bottom of the real ones.
Now the replica. There's that red tape again, and notice the lack of part number and "Made in Japan" stamp.
This particular kit was available in the two types of packaging you see below (which are both genuine). The clear window box is the most commonly seen replica package. Some replica packages even include a photocopy of the genuine installation instructions, making them even harder to spot. Since the replica packages so closely resemble the genuine ones, the best way to tell fake from real will be to inspect the pedals themselves.
The cardboard box version was available via Honda dealers and has a different part number (but is the same kit).

== ==
Why does it matter?
Replica pedals are known to come apart due to inferior manufacturing and materials. This is extremely dangerous and can cause slippage on the pedal -- or worse -- interfere with pedal operation. Imagine not being able to press the brake pedal because the accelerator cover is lodged behind it!
Want to make sure you get genuine pedals that won't fall apart on you? Buy from an authorized Mugen dealer like King Motorsports.
http://www.kingmotorsports.com/p-225-mugen-sports-pedal-kit-mt.aspx
Thanks again to Jerimiah for his insight and we look forward to more posts from him!
** UPDATE **
Since we published this post, we've had some questions about the variations within the genuine Mugen pedals. Over time, Mugen improved and modified their manufacturing process and the design of the pedals. Enthusiasts have identified three distinct "generations" of pedals: Gen 1, Gen 1.5, and Gen 2. Below is a comparison chart that helps identify the various generations of genuine Mugen pedals.
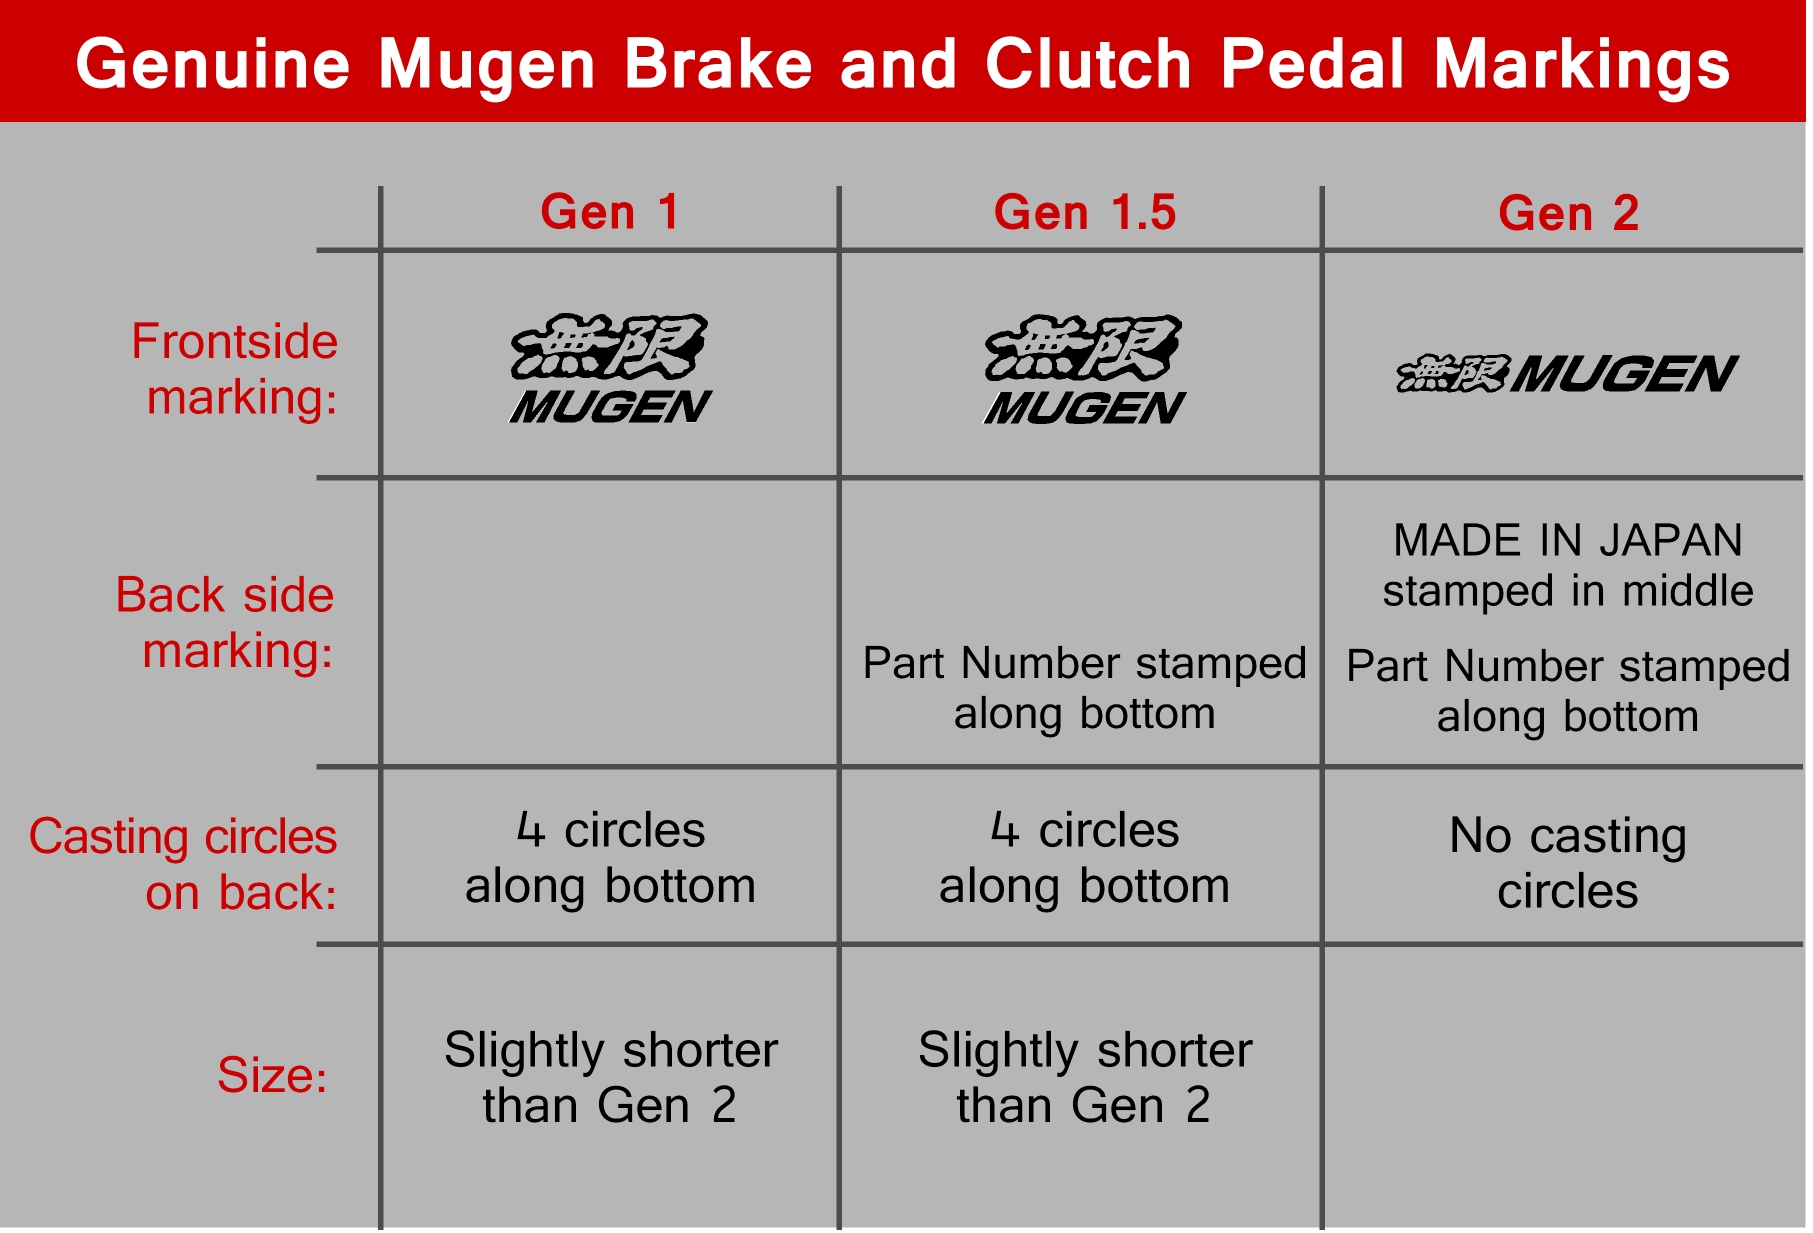
Right-click to see this sheet at full size!
The text:
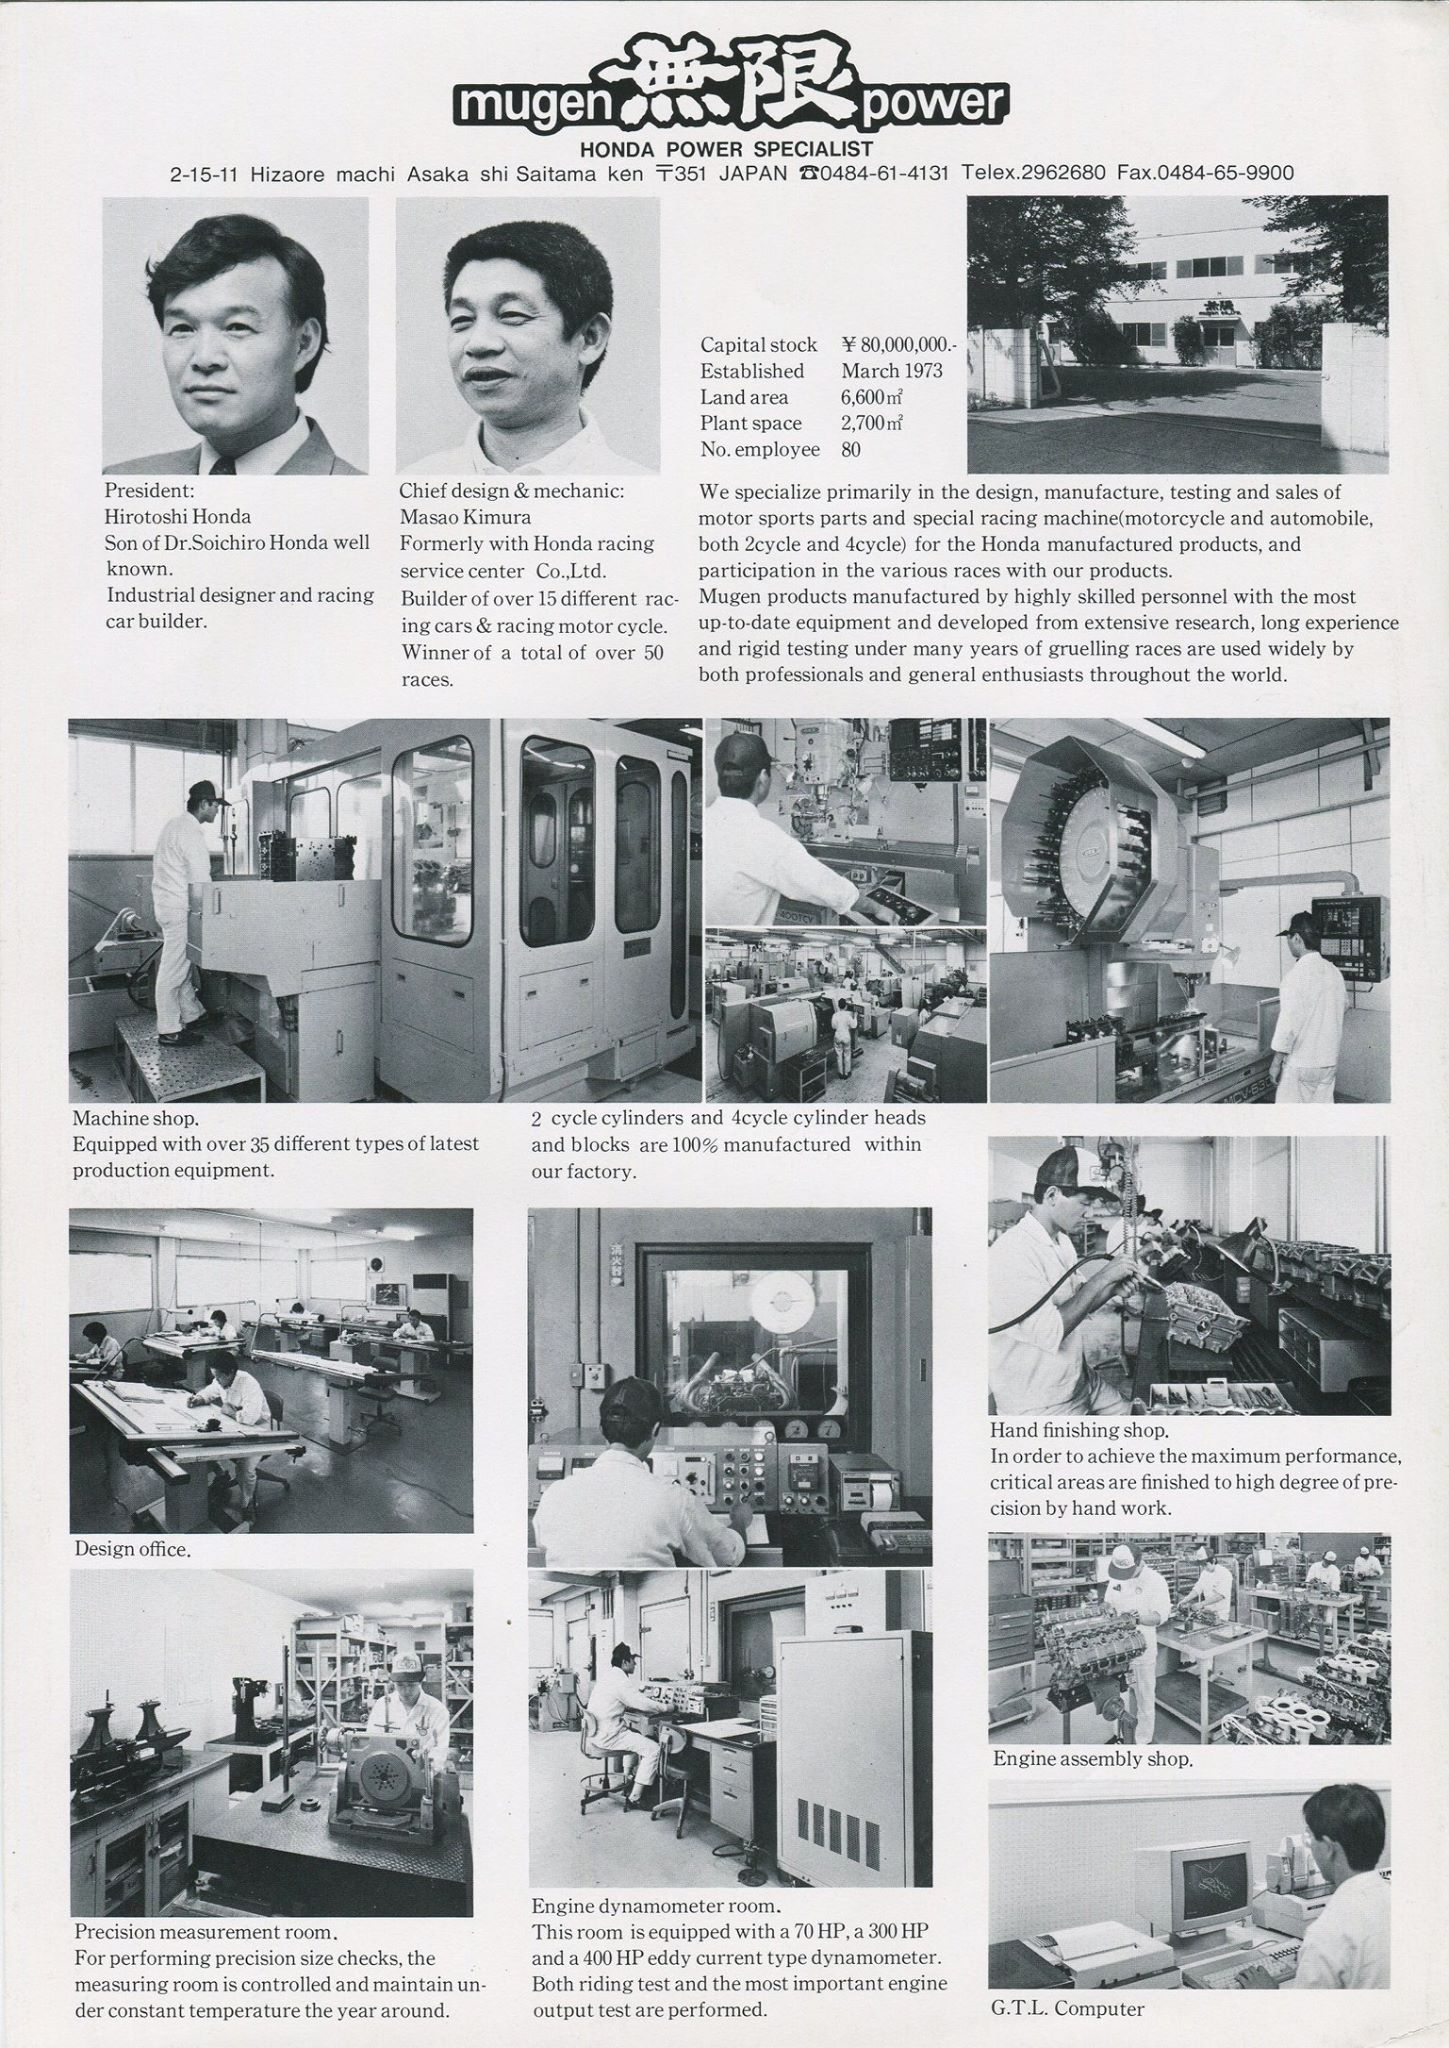
MUGEN POWER
HONDA POWER SPECIALIST
President:
Hirotoshi Honda
Son of Dr. Soichiro Honda well known. Industrial designer and racing car builder.
Chief design & mechanic:
Masao Kimura
Formerly with Honda racing service center Co., Ltd. Builder of over 15 different racing cars & racing motorcycles. Winner of a total of over 50 races.
Capital stock ¥ 80,000,000
Established March 1973
Land area 6,600m²
Plant space 2,700m²
No. employee 80
We specialize primarily in the design, manufacture, testing and sales of motor sports parts and special racing machine (motorcycle and automobile, both 2cycle and 4cycle) for the Honda manufactured products, and participation in the various races with our products.
Mugen products manufactured by highly skilled personnel with the most up-to-date equipment and developed from extensive research, long experience and rigid testing under many years of gruelling races are used widely by both professionals and general enthusiasts throughout the world.
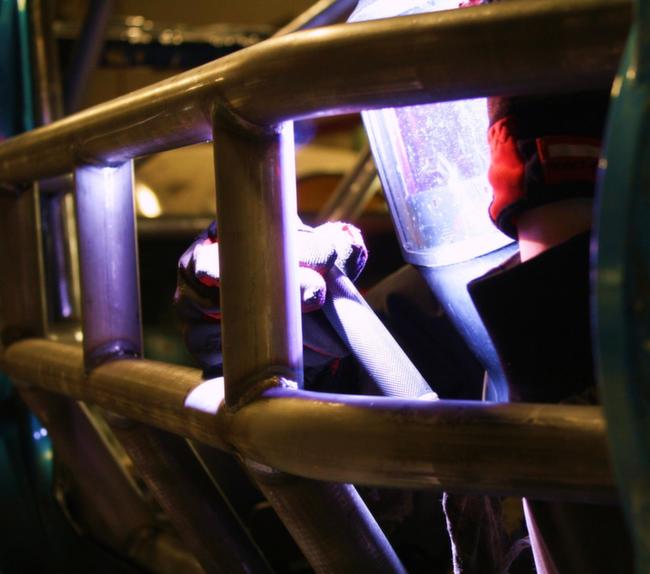
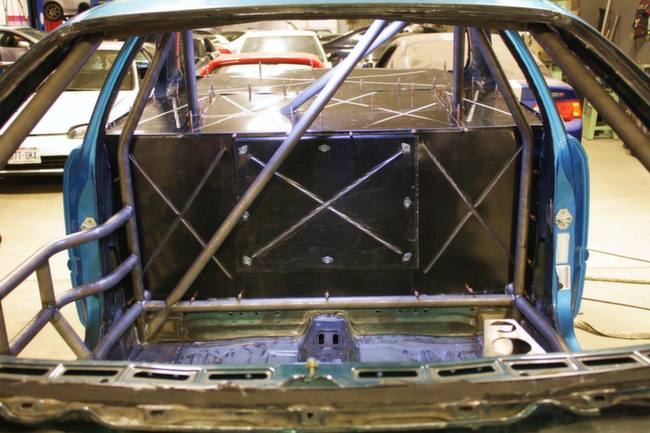
In the shop recently we are preparing an EK Civic SCCA STL race car. First up- TIG welding door bars:
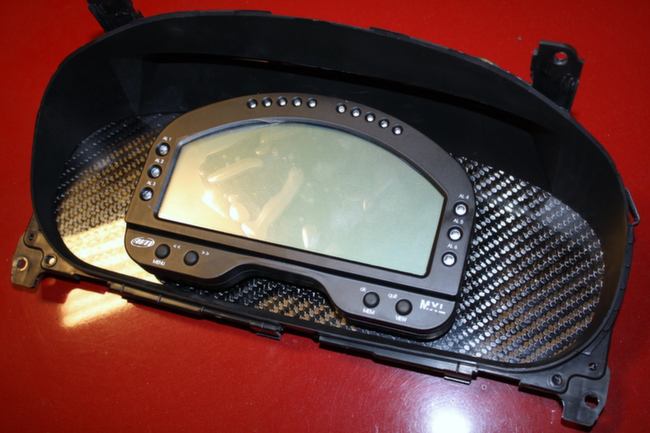
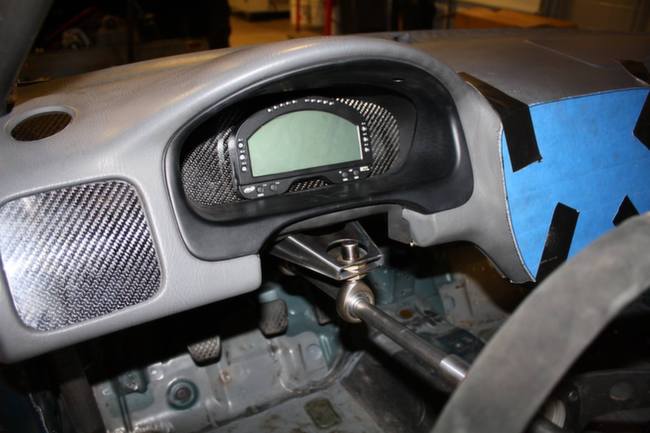
Next- AIM MXL data aq unit mounted in a very cool carbon fiber inlay:
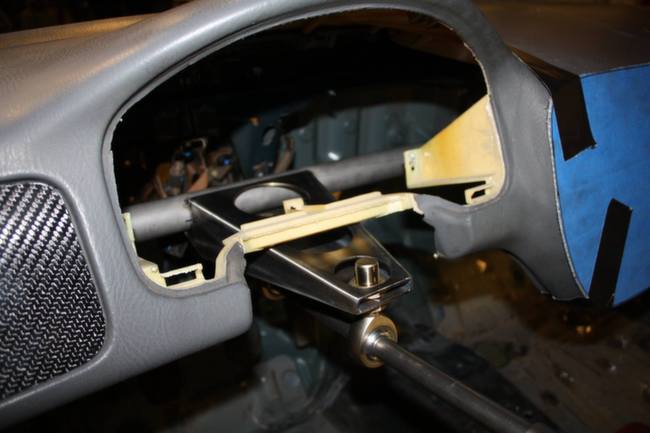
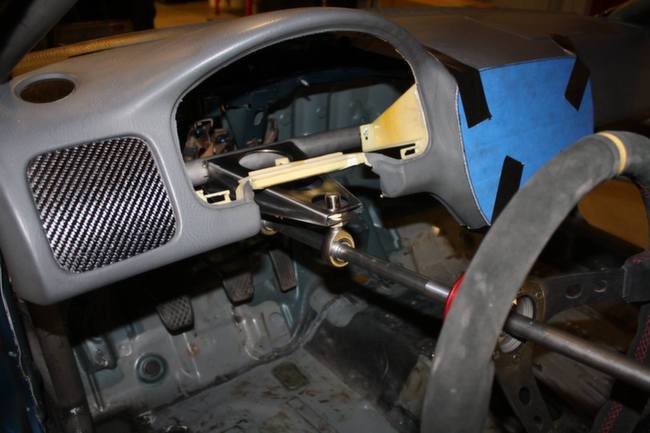
Dashboard mock up. Check out the KMS custom fabricated adjustable steering shaft....
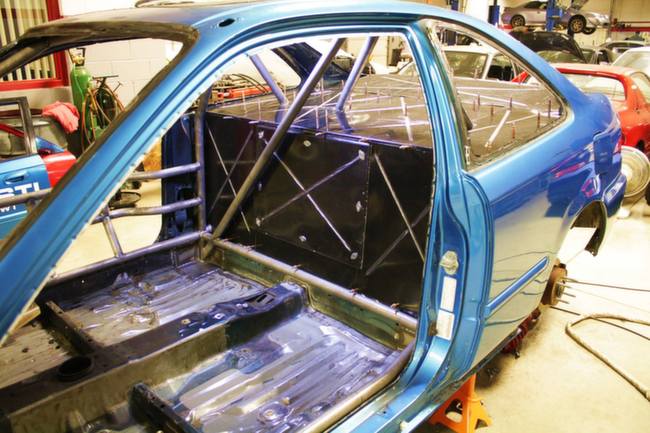
Just a few more bars and this EK Civic STL roll cage will be complete. Next step is all the tin work to separate the fuel cell from the drivers compartment.
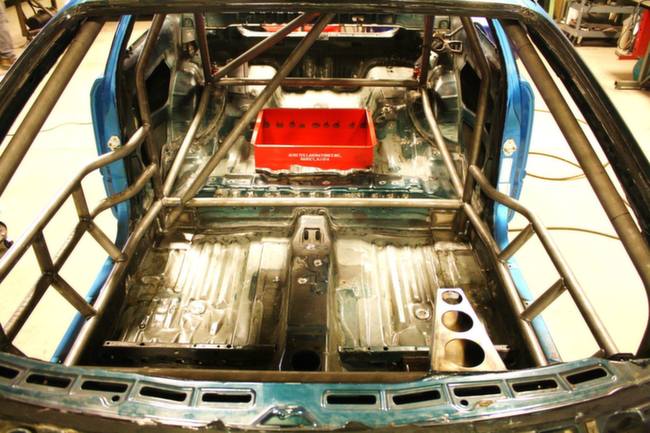
Just a few more bars and this EK Civic STL roll cage will be complete. Next step is all the tin work to separate the fuel cell from the drivers compartment.

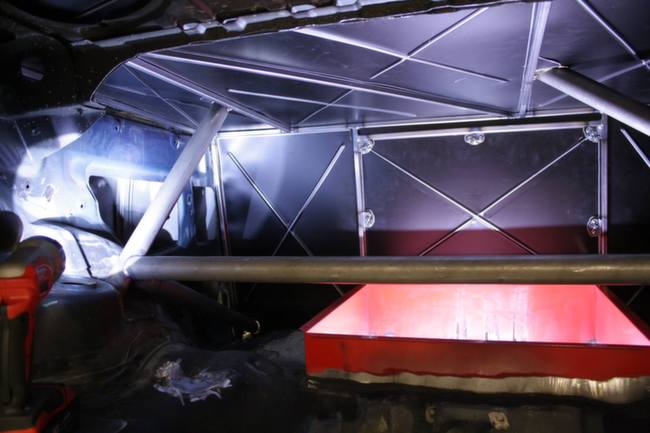
Finishing up work bulkhead work on the SCCA STL Civic race car. All aluminum panels are hand fit and then bead rolled for strength. The center section is attached with self ejecting DZUS fasteners for easier access to the fuel cell, fuel pump etc. All other panels are pop riveted in place.
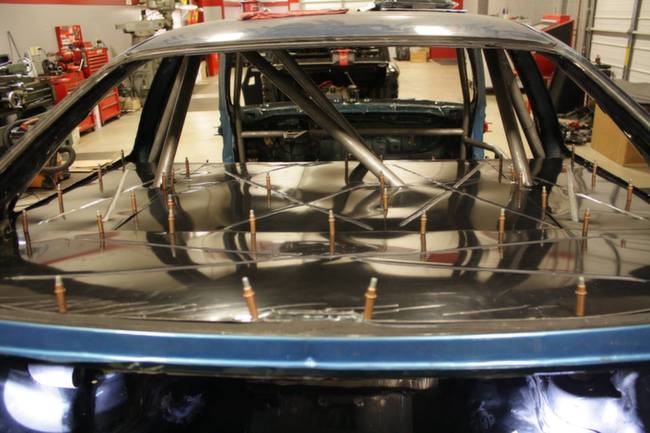
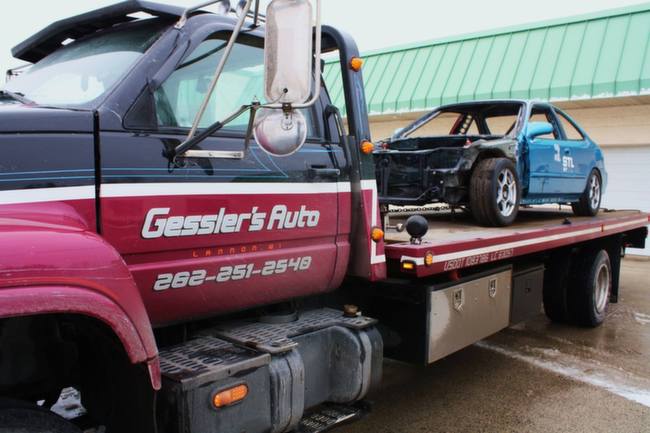
The SCCA STL Civic heads to the body shop today for paint. Back in a few weeks for final assembly! Big thanks to Kyle Gessler of Gessler's Auto for the outstanding service!
Call us today for custom roll cages, race prep and fabrication!
http://www.kingmotorsports.com/c-248-roll-cages.aspx
http://www.kingmotorsports.com/c-242-fabrication.aspx
The following review comes to us via King customer Andy Thompson - thanks Andy!
****
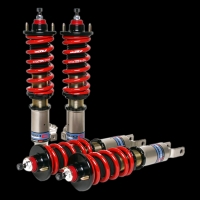
Skunk2’s Pro-C Coilovers are a solid choice for an all-inclusive, mid-level suspension offering features beneficial to track-specific applications.
Why I Chose Pro-C
I initially set out to find an authentic suspension that offered modern coilover features and chassis-specific production. Although many with newer vehicles will not have this issue, my dated EF chassis has quite limited aftermarket choices. So the Pro-C was one of my only choices.
Skunk2 designs and tests all of their products, specific to application. This is important because the coilover actually matches the intended chassis it was designed for, instead of a coilover that was originally designed for one chassis and has been translated to fit others.
I wanted a fully-inclusive suspension that had springs matched to struts, versus a two-piece spring and strut combination from two separate manufactures. I wanted fully independent adjustability in spring rate, dampening, and ride height. The Pro-C smartly offers ride height adjustability independent of spring rate. With many older suspensions, changing ride height also adjusts the spring rate as a negative side effect.
I was also interested in an inverted mono tube strut to maintain a larger oil capacity while offering strength and responsiveness. The Pro-C does not offer inversion, but still uses a mono tube design versus an OE style struts twin tube design (which can feel unresponsive in performance applications).
Here is a comparison of the EF OEM suspension versus the Pro-C:
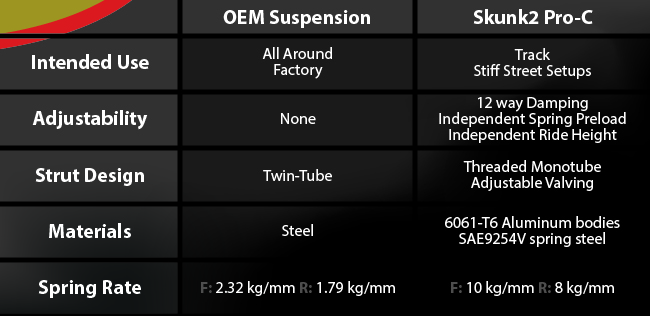
Pros
12-Way Valving
The Pro-C offers a relatively simple and effective valving system. Removable keys on the top of the strut easily control dampening. The keys are retained to the top of the piston rod via rubber o-rings, which allow them to be left in place during driving.
Many lower quality suspensions advertise 36-way adjustability, which is fine, but can be quite frustrating to keep track of and count out when readjusting damping. With Skunk2 offering 12 points of adjustability, it gives the user enough range to dial in damping with meaningful differences between each click. I currently have my suspension set at 3 in the front and 5 in the rear, for casual street driving.
CNC Machined Aluminum Strut housing and Spring Perches
If you live anywhere with rain, snow, or dirt; aluminum threading and perches are a huge deal. A common issue with lower quality aluminum and steel struts is corrosion, and trying to adjust spring rate after any amount of time usually involves ditching the spanner wrenches and grabbing a punch and hammer. The Pro-Cs are made of 6061-T6 aluminum, which is a tempered grade. This makes the threading much more corrosion-resistant and spring rate adjustability a feature that persists despite your weather or road conditions.
I have two summer seasons on my coilovers, in which they still adjust with ease after road grime is wiped off. I personally apply silicon lubricant to threading to repel water (although road grim builds up quicker but is easily removable).
Cons
Street Comfort
Contrary to what is advertised, these coilovers are by no means comfortable. With almost no spring load and low dampening settings, you will still be feeling every crack in the street. On the other hand, the feeling is confident, and there is a total absence of slack in the system. That said, make sure the rest of your suspension system and bushings are up to par-- if not, expect the soft spot in your system to be amplified.
Clearances with UCA
Although this is not a coilover specific issue, some double wishbone suspension setups with front camber kits may run into clearance issues with certain degrees of camber. On my EF, I am running an irrational 4.6 degrees of camber in the front, in which occasionally my front knuckle knocks against the springs and spring perches of the coilover on larger bumps.
Final Word
If you’re a Honda enthusiast looking to get involved in some motor sports such as local auto cross events or open road racing events -- while still being able to drive your car on the street -- this is definitely a great choice.
If you’re planning on driving your car every day or commute long distance to work, the Pro-C may not be for you. Or consider purchasing the Pro-C with lower spring rates.
I am constantly tinkering with my suspension and plan to try a different set of springs for summer 2015. Thanks for reading.
Detailed look at the Pro-C:
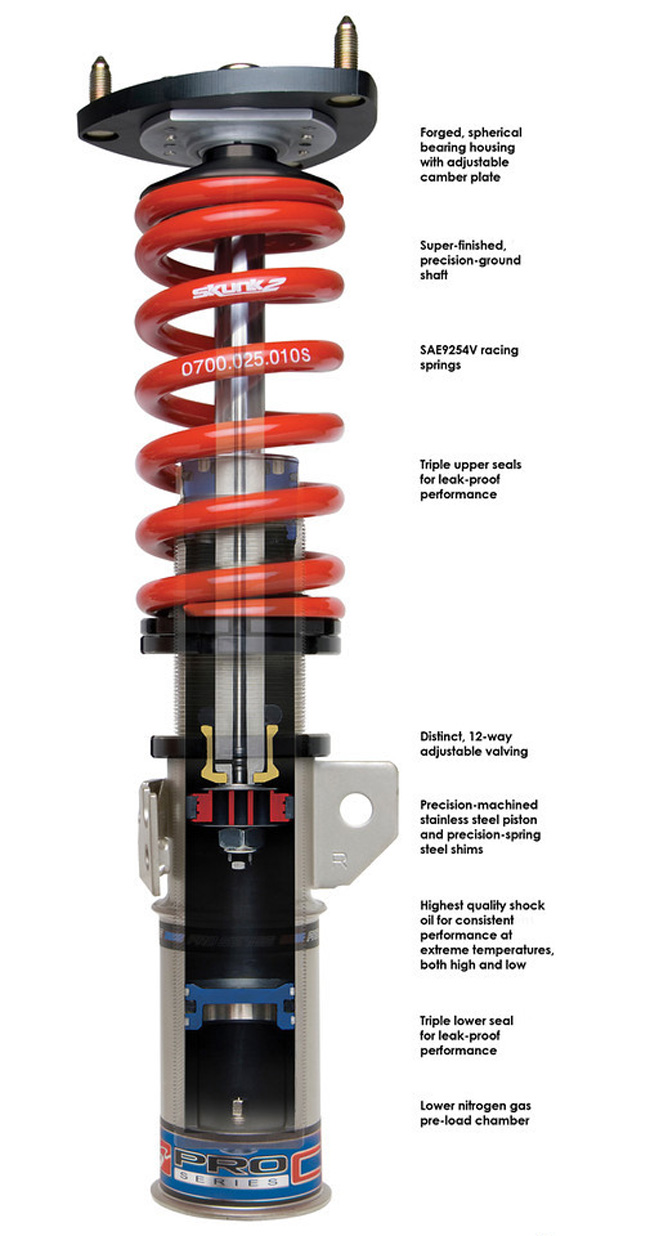
****
See more Skunk2 Racing products at the King Motorsports online store!
http://www.kingmotorsports.com/m-43-skunk2-racing.aspx
The riveted metal Mugen badges are commonly found on front lips and aero pieces. These badges were included on many previous-generation, discontinued Mugen body pieces that circulate the secondary market. Given enough time, miles and repaints, the badges have become one of the only remaining indicators to tell a genuine apart from a replica body part. There are few ways to spot a replica/fake metal rivet badge:
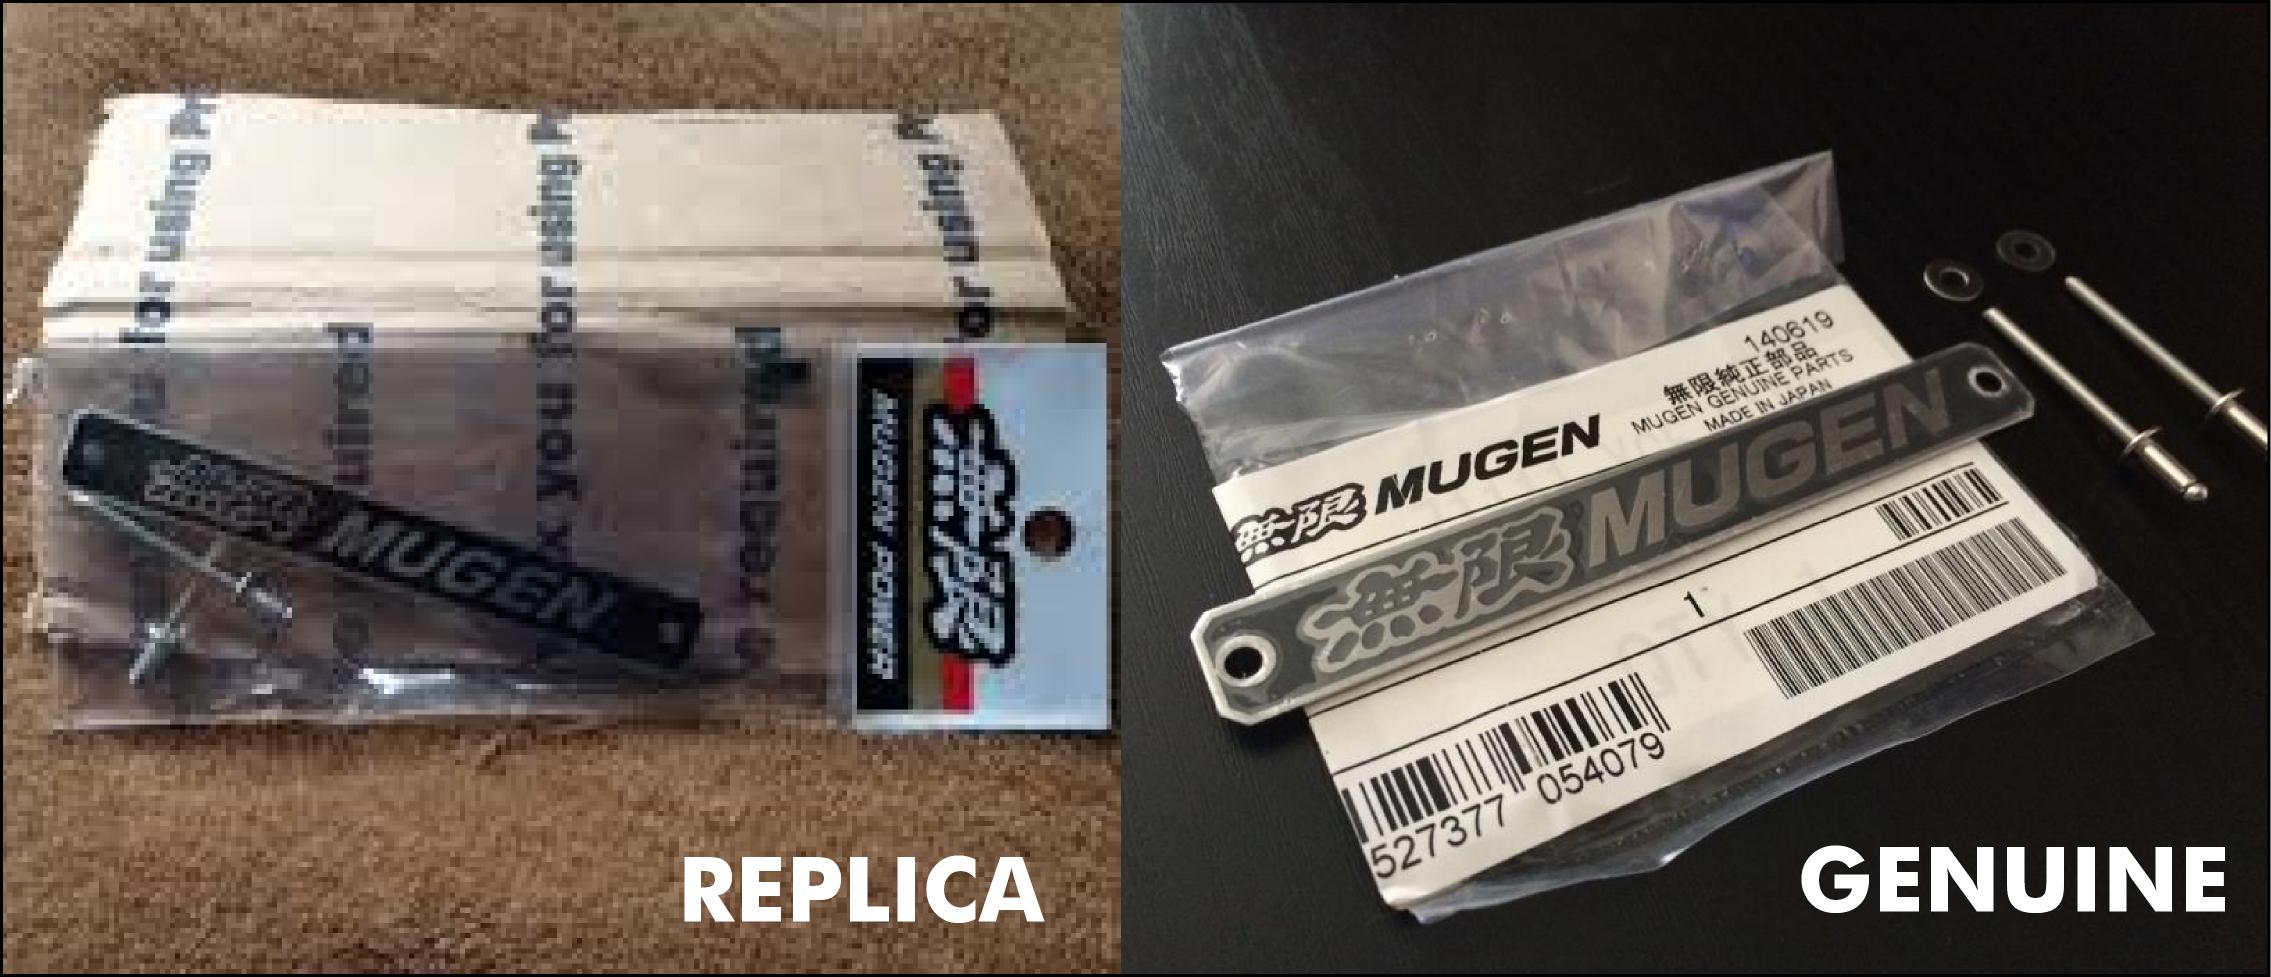
1. Packaging. If the emblem does not include the proper package (or no package), it may be a replica. Note that Mugen have not sold the badge in the colored red-gold-black diplay bag, only the more generic bag.
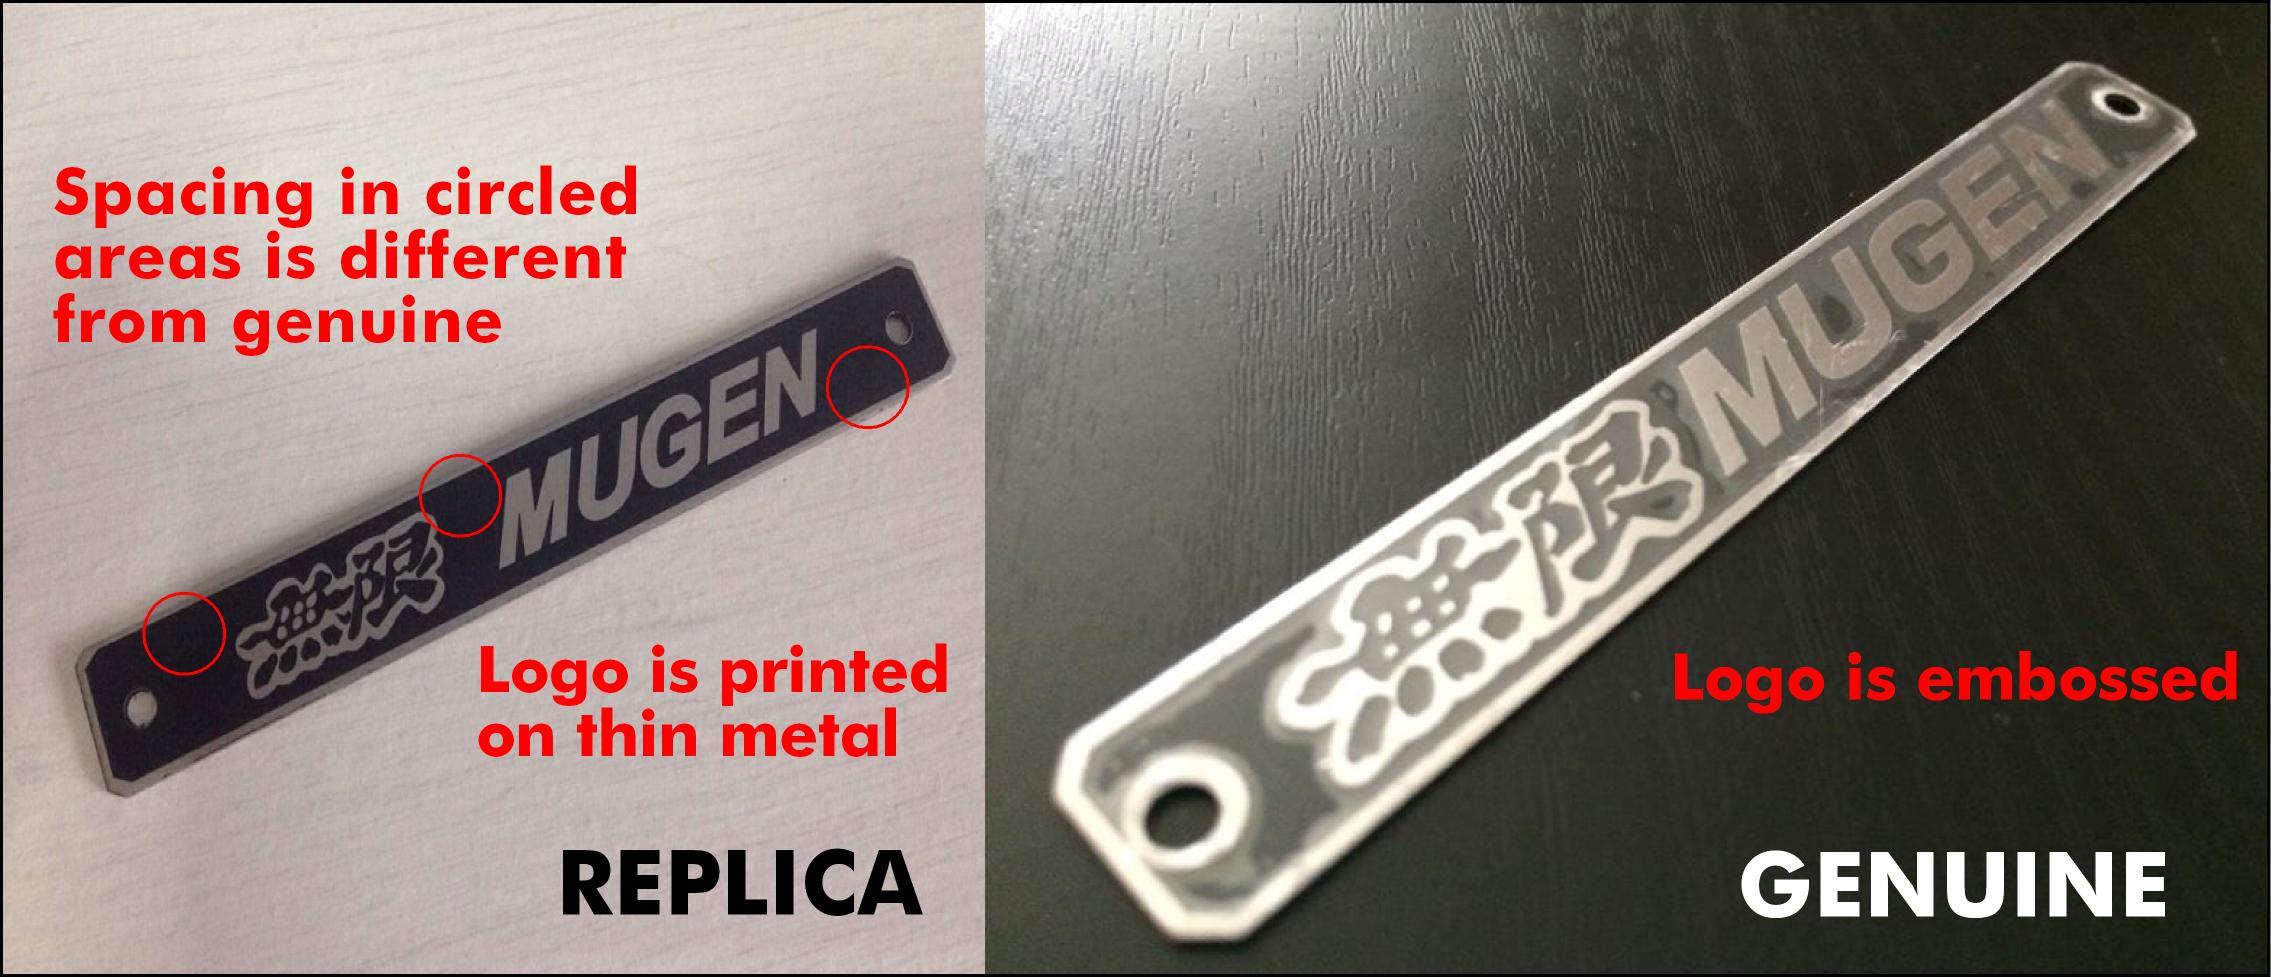
2. Painted versus embossed. The genuine badge is embossed on sturdy metal. If you run your finger over it, you should be able to feel the logo.
3. Logo spacing. The replica badge has extra spacing around the kanji and MUGEN logo. The genuine has an overall tighter design with less space around the kanji and MUGEN logo.
Here is a comparison photo of the packaging.
Photos of genuine badge courtesy of Wilhelm C.
You can find genuine Mugen emblems and decals on the King Motorsports online store:
http://www.kingmotorsports.com/c-147-decals-stickers-emblems.aspx
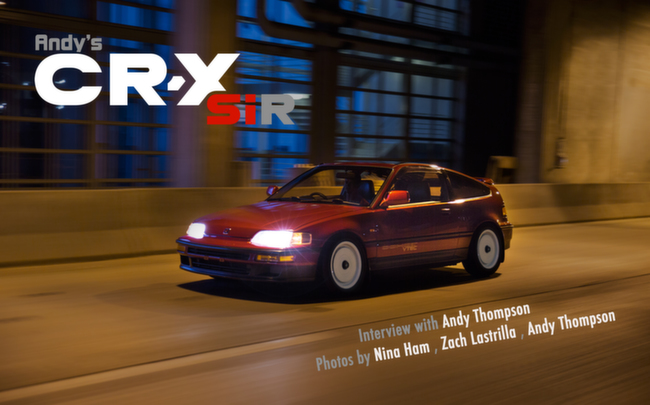
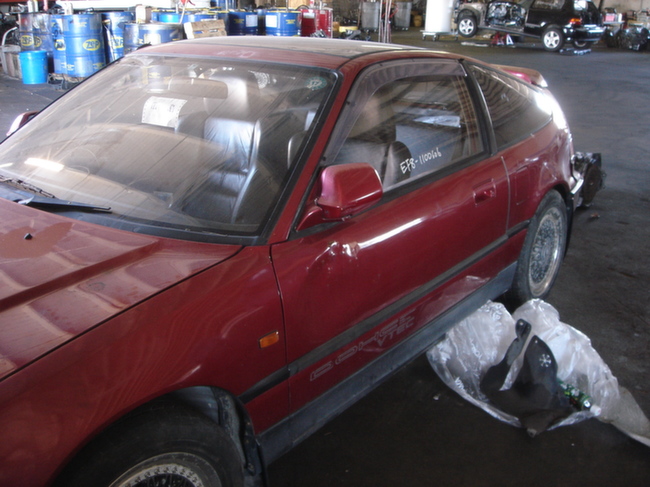
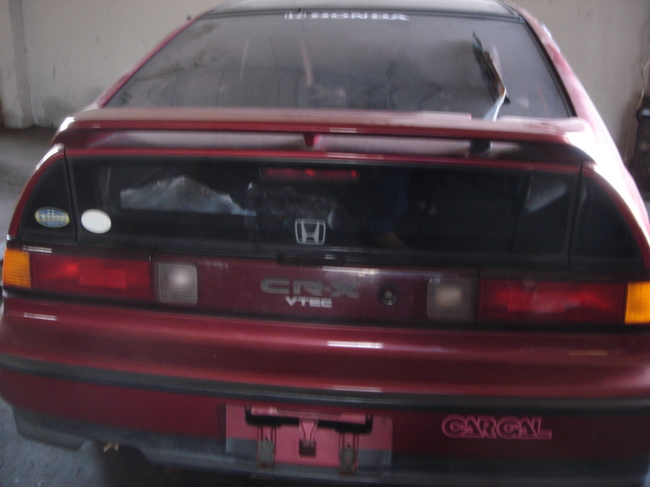
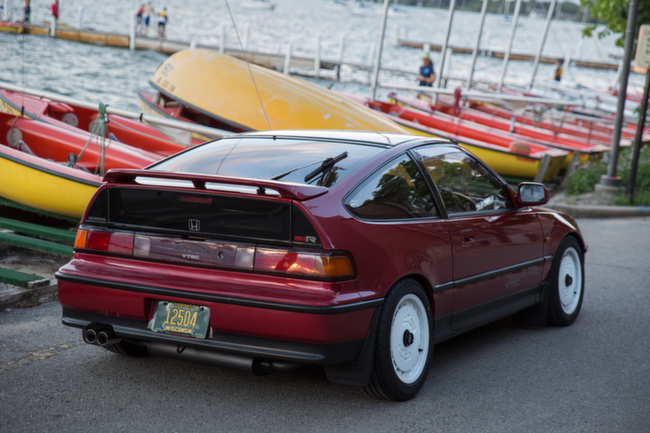
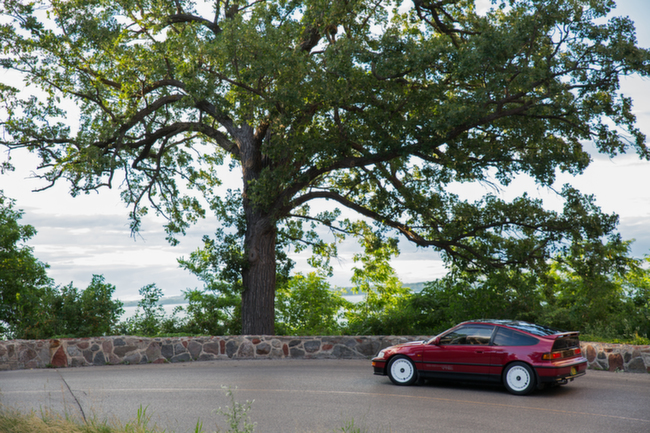
We don’t have to tell you there are passionate Honda owners all over the world. We’ve helped countless enthusiasts achieve their goals, whether it’s a fully-built race car or a daily driver that performs and looks great on the street. One of these enthusiasts is Andy Thompson – and he lives right here in Wisconsin. He’s local to our facility in New Berlin, Wisconsin and is close enough to stop by from time to time. We were lucky enough to see his amazingly clean CR-X SiR at our 2014 Dyno Day event.
His CR-X is a 100% legally imported JDM RHD beauty that took over 3 months to locate and import in 2008. Because Andy imported it, he’s the first and only Stateside owner. He took it from fairly rough shape and has built up an “OEM perfection” build that stays true to the period and is fueled by Andy’s background in both graphic design and mechanical engineering. If you ask us, that’s a potent education for crafting a clean ride. Good taste plus the skills to achieve your vision? That’s a win-win combo.
The love he’s put into his old school Honda definitely deserves a special showcase, so we caught up with Andy to get the 411 on his build. Andy says that compliments can be hard to come by in the import scene, but I think you’ll agree his CR-X deserves them.
Why a CR-X?
Andy: I feel that many people forget to realize the fact that vintage Japanese cars can hold as much history as any other car. It’s true that many older Japanese cars are built like cheap utilities -- including the Honda CR-X -- but that doesn’t make them any less important than any other car in the scope of automotive history. Many of us grew up with affordable tuner cars, including myself, buying my first CR-X at 13 and owning five EFs before I even bothered to try a different car (an S2000), but unlike many, I can’t just forget and leave the EF chassis behind.
At 17 I sold off almost everything I owned in order to seize the opportunity to bring this CR-X into the US -- fully legal and VIN matched. The car was sold as an extremely dirty rolling shell, with engine shipped separate, but it was all there. Rust free, and most importantly able to be registered just before the laws changed.
Having owned a CR-X since 13, I had grown an undivided love towards the weird little cars, and knew instantly that this car had the potential I was looking for.


Classy choices for a teenager Andy! You were raised right! Tell us about your CR-X.
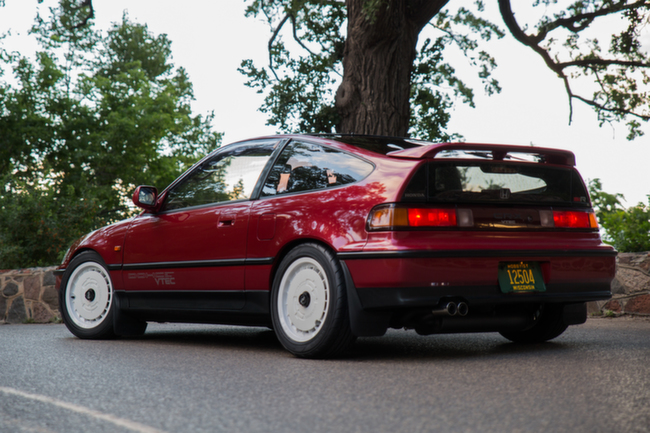
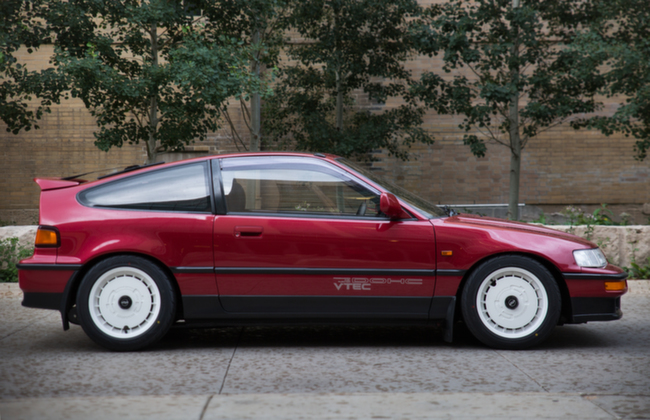
Andy: The exact model is a 1990 EF8 SiR Glasstop in Torino Red Pearl. For a little background info, SiRs were only made in Steel roof and Glasstop models. The Glasstop was a rare dealer option, in which was only sold in black and red. The red models were extremely rare as compared to the black, in which I only know of one that resides in the US at this time.
Since 2008, I have been slowly working at this car to build an example of one of the cleanest CR-X projects while paying respect to what Honda intended when their engineers designed this lovable little machine. I continually strive for OEM perfection, and aftermarket modifications that complement the vehicle in a vintage grip car sort of manner.
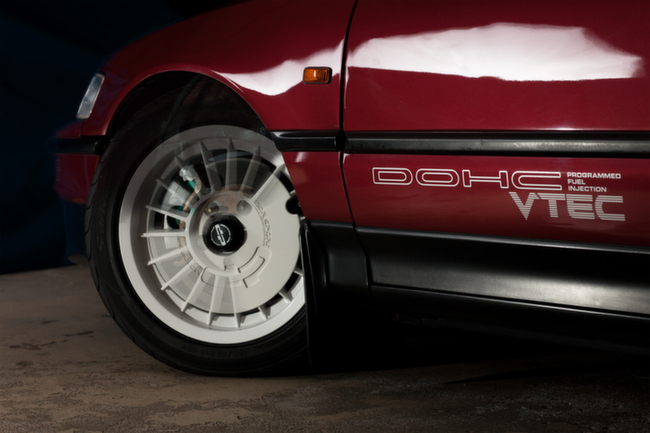
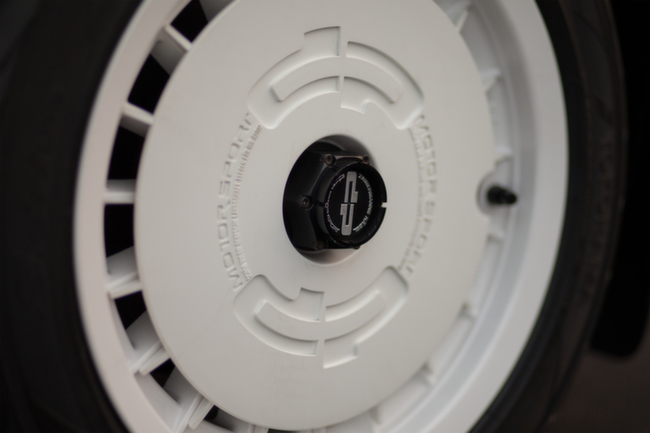
Every year I try to do something interesting to the car. This past spring, I completed an EK9 32 mm 5-lug conversion with EK9 brakes in order to fit a set of extremely rare DP Motorsport Pacific wheels I picked up brand new in box from 1987. Because I have a BS in Graphic Design, visual and complementary aesthetics are very important to me; these era-specific turbine wheels were perfect for the car.
Wait so you found classic wheels that are even older than your car? And they were brand new?
Andy: Yes-- I purchased the wheels earlier this year from a guy in Ohio. The wheels were manufactured in 1987 and were still brand new, unused in their original boxes. 2 of the 4 were still sealed in their original bags never opened. So the wheels had sat for 27 years before I got a hold of them.
Holy cow that is awesome. What were the next mods?
Andy: The 5-lug swap project became quite an ordeal once I got into it, including sandblasting and powdercoating most of the suspension and brakes -- and acquiring a lot of new hardware, ball joints, bearings, etc. I met Scott at King Motorsports earlier this year and knew he was the guy to help me tie up all of the loose ends on my laundry list of parts to make the conversion happen.
What does the future hold for you and your CR-X?
Andy: Currently I am very happy with how the car sits. If I were to list future plans for the car, the top of the list would include new old stock front and rear bumpers, trim, and side moldings; OEM fog lights; and a working bumper pole (I have one, it’s just junk). I am also always on the look for old rare wheels, and would love to find a set of SSR Air Stage or Auswuch for it.
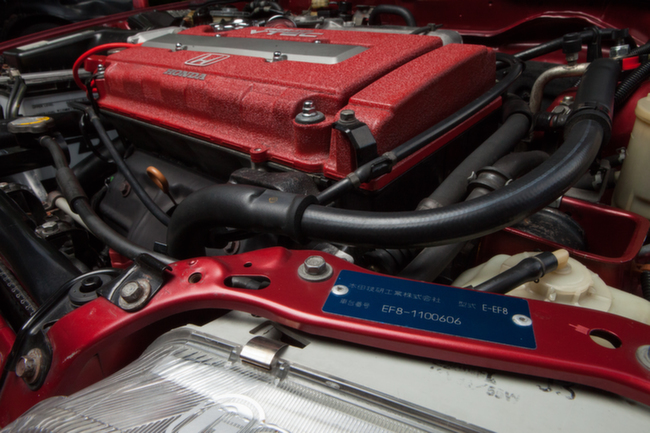
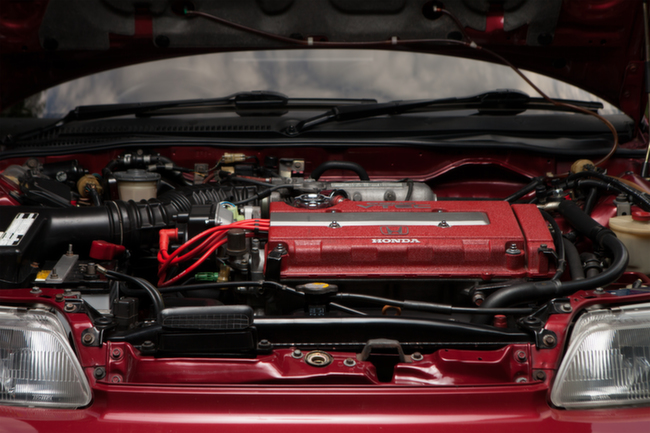
I’m happy with the stock B16 engine, it runs perfect and all accessories work, including the AC, thank god. Perhaps unrealistically, I have always considered a Honda N22 swap (I’m a pretty big diesel fan). I think a very interesting project could come about from the swap.
I’m very thankful that King Motorsports is able to help keep these “golden era” Hondas on the road. Valuable resources like that don’t come around often.
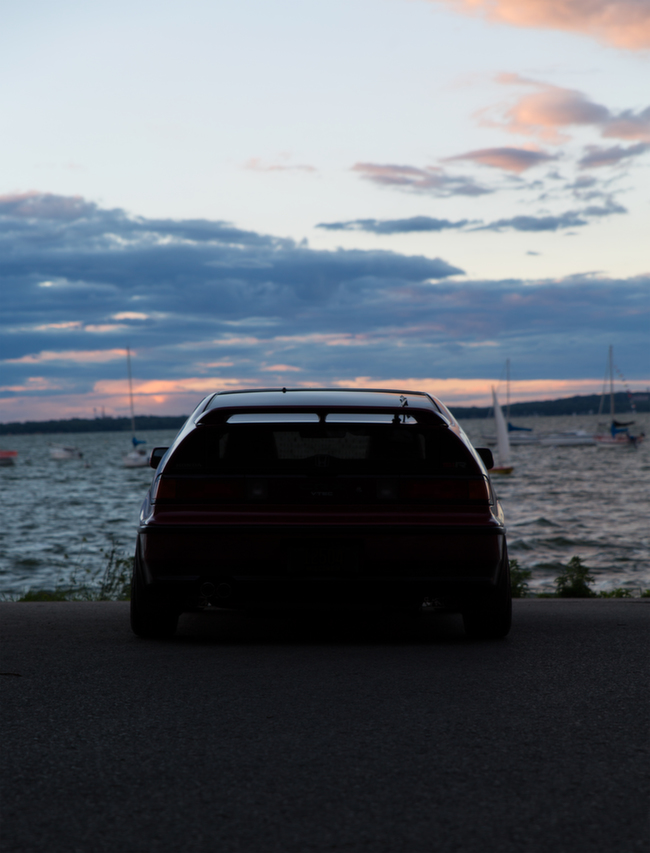
Enjoy my CR-X and remember to keep the classics alive!

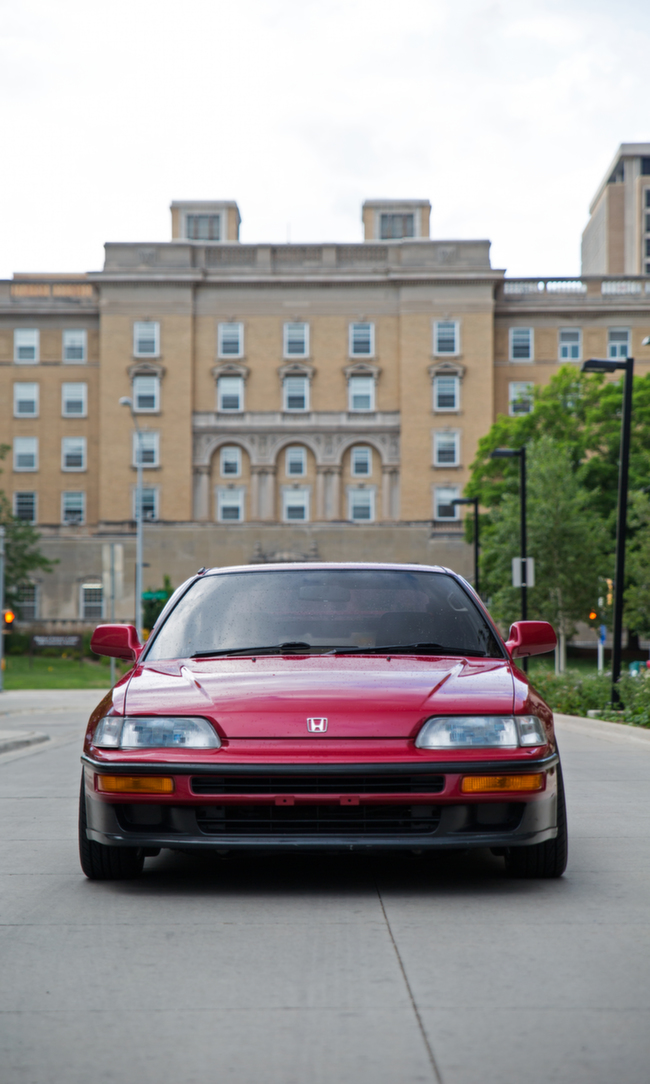
Exterior
Complete matching VIN Real EF8
Torino Red Pearl Color
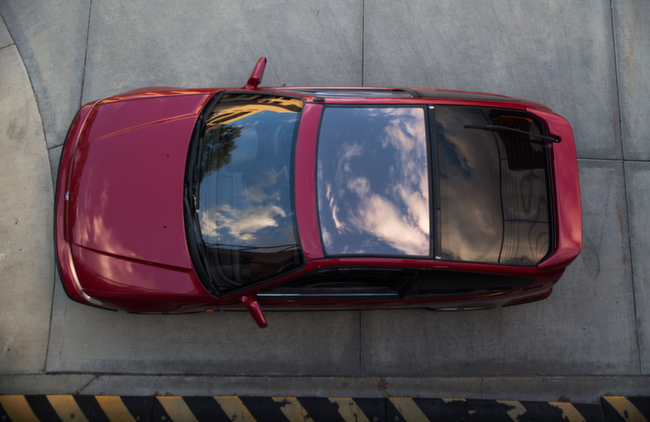
JDM SiR Cyber Top (glass roof, rare option)
JDM SiR Wing
JDM SiR front lip
JDM SiR Power folding mirrors
JDM SiR Amber glass
JDM Window visors
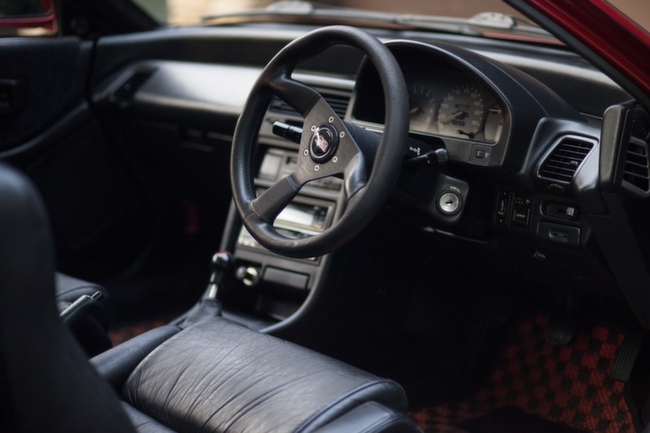
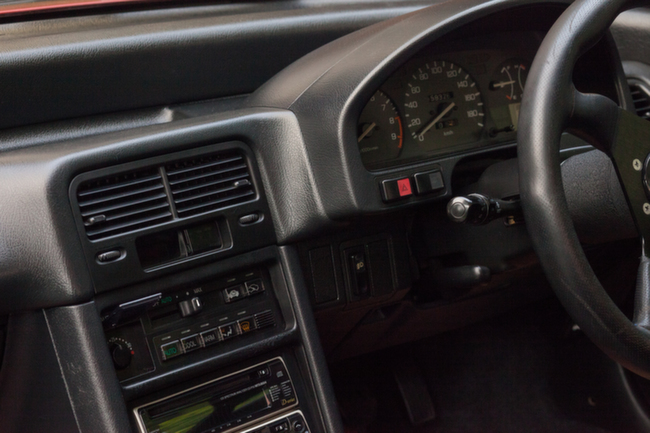
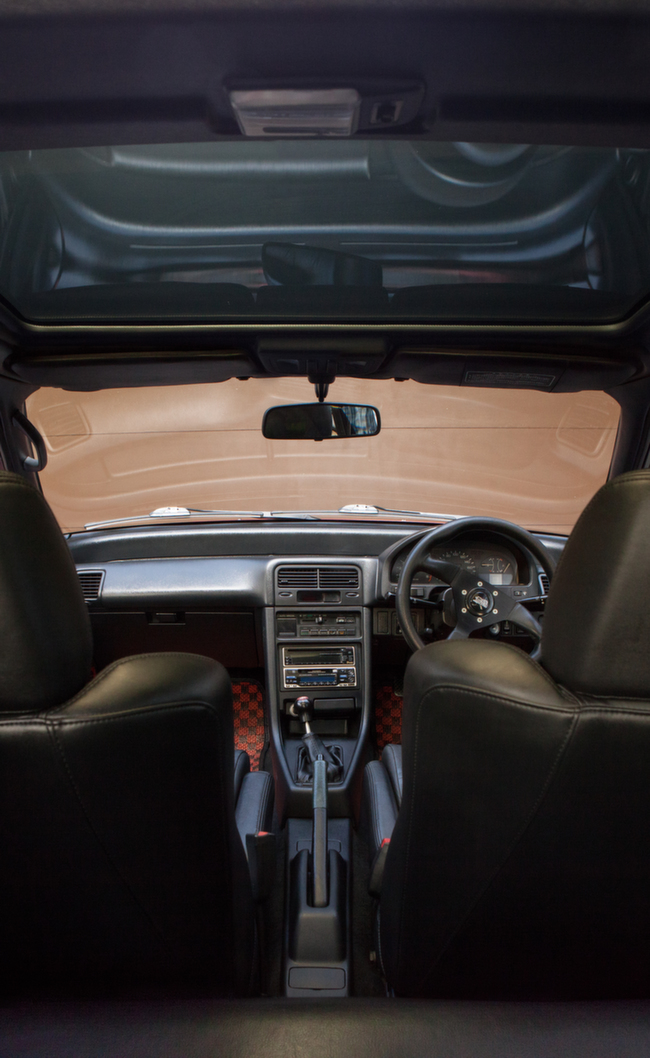
Interior
JDM NSX Seats
JDM SiR Back seats
JDM ATC Sprint Steering wheel (Mugen Horn Button)
JDM Mitsubishi Mini Disk Player/CD Player
HKS Shift knob
Cartiva Bamboo Floor Mats
Engine
Original matched B16A
HKS Sport Exhaust
JDM Integra Type R Valve Cover
JDM Integra Type R Oil Cap
Suspension
Skunk 2 Pro C Coilovers
Function 7 Lower Control Arms (Spherical Bearings)
ASR Subframe Brace
Spoon lower tie bar
Skunk 2 Pro Series adjustable control arms front
Skunk 2 Pro Series adjustable control arms rear
EK9/ITR 5 lug Front Spindles (Machined for SiR/DA Wheel Bearing)
EK9/ITR 5 Lug Rear Spindles
Powdercoated DA Front Knuckles
Powdercoated EK9 Rear hubs
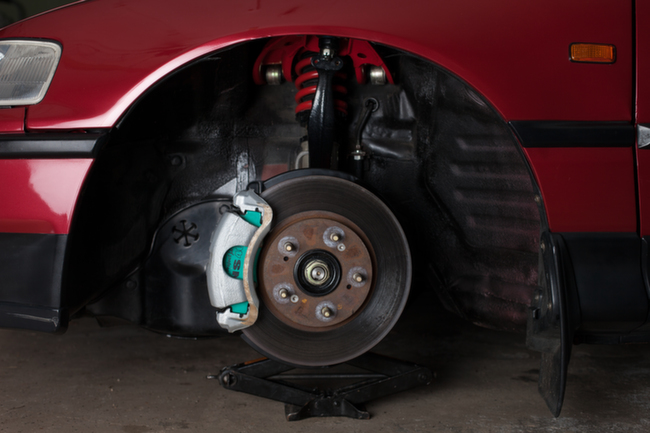
Brakes
Powdercoated EK9 Front Calipers
Powdercoated EK9 Rear Calipers
OEM EK9 Brake Rotors
Techna Fit Braided Stainless Steel Brake Lines
Project Mu NS 400 Brake Pads
Wheels
15 X 6.5 +18 1987 DP Motorsport Pacific Wheels
185/55 R15 Yokohama S Drive Tires
Mugen Lug Nuts
Volk Rays Valve Stems
See more pics on Andy’s Flickr account:
https://www.flickr.com/photos/108200011@N02/sets/72157646023680793/
Find parts for your CR-X on King's online store:
http://kingmotorsports.com/s-86-crx.aspx
In our shop recently: We put our vertical mill to good use porting a Skunk2 K Series intake manifold for a 74mm throttle body. This manifold is headed for install on a K24/K20, with dyno tuning shortly afterwards.
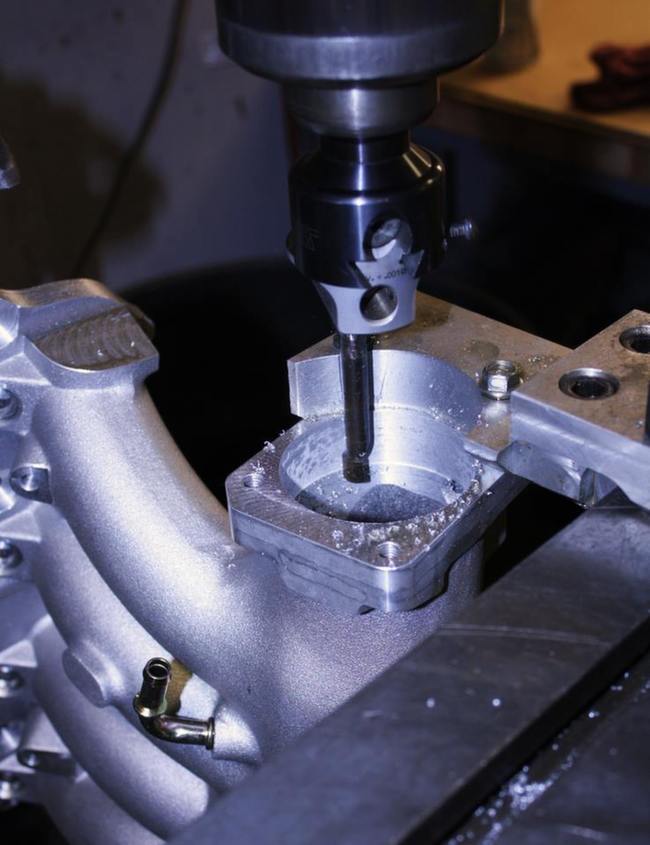
Our customer Jason S. asked, "Can't this be done on a flap wheel?" The answer is that it is difficult to get the precision to open up the throttle body exactly 4mm with a flapper wheel. We're all about precision!
We are also porting the intake runners.
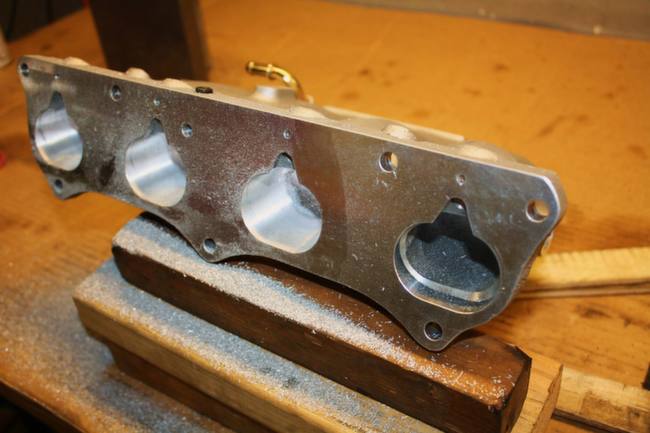
Here is a close up of the before (right side) and after (left side).

Call or email us to talk about your porting job!
http://kingmotorsports.com/advsearch.aspx?SearchTerm=port
Skunk2 Intake Manifolds