Baking the Mugen RR Advanced Concept


If you've ever been to one of our Dyno Day events, you may have met Kojima San. He travels out every year from Mugen HQ in Tokyo to visit with us, talk to attendees about their cars, and share news from Mugen. So when this year Dyno Day landed on Kojima San's birthday, we knew we had to celebrate in style. We were also unveiling the Mugen Civic RR Advanced Concept (shipped all the way out from Tokyo) and it made for a great opportunity to commission a cake creation as one-of-a-kind, unique and masterfully constructed as the RR.

We looked to Michael Kinjerski, a legend when it comes to Honda cakes (See some of his other Honda cakes here). His son Dustin is a long time friend of King's too.

Here are the photos and the notes Michael shared with us:

==

This is the total construction of the Mugen Civic RR Advanced Concept car from baking the cake to prep work to sculpting and decorating, leading to the finished product. You've seen the finished product, now you'll see what it takes to put this cake together.

Baking the cake using Betty Crocker Super Moist:


Wrap after baking then put into the freezer:


Prep the cake board:


Cut out a foam board template to 1/12 scale of the car:


Utilize template to begin stacking the cake:


Layering the cake with frosting against the foamboard template until the car shape is covered completely in buttercream frosting:


Templates to the exact size are made for all 4 sides:

Templates are pinned to all sides and outlined:

Mugen Civic starting to take shape:


The finished product! This cake took about 5 hrs to decorate not including the baking and other prep work. We even added a "Happy Birthday" message in Japanese to Kojimo San. I 'm honored and humbled to do this project and based on the reaction it was well received. Thank you so much for the opportunity!


Kojima San being surprised with the cake at Dyno Day!:


Hondafest NW 2016: Iron Sharpens Iron

IRON SHARPENS IRON


Collaborating remotely for King Motorsports from Oregon has its pros and cons. On the downside, I don't get out to Wisconsin to see the shop, cars and staff as often as I'd like to. But on the upside, I get to experience the car culture of the Pacific Northwest, with its own unique blend of Mugen-inspired vehicles. And there a few unicorns I have yet to see in person.

Last weekend I set the alarm for 5am and hit the road by 6am for the three hour drive to Hondafest NW at Pacific Raceways just southeast of Seattle. Hondafest NW is an annual Honda and Acura car show put on by NW Motiv. This year there would also be drag races and autocross.

Pacific Raceways has a 2.25-mile road course, drag strip, and plenty of asphalt for autocross crafting. Somehow this entire facility is hidden away by Washington's treescape, and it reminds me of visiting Trees of Mystery. Except there are a gazillion Hondas in line trying to get in.

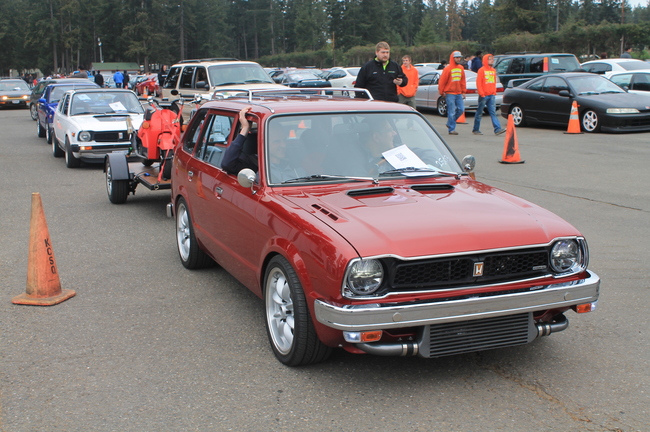
This line of Honda and Acuras of all ages and levels of polish are 3 wide and maybe a half mile long, but is thankfully moving along.

The roll-in is a glorious chorus of enthusiastic revving, the kind you only do when you are with your own kind and in the middle of the woods with nobody to complain. Mostly we have raspy tenors but there is the occasional baritone and bass. The smell of fuel reminds me of the Dyno Day roll-in at King Motorsports-- my favorite part of the event.

I glance at my fuel meter a few times. We've all been in line about 30 minutes, maybe more? In the lane next to me a maroon Civic sedan starts to ooze white smoke out of the hood just after the passengers offload a custom lowrider adult tricycle off the roof.

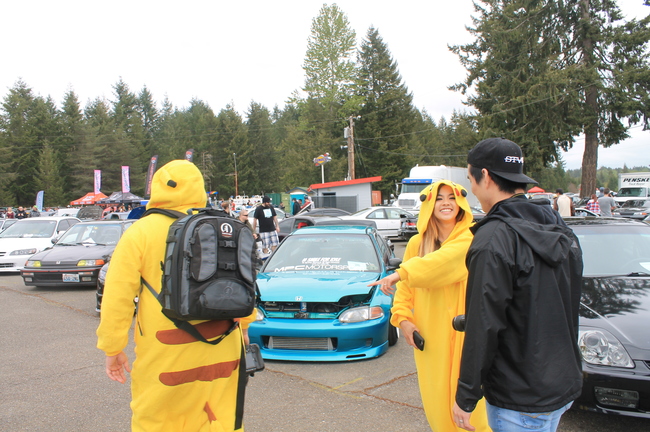
Having somewhat misjudged my bathroom breaks, I start glancing around for a porta-john, considering if I should give up my place in line, pull over, and take a break. Just then I catch a glimpse of bright blue in my rearview mirror, about 20 cars back-- Bill Master's EP3 was maneuvering into the special entrance reserved for show cars. Following closely were Mel Diego's white EP3 and Huy Hoang's red DC5. It was then I knew it would be a good show. The long drive here would definitely be worth it.

A few minutes later, I had paid and was turning into the VIP parking area. Helpful event staff guided us on exactly where to park, and that seemed to help keep things organized. I parked my black EP3 next to a nicely sorted black RSX, loaded up my backpack, grabbed my camera and headed for the show car corral by way of the restrooms.


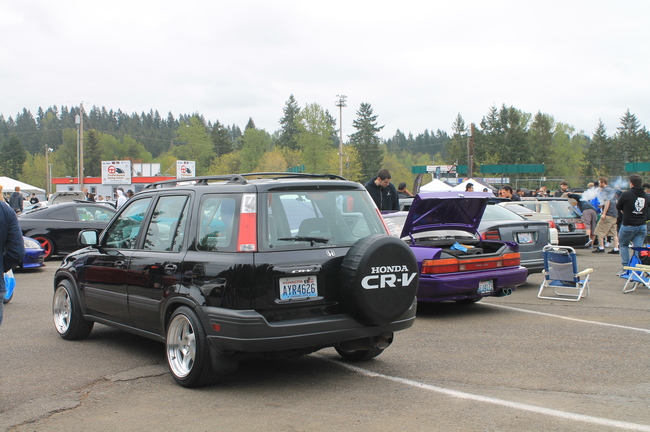
The show cars were a really interesting mix. Quite a good mix of RSX, Integra and Civics. There was a healthy showing of Accord and Prelude, plus a few old school CRX and very early gen Civic hatchbacks. Someone brought their Odyssey, and I even found a very clean CRV. There were a few NSX there too.


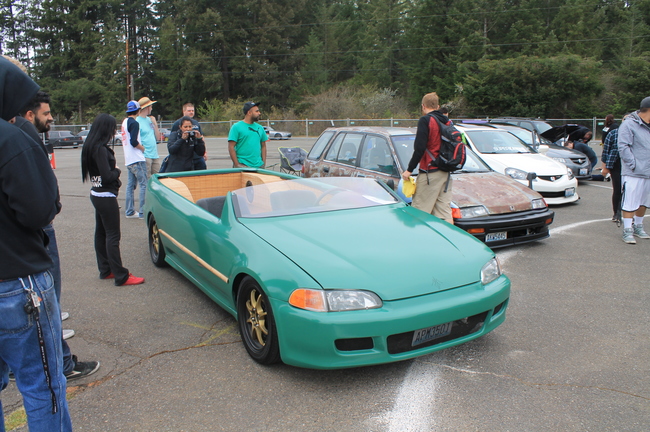
The variety is what I love about one-make car meets. Normally a dude with a chopped-up Del Sol wouldn’t consider shining up his car to show at an event for fear of getting the stink eye. But show up to a Honda event with said Sol, and you are instantly family. Sure they may look at you like you are the oddball uncle, but you're still family and people are glad you showed up. Tell me more about how you turned this Honda into a bamboo-lined tropical cabana, Uncle Steve.


I run into Jerimiah Styles, who has just completed the installation of his Mugen aero kit on his white 2nd gen Integra. He’s showing his car and has recently swapped his bronze MF8s for time attack RNRs. His car is looking great and the King Motorsports sticker on his windshield nabs him a bonus +5 HP.


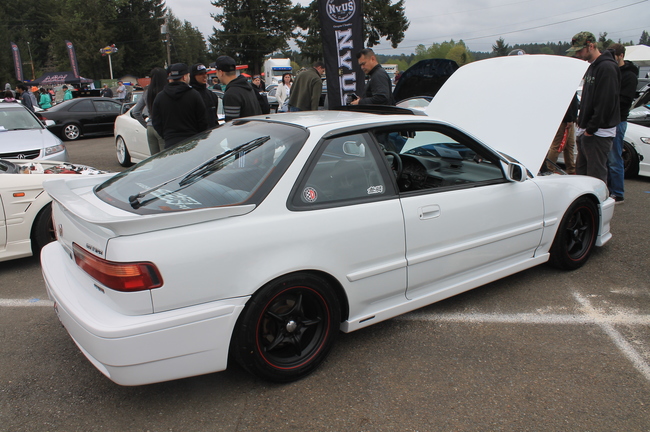
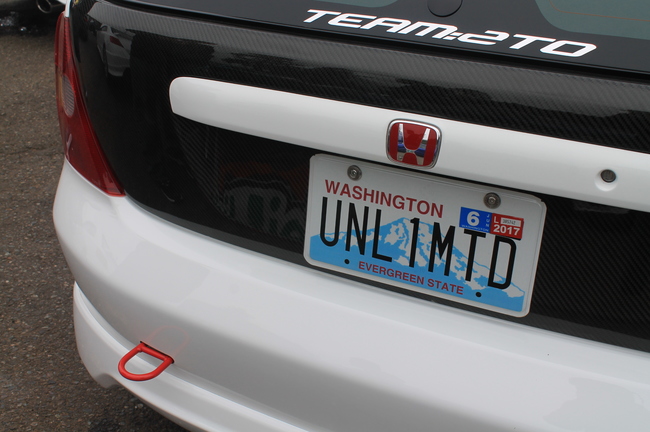
He introduces me to Mel and Bill, who have the only two EP3s in the show. Their builds are legends here in the Pacific Northwest. Mel generously gives me a tour of his white 2003 Civic Si hatch, something I’d been looking forward to. This car is so well-known that it’s usually the first image that comes up when you Google “EP3.” Mel is an old friend of King’s CEO Scott, having worked closely together to assemble Mel’s Mugen wish list.


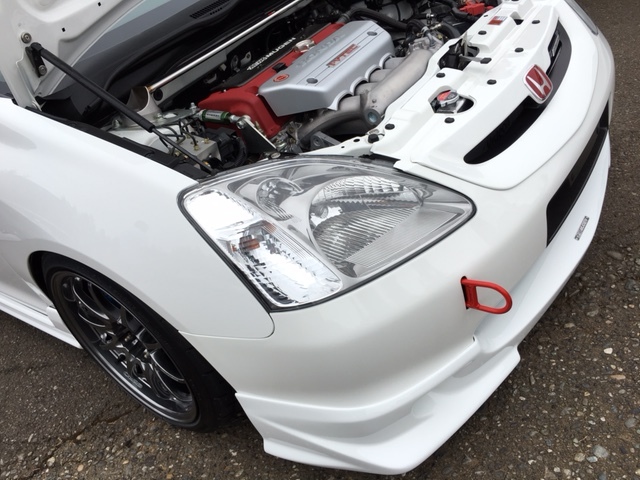
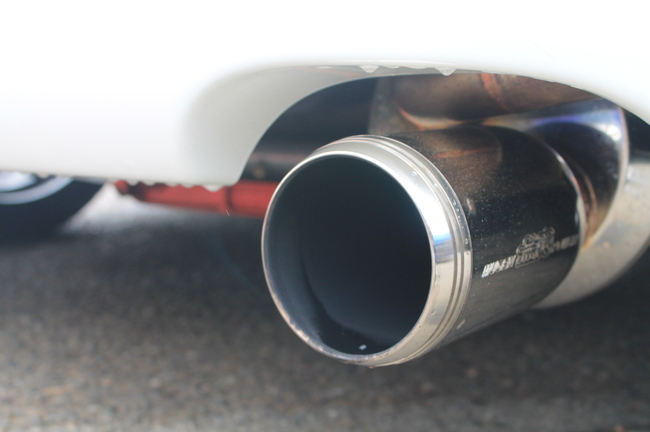
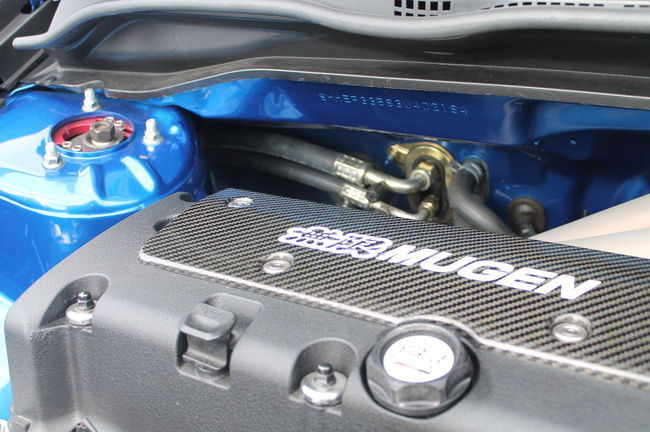
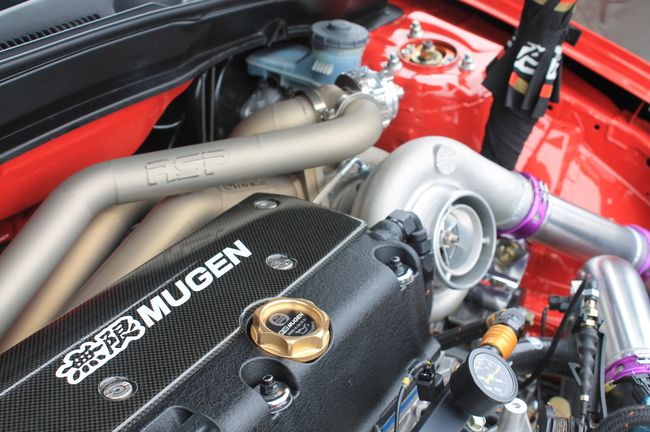
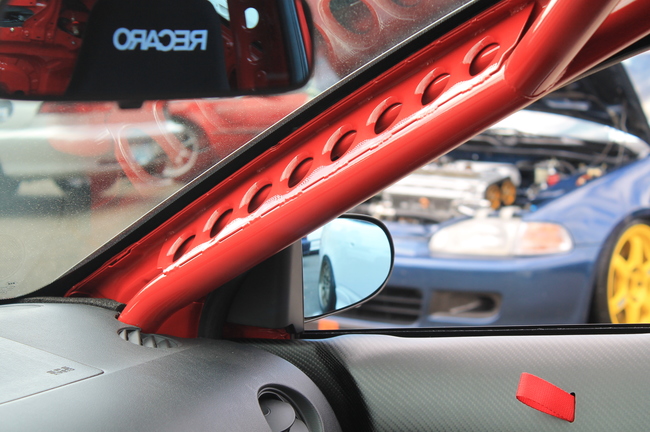
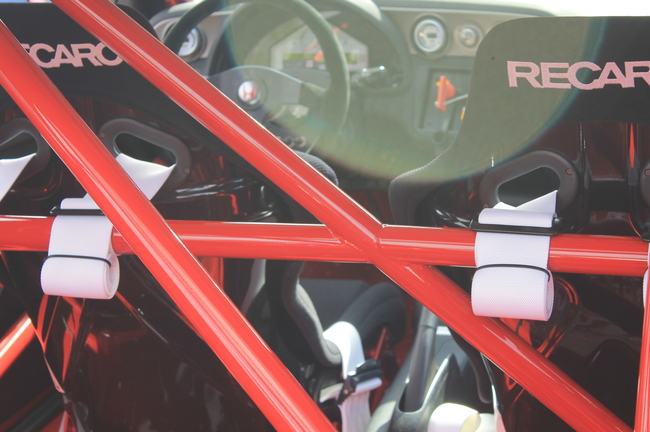
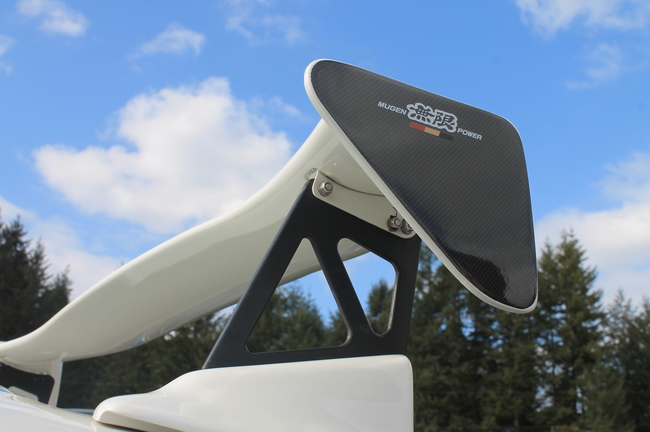
Mel points out all his parts and describes each with care. He moves along swiftly from part to part, because there is just so much to show off. Full JDM front bumper conversion. Type-R headlights and side skirts, Mugen front lip and radiator duct, Mugen wing, Mugen seat rails, Mugen Twin Loop, Mugen hood, a custom-modified Mugen roll cage that is so well integrated with the OEM interior that it looks like the plastics had been molded exclusively for the cage. His Mugen grill is properly painted with a black background to add extra dimensionality. His CAI draws air from behind the driver side opening on his Mugen lip.


“It’s the details,” he says. And he’s right. Because I also own an EP3, I can process the walkaround at the speed the details are hitting my ears. And I can also appreciate how rare these parts are. I’ve only seen a few of these Mugen pieces on one other car, and that’s the Mugen EP3 in the King Motorsports showroom.


Mel describes the stages of his car’s evolution as “Chapters.” He’s on Chapter 2 now. Chapter 3 involves adding Mugen MF10 17x8, Mugen brakes and Mugen seats. “With some luck and the help of King Motorsports, that will be the final chapter,” he declares. Something tells there will still be an amazing Chapter 4.


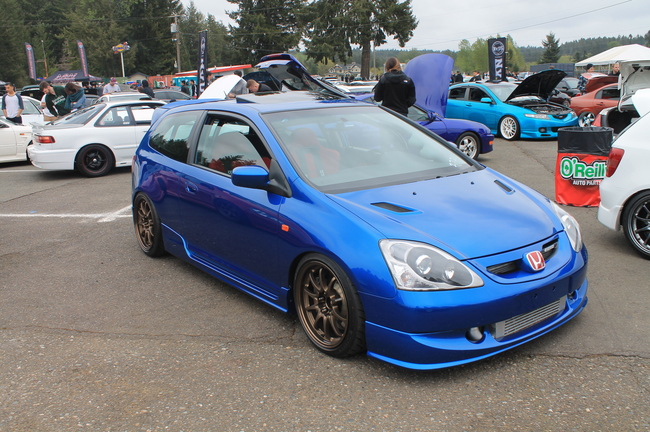
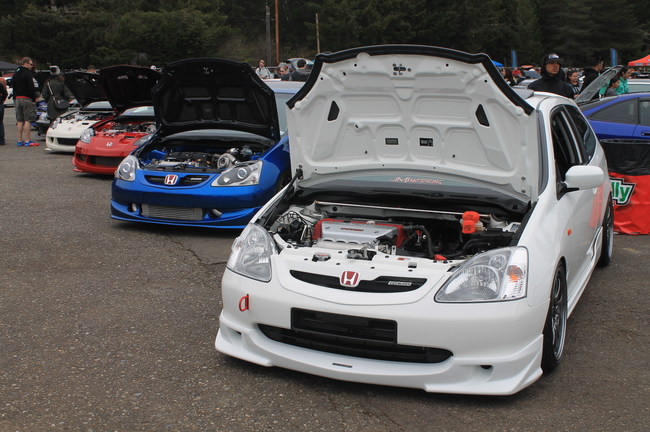
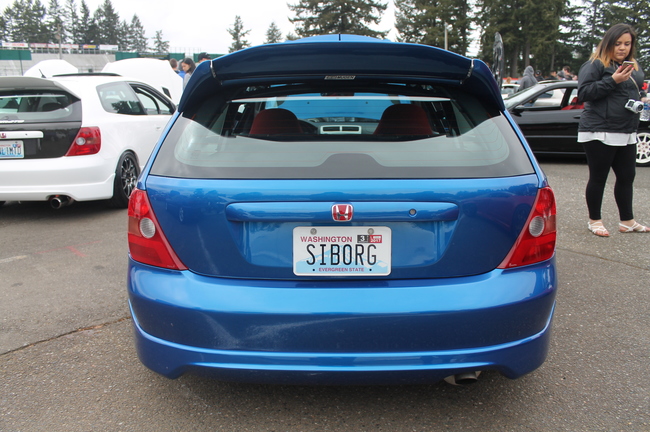
Parked next to Mel is Bill’s turbocharged 2003 Civic Si, equally stunning in the dedication and hard work put into it. You can tell these two have influenced each other and made each other’s builds better. Bill also has many of the same Mugen parts and JDM upgrades, but his build still feels distinct. He points out that his paint is actually a remixed, brighter version of Honda’s already vibrant Vision Blue Pearl. Now that he points it out, I’ll never be happy with Honda’s blue again. His version really is so much better.


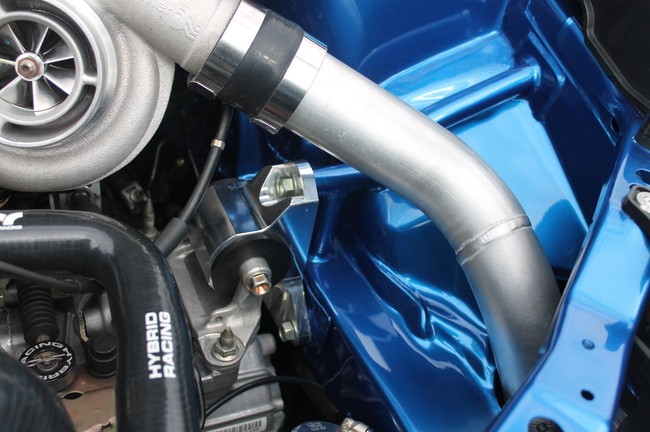
Having followed Bill on Instagram I’ve seen that his day job is a woodworking magician, creating the HGTV-worthy kitchen and home remodels. That same craft and precision finds its way into his EP. My friend Julio points out the custom bracing for the motor mounts and the custom re-routed AC lines. They were so well done I didn’t even notice them. Overall there is a strong sense of restraint with Bill’s EP build. It feels curated, like he methodically chose only the best of the best parts and mods, the ones that would still be impressive and relevant decades later.


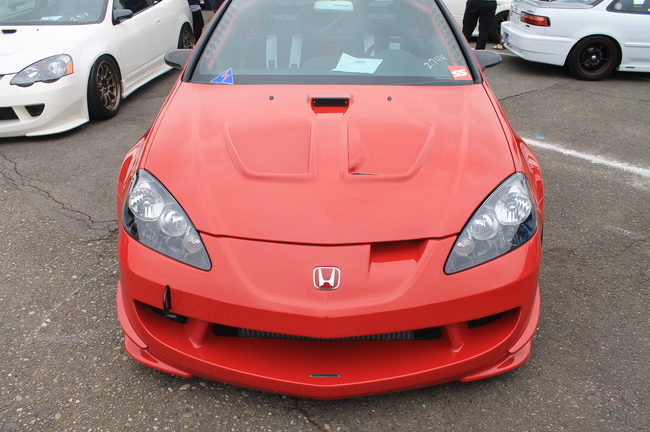
Parked next to Bill is Huy’s turbocharged 2003 RSX Type-S – aka REDRUM1. This car has all the shine of a Mugen show car fused with the raw functionality of a gutted and purpose-built race car. It sits right on the elusive line between show car and race car. Huy treats me to a guided walkaround, and I am floored. I find it hard to comprehend the amount of time, skill and resources that went into this vehicle.

Huy has an elusive perfect balance of finances + skill + taste that produces something masterful. If you only have finances + skill, you might go overboard on the mods. If you only have skill + taste, you probably restore a car to its original glory. If you have finances + taste, you go buy an NSX. But if you have all three – you build the DC5 elevated to what must be its perfect functional and aesthetic balance.


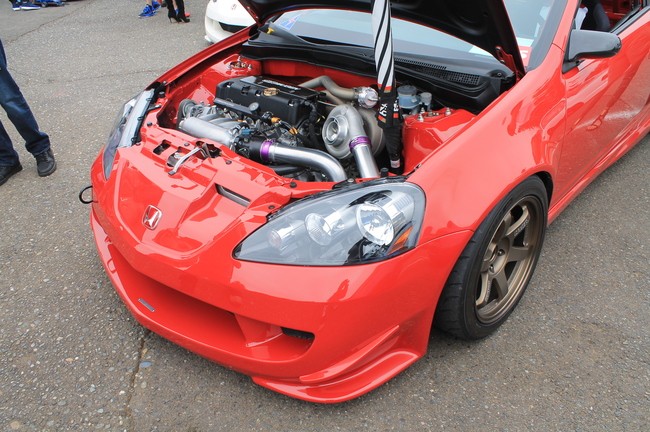
Like the artist he is, Huy tells me the build started with one thing – the desire to fit a specific set of wheels. To do that, he had the fenders masterfully pulled out and the whole car widened. Everything else flows from there. There is a reason Super Street called it “one of the best Honda builds to date!”


Huy brought two other cars with him, a white Mugen-equipped DC5 and a gorgeous green EK hatch. He tells me that the Autoart Mugen DC5 1:18 die-cast model was his inspiration for his white DC5, and I can see the similarities. It hits me that he’s actually creating big-scale, functional model kits, which in turn are replica of full scale cars. It is life imitating art imitating life. This loop produces impressive refinement in Huy’s hands.
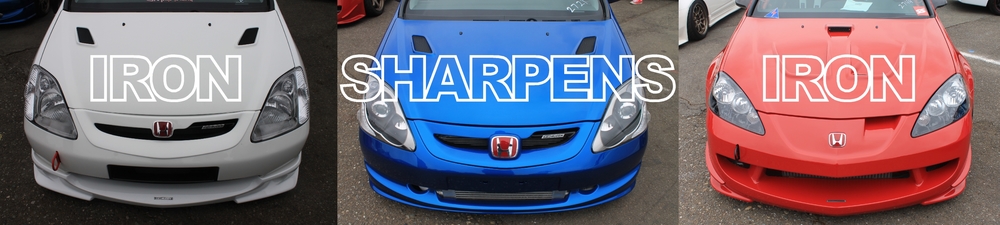
Iron Sharpens Iron

It’s no coincidence that Mel, Bill and Huy are parked next to each other. They are friends outside the car show too, parking their beloved rides in each other’s home garages from time to time. These three friends have sharpened and pushed each other to create functional works of art.

**

More info:

Mel Diego’s 2003 Honda Civic Si
Instagram: @hur1cne@hov
http://www.superstreetonline.com/features/htup-1108-2003-honda-civic-si/

Bill Master’s 2003 Honda Civic Si
Instagram: @siborg_ep
http://www.superstreetonline.com/features/htup-1301-2003-honda-civic-si/

Huy Hoang’s 2003 Acura RSX Type-S
Instagram: @wiiizzer
http://www.superstreetonline.com/features/1510-turbocharged-mugen-2003-acura-rsx-type-s/

Full set of photos from Hondafest NW:
https://www.facebook.com/media/set/?set=a.10153475333141319.1073741856.110076751318&type=1&hc_location=ufi

Vintage Catalogs - King Motorsports Unlimited

We recently came across an OG customer who had all three catalogs that King created in the late 80s / early 90s. Each of these hand-assembled catalogs was called a Volume and included a carefully curated collection of Mugen parts, King parts, information about Mugen, and information about King's racecars and services. Each include thoughtful introductory letters written by King's CEO Scott and are a terrific snapshot of Honda/Acura performance culture at the time.

Because we don't spend much time looking in the rear view, we actually didn't have these Volumes anymore in our own library of literature. In fact we only printed about 1000 of each Volume. So Bill Yoon generously loaned the Volumes to us (including the price list inserts) for us to scan and make available to share with our friends!

Click an item below to download the PDF scan.

King Motorsports Unlimited Catalog Volume 1

KMS Volume 1.pdf (4.43 mb), Circa 1989

KMS Volume 1 Price List.pdf (1.11 mb)


King Motorsports Unlimited Catalog Volume 2

KMS Volume 2.pdf (5.24 mb), Circa 1991

KMS Volume 2 Price List.pdf (909.23 kb)


King Motorsports Unlimited Catalog Volume 3

KMS Volume 3.pdf (3.79 mb), Circa 1993

KMS Volume 3 Price List.pdf (2.24 mb)

Refinishing My Mugen B16A Header

The following post comes to us courtesy of Mugen aficionado Jerimiah Styles! In this post he shares his experience cleaning up his new-to-him Mugen header. Many thanks to him for another contribution of his time and insight!

== ==


I recently picked up a pre-owned Mugen B16A 4-2-1 header from a buddy of mine. He'd offered this header to me many times, but I had until recently declined, as the header needed a little bit of work (cleaning and welding a crack on the bracket). I had always been intimidated to attempt such a project until I received this header. I did a bit of research and decided I was going to sand it up and attempt to polish it. However, I didn't want a high polished "chrome" look, I opted for the original polished raw metal route, the way this beauty came from Mugen.

Here's how it looked when I first picked it up.


One of my good friends is a woodworker and suggested that I try synthetic sand paper. It lasts much longer than conventional sand paper and is easier to use. Unfortunately the finest grit I could find it was 350, but this is needed to really get all of the oxidization off. As you can see just seconds into wet sanding and I was already seeing results. (below)


For this project I wet sanded the entire time. Here is with the 350 grit. Make sure the residue (seen pictured) is constantly wiped down with a rag and kept clean. This not only allows you to see your results, and where you need to sand, but also assures that you aren't damaging the header by getting any pieces of dirt in there that could potentially scratch the surface of the header. (below)


I used a small spray bottle to keep the sand paper wet, and also to keep the header clean throughout the process. This is about halfway through. You can take each step as far as you would like per your own personal preference. (below)


Next I switched to 1500 fine grit, again repeating the same process as above getting progressively finer with 2000, grit, and then 3000. This was as far as I wanted to take it. Again if you'd like a higher polished header go for it, and keep on sanding. After you're happy with the luster that you have achieved, you can take a metal polishing compound and add as much gleam as you'd like. (below)


Here is after sanding. Again repeating the steps and taking each as far as you'd like, 350 fine grit, 1500, 2000, 3000 Before doing any kind of polishing.(below)


A critical step in making sure that your header turns out beautiful is to wipe it down with 99% rubbing alcohol: after polishing, after installation, and before starting your engine. This will remove any remaining polishing materials and oil from the fingers of whom ever installed it. As the header ages it takes on a gorgeous golden hue that adds a touch of Mugen class to any engine bay.


Fakespotting: Mugen Hi-Pressure Radiator Cap 19045-XGER-0000-B2

The following post comes to us courtesy of Mugen aficionado Jerimiah Styles! Many thanks to him for another contribution of his time and insight!

In this post Jerimiah covers some of the differences he's observed with the Mugen Hi-Pressure Radiator Cap. Note that there are two genuine versions of this cap:


19045-XGER-0000:
Civic (1992-1995)
Civic (1996-2000)
Civic (2001-2005)
Civic (2006-2007)
Del Sol (1993-1997)
RSX Type-S (02-04)
S2000 (2000-2003)
S2000 (2004-2008)
TSX (2004-2007)
Integra (1994-2001)
Fit (2007)
RSX Base (02-06)
RSX Type-S (05-06)

19045-XGER-0000-B2:
Civic (1988-1991)
CRX (1988-1991)
Integra (1990-1993)
Prelude (1992-1996)
Prelude (1997-2001)
(this version displays "B2" on the decal and fits Koyo radiators)


This is the way the part is described in our King Motorsports / Mugen 1999 Mugen Pricelist for Integra (
19045-XGER-0000):

This radiator cap is a high-pressure type that increases the pressure inside the radiator, thus raising the coolant boiling point and increasing the cooling efficiency. The open valve pressure is 1.3 kg/cm2 compared to the normal 1.1 kg/cm2. It demonstrates its power under high-load situations such as circuit driving.

== ==

The genuine Mugen cap comes in the traditional Mugen window box with Mugen stripes across the top, and high quality foam to protect the product. Printed Japanese instructions are included.

Genuine Mugen Radiator Cap Package Front

The back of the genuine part has the typical characteristics of all genuine Mugen parts, kanji in the top left corner and sticker with part number and M-Tec information.

Genuine Mugen Radiator Cap Package Front

In this below image, this fake window box is entirely different from its genuine counterpart. These knock off companies are always evolving and continually getting better at their packaging, getting closer and closer to the authentic Mugen boxes. Always look at the part itself and its distinguishing signs to discern if the part you are buying is indeed real.

Mugen Radiator Cap Package Comparison

Here is a close up of the genuine cap. The authentic Mugen cap is high quality metal, nicely polished, but not a chrome finish. There are no indentations or stampings on this cap. The decal has a metallic foil quality with golden letters in the red area along with "NEVER OPEN WHEN HOT" printed in white, and a brushed metal look to the script in the black portion.


Now here are a sample of the many fakes that are out there. Fonts, font colors, printing quality, decal size, decal placement, and stamping on the metal are all indicators of a fake. We recently discovered a company on eBay selling just the decal!

Mugen Hi-Pressure Radiator Cap Genuine vs Fake Comparison

Here are a few pictures of the genuine cap's bottom and the included instruction sheet:


Why does it matter?

The Mugen Hi-Pressure Radiator Cap is more than just engine dress-up. It's a functioning part that increases your open valve pressure to a specific 1.3 kg/cm2 for performance reasons. Those that use fakes are not only missing out on performance benefits, but have no idea if the cap has even been manufactured to meet OEM standards. The open valve pressure can be too high, too low, or inconsistent. Fakes can come apart due to bad seals and assembly, causing nasty spills and other headaches.

== ==

Visit the King Motorsports store for genuine Mugen hi-pressure radiator caps!

http://www.kingmotorsports.com/p-38-mugen-radiator-cap.aspx


Fakespotting: Mugen "Formula" Shift Knob 54102-XG4-K0S0

The following post comes to us courtesy of Mugen aficionado Jerimiah Styles! Many thanks to him for another contribution of his time and insight!

In this post Jerimiah covers some of the differences he's observed with the Mugen "Formula" Shift Knob:

54102-XG4-K0S0-BU/BL/G/S/R

This is the way the shift knob is described in our King Motorsports / Mugen 1999 Mugen Pricelist for Integra:

"Formula Quality" is the essence of Mugen's approach to production, since we also manufacture components for formula engines. This machined shift knob exemplifies our high manufacturing precision. Each product is machined individually from aluminum, and then given an alumite hard-coat finish before the Mugen logo is imprinted by laser. This is a sports-type shift knob for the discerning eye. Available in five colors: blue, black, gold, silver, and red. Supplied with a shift pattern plate. For five-speed manual transmission only.

== ==

The Mugen formula shift knob (discontinued) is a commonly replicated item that comes up often on Mugen part searches. While this knob was made in five colors by Mugen, I am going to stick to the black knob for this blog.


Comparing the window box package, they are basically identical from the front. One important thing to look for is the inclusion of the round shift guide badge. Fakes will not include this badge.

Mugen Formula Shift Knob Genuine vs Replica


The back of the packaging shows more tell tale signs. While the top left corners appear identical, the bottoms are different. The Mugen package has a sticker with printed description and the fake does not. The fake is also missing the Mugen part number.


Comparing the knobs themselves, the first thing to look for is the shape at the top. The Mugen is smooth and rounded. The fake is usually flat and often shows rings from poor machine work. The hard-anodizing of the genuine Mugen part is stunning and shows a depth that the painted surface on the fake can not compare to. A closer look at the Mugen logo/kanji shows that the fake uses a thinner font for the MUGEN logotype.  

Mugen Formula Shift Knob Genuine vs Replica


The genuine shift knob's logo/kanji come in both a raw-metal engraved version ("gen 1") and in white ("gen 2"). Below is an image of two genuine shift knobs. You can see the silver knob has a raw-metal logo/kanji.


Mugen Formula Shift Knobs


In the image below you can see how the genuine knob is domed/rounded on top, while the fake has a flat spot. Flat spot = fake.


One more thing to look for is the vertical placement of the Mugen logo/kanji. On the genuine knob, it sits higher than half way on that section of the knob. On the fake, the logo/kanji is vertically centered within that section.

Mugen Formula Shift Knob Genuine vs Replica

Here are instructions that are included with the genuine shift knob. Fakes do not include instructions:

Mugen Formula Shift Knob Instructions

Why does it matter?

Because of the slipshod manufacturing on the fakes, they are known to actually cut driver's fingers. Needless to say that's a nasty surprise. The authentic knob is far better quality that will pass the test of time and add a touch of class to any enthusiast's build. While the hard-anodized finish on the genuine knobs can unfortunately fade over time, it is another way to determine authenticity when buying a used part. The painted finish on the fake knob very easily scars, resulting in an unsightly eyesore in your interior.

Minor update: As you might expect, even fakes have their exceptions. Vivian R. shared this fake knob and package that even includes knock off shift badge and instructions!

Fake Mugen shift knob package

== ==

Visit the King Motorsports store for genuine Mugen shift knobs!

http://www.kingmotorsports.com/advsearch.aspx?ctl00%24HeaderControl%24SearchBox%24searchterm=&IsSubmit=true&SearchTerm=mugen+shift+knob&SubmitSearch=Search


Fakespotting; Mugen Number Plate Bolts 75700-XG8-K0S0

Mugen License Plate Bolts 75700-XG8-K0S0

The following post comes to us courtesy of Mugen aficionado Jerimiah Styles! Many thanks to him for another contribution of his time and insight!

== ==

A beautiful touch to any Mugen equipped vehicle, Mugen Number Plate Bolts (75700-XG8-K0S0) combine high-quality stainless steel construction with decorative Mugen Power engraved washers. The bolts are 3mm hex head, 20mm long, and are designed to be used as a garnish for the license plate frames of your car. However, clever tuners have discovered that they can be used for enigine bay aesthetics and also fit perfectly with the Mugen K-Series Carbon Fiber Ignition Cover (12500-XK2B-K0S0). Anywhere a 3mm bolt can fit, you can decorate it with a Mugen number plate bolt.

A look at the window boxes shows the extremes that these companies are going to replicate these items. The front of the boxes appear to be the same, but are they? The colored flag at the top of the box is mis-proportioned on the fake, with fatter color bands, and the Mugen logo at the bottom of the box is noticeably altered.

Mugen Number Plate Bolts Package Front

A look at the back of the boxes shows that the two products are labeled entirely different. Kanji appear at the top the genuine product and the bottom lists M-TEC contact information. The fake window box shows just a portion of the original, and the description is in Japanese (instead of English).

Mugen Number Plate Bolts Package Back

The Japanese printed instructions inside of the original Mugen number plate bolts is a gray print. The product illustrations are placed on the right of the page.

Genuine Instructions Sheet

The instructions inside of the fake box are a much darker, bolder, black print and the product illustrations are placed on the left side of the page. The printed area also takes up less of the page.

Fake Instructions Sheet

A close look at the washer shows the high quality stainless steel and engraved Mugen Power logo. The hex bolt has a slight bezel around it, allowing you to tighten them down without scarring or stripping the finely detailed surface. The bolt itself sits slightly elevated from the washer with clear cut jewelery-like edges.

The fake bolt is much less refined. The logo appears to be printed or painted (not etched) and the bolt sits flush with the washer, unlike the genuine part.


Photo courtesy of Paroykos


Why does it matter?

Replica Mugen parts built with subpar methods result in a far inferior product. In the case of the Mugen number plate bolts, an allen wrench does not fit properly into the bolt. The bolts become damaged and stripped over time, potentially seizing to wherever they have been placed.

Fakespotting; Mugen Oil Filler Cap (Gen 1) 15610-XG7-K0S0

The following post comes to us courtesy of Mugen aficionado Jerimiah Styles! Many thanks to him for another contribution of his time and insight!

== ==

Back again for some more Fakespotting. This time we will discuss the first generation Mugen oil filler cap.

Mugen Formula engines, including those for Formula 1, naturally require components manufactured with high precision. Mugen meets such requirements by machining to exacting specifications at its factories. These oil filler caps are manufactured individually from aluminum at the same factories in the same way. "Formula Quality" is a result of the attention to detail that Mugen pays to its vehicles and products.

Upon first inspection of these caps they appear to be very similar, but a closer look tells a different story. The first thing you'll notice is the quality craftsmanship of the genuine piece. The replica is oddly shiny and lacks the brushed aluminum finish of the original.

1 Mugen Gen 1 Oil Filler Cap Genuine versus Fake

The center medallion of the genuine Mugen piece is etched aluminum. The medallion comes from Mugen Scotch-taped (not yet attached) to the oil cap. The medallion has an adhesive on the back and is to be applied by the user after the cap has been screwed into place so the Mugen logo appears straight in your engine bay.

2 Mugen Gen 1 Oil Filler Cap Genuine versus Fake

The "medallion" of the fake cap is more of a print, and comes pre-installed from the manufacturer. So fake caps may end with crooked Mugen logos once screwed into the head cover.

3 Mugen Gen 1 Oil Filler Cap Genuine versus Fake

The underside of the cap reveals some more secrets. The genuine cap again shows top notch machine work seen in genuine Mugen craftsmanship. The fake cap has noticeable ring marks where the inside of the cap appears to have been shaved away, far from the quality of the genuine Mugen part.

4 Mugen Gen 1 Oil Filler Cap Genuine versus Fake

The black sealing rings around the base of the two are also noticeably different. The grooved, flat seal of the genuine cap has more surface area, creating a better seal than just the o-ring of the fake part. Also the material and heat-resistant properties of the fake o-ring are unknown. Also notice the rough edges around the threading of the fake cap as opposed to the smooth precise edges of the Mugen oil filler cap.

5 Mugen Gen 1 Oil Filler Cap Genuine versus Fake

The side profiles of the two oil caps shows more of the differences in quality. The edges of the real Mugen are much more defined. The brushed look of the genuine cap is very evident in this photo as opposed to the cast look of the replica.

6 Mugen Gen 1 Oil Filler Cap Genuine versus Fake

Below is another version of a replica Mugen oil filler cap that I recently saw. This one has an obvious ring around the base, suggesting that it is more than one piece. This as well as the inferior finish should be obvious signs of a fake. The high quality of the Mugen cap will not oxidize over time -- it should retain its original luster if kept after properly.

7 Mugen Gen 1 Oil Filler Cap Fake

Why does it matter?

Fake parts are passed off as genuine every day, knowing how to identify real from fake could mean saving you potential headache down the road. In the case of an oil cap, an improper or inferior seal could cause oil to leak from the top of your head cover, potentially causing harm to your engine. Always buy genuine Mugen products from an authorized dealer such as King Motorsports Unlimited.

I would like to thank Roy Brantley for providing photos.

****

Visit the King Motorsports store to get your genuine Mugen oil filler cap!

http://www.kingmotorsports.com/advsearch.aspx?ctl00%24HeaderControl%24SearchBox%24searchterm=&IsSubmit=true&SearchTerm=mugen+oil+filler+cap&SubmitSearch=Search


Fakespotting: Mugen Formula Head Cover 12310-XF0-K1S0

The following post comes to us courtesy of Mugen aficionado Jerimiah Styles!

== ==


In this installment of Fakespotting I discuss the discontinued Mugen Formula Head Cover for B Series VTEC DOHC engines found in the Integra, Civic, CRX and others.

Mugen Formula Head Cover: 12310-XF0-K1S0

These aluminum engine head covers are manufactured individually using sand casts in the same way as covers for Mugen Formula engines. The genuine cover comes with a new gasket kit, shortened studs for the center four bolts of the cover, a fresh new tube of Hondabond, brand new washers, and printed Japanese instructions.


The Mugen letters are stretched across the length of the bottom two bolt holes (the 'N' begins at the hole) and the high quality of the aluminum is as gorgeous as a Rolex watch!

Next we have the fake head cover. The first obvious difference between the two is the Mugen lettering, it's not quite as stretched out (less "italic" or slanted) -- a different font if you will. The finish on the lettering is polished, as opposed to the brushed look of the authentic Mugen cover. Below is the fake:


The quickest way to spot a fake: Compare where the start of the letter N in MUGEN lines up to the bolt hole above it:


A closer look at the kanji is another sign; smooth, well-defined edges and the fine craftsmanship of genuine Mugen products is evident here. I count a total of eight bumps at the bottom of the genuine Mugen kanji.


The fake cover's kanji is far more angular and less defined. I counted seven bumps, not the eight of the genuine one. A closer look shows a polished finish which is more susceptible to oxidation and discoloration as opposed to the superior quality of the Mugen piece.


A look underneath the authentic cover looks like something you would expect to see on an F1 race car. The baffles are screwed in place and the product is clean enough to eat off of.


Underneath the replica it's an entirely different story. The baffle is riveted on, and the center piece is a different color, not the bronze color of the real one. Notice the included printed yellow WARNING insert? It instructs the unlucky owner to wash the inside of the cover before installing because METAL SHARDS MAY BE PRESENT-- potentially causing damage to your VTEC engine!


The packaging really needs no explanation. Here's the genuine box:


And the box for the fake:


On the side of the box, you'll see various color options. Replica valve covers were available in multiple colors, not something Mugen offered.


A very rare look at the installation instructions from the genuine packaging. (Front)


(back)


Why does it matter?

Replica parts made with inferior materials could potentially warp, resulting in an improper seal to the head and causing oil leakage. The possibility of metal shavings being inside of the fake cover is another very dangerous hazard to your engine-- one that could ultimately lead to some very expensive damage down the road.

Knowing what you're looking for when purchasing a Mugen Formula Head Cover is important. These are now discontinued and can no longer be purchased new from an authorized dealer such as King Motorsports. Finding them with the original packaging is becoming harder and harder. It's not uncommon for these head covers to fetch a premium, and there are sharks out there trying to sell fakes for those prices. Know what you're looking for and you can save yourself from a potential scam.

Fakespotting: Mugen Sports Pedal Kit 46545-XG5-K2S0

The following post comes to us courtesy of Mugen aficionado Jerimiah Styles!

== ==

The Mugen sport pedal kit is one of the more commonly replicated parts found on the market today. Let's go over some tell tale signs to identify real from fake. In this post we'll look at a specific pedal kit that is available for the CRX, Del Sol, '90-'05 Civic, Integra, RSX, TSX and a few more. Suffice it to say this is a very common pedal kit:

Mugen Sports Pedal Kit (MT): 46545-XG5-K2S0

We'll start with the authentic Mugen kit. Notice the orange tape on the clutch and brake pedals and white tape on the gas pedal. The high quality of the aluminum is also a sign that you have a genuine Mugen product. Notice the Mugen logo on the brake/cluth is a single line with kanji and MUGEN.


Now, let us compare the replica version. Red tape has replaced the orange, and we have a finish on these that is noticeably different than the genuine Mugen set. You will also notice that the logo is different on the brake/clutch -- kanji is stacked above MUGEN -- however this does not determine authenticity. The older sets of genuine Mugen sport pedals did indeed have this insignia on them. They are referred to by some as first generation sport pedal kits, highly sought after by Mugen collectors.


A look at the authentic Mugen accelerator pedal shows the high quality of the aluminum.


A look at the back of the replica accelerator pedal shows the difference in quality and tell tale red tape of the replicas (versus white tape on the genuine). The overall shape of the fake pedal is more jagged and slightly larger. The fake pedal does not install the same as the Mugen -- which is riveted or screwed on. Keep in mind the fake is a brand new, out of the box set -- far from the craftsmanship of its authentic counterpart.


Next let's look at the Mugen brake and clutch pedal (these two Mugen pedals appear to be identical). Again the orange tape and the part number is on the bottom of the real ones.

Now the replica. There's that red tape again, and notice the lack of part number and "Made in Japan" stamp.


This particular kit was available in the two types of packaging you see below (which are both genuine). The clear window box is the most commonly seen replica package. Some replica packages even include a photocopy of the genuine installation instructions, making them even harder to spot. Since the replica packages so closely resemble the genuine ones, the best way to tell fake from real will be to inspect the pedals themselves.

The cardboard box version was available via Honda dealers and has a different part number (but is the same kit).


== ==


Why does it matter?


Replica pedals are known to come apart due to inferior manufacturing and materials. This is extremely dangerous and can cause slippage on the pedal -- or worse -- interfere with pedal operation. Imagine not being able to press the brake pedal because the accelerator cover is lodged behind it!


Want to make sure you get genuine pedals that won't fall apart on you? Buy from an authorized Mugen dealer like King Motorsports.

http://www.kingmotorsports.com/p-225-mugen-sports-pedal-kit-mt.aspx


Thanks again to Jerimiah for his insight and we look forward to more posts from him!


** UPDATE **

Since we published this post, we've had some questions about the variations within the genuine Mugen pedals. Over time, Mugen improved and modified their manufacturing process and the design of the pedals. Enthusiasts have identified three distinct "generations" of pedals: Gen 1, Gen 1.5, and Gen 2. Below is a comparison chart that helps identify the various generations of genuine Mugen pedals.


Genuine Mugen Sport Pedal Generation Comparison