Hondafest NW 2016: Iron Sharpens Iron

IRON SHARPENS IRON


Collaborating remotely for King Motorsports from Oregon has its pros and cons. On the downside, I don't get out to Wisconsin to see the shop, cars and staff as often as I'd like to. But on the upside, I get to experience the car culture of the Pacific Northwest, with its own unique blend of Mugen-inspired vehicles. And there a few unicorns I have yet to see in person.

Last weekend I set the alarm for 5am and hit the road by 6am for the three hour drive to Hondafest NW at Pacific Raceways just southeast of Seattle. Hondafest NW is an annual Honda and Acura car show put on by NW Motiv. This year there would also be drag races and autocross.

Pacific Raceways has a 2.25-mile road course, drag strip, and plenty of asphalt for autocross crafting. Somehow this entire facility is hidden away by Washington's treescape, and it reminds me of visiting Trees of Mystery. Except there are a gazillion Hondas in line trying to get in.

This line of Honda and Acuras of all ages and levels of polish are 3 wide and maybe a half mile long, but is thankfully moving along.

The roll-in is a glorious chorus of enthusiastic revving, the kind you only do when you are with your own kind and in the middle of the woods with nobody to complain. Mostly we have raspy tenors but there is the occasional baritone and bass. The smell of fuel reminds me of the Dyno Day roll-in at King Motorsports-- my favorite part of the event.

I glance at my fuel meter a few times. We've all been in line about 30 minutes, maybe more? In the lane next to me a maroon Civic sedan starts to ooze white smoke out of the hood just after the passengers offload a custom lowrider adult tricycle off the roof.

Having somewhat misjudged my bathroom breaks, I start glancing around for a porta-john, considering if I should give up my place in line, pull over, and take a break. Just then I catch a glimpse of bright blue in my rearview mirror, about 20 cars back-- Bill Master's EP3 was maneuvering into the special entrance reserved for show cars. Following closely were Mel Diego's white EP3 and Huy Hoang's red DC5. It was then I knew it would be a good show. The long drive here would definitely be worth it.

A few minutes later, I had paid and was turning into the VIP parking area. Helpful event staff guided us on exactly where to park, and that seemed to help keep things organized. I parked my black EP3 next to a nicely sorted black RSX, loaded up my backpack, grabbed my camera and headed for the show car corral by way of the restrooms.


The show cars were a really interesting mix. Quite a good mix of RSX, Integra and Civics. There was a healthy showing of Accord and Prelude, plus a few old school CRX and very early gen Civic hatchbacks. Someone brought their Odyssey, and I even found a very clean CRV. There were a few NSX there too.


The variety is what I love about one-make car meets. Normally a dude with a chopped-up Del Sol wouldn’t consider shining up his car to show at an event for fear of getting the stink eye. But show up to a Honda event with said Sol, and you are instantly family. Sure they may look at you like you are the oddball uncle, but you're still family and people are glad you showed up. Tell me more about how you turned this Honda into a bamboo-lined tropical cabana, Uncle Steve.


I run into Jerimiah Styles, who has just completed the installation of his Mugen aero kit on his white 2nd gen Integra. He’s showing his car and has recently swapped his bronze MF8s for time attack RNRs. His car is looking great and the King Motorsports sticker on his windshield nabs him a bonus +5 HP.


He introduces me to Mel and Bill, who have the only two EP3s in the show. Their builds are legends here in the Pacific Northwest. Mel generously gives me a tour of his white 2003 Civic Si hatch, something I’d been looking forward to. This car is so well-known that it’s usually the first image that comes up when you Google “EP3.” Mel is an old friend of King’s CEO Scott, having worked closely together to assemble Mel’s Mugen wish list.


Mel points out all his parts and describes each with care. He moves along swiftly from part to part, because there is just so much to show off. Full JDM front bumper conversion. Type-R headlights and side skirts, Mugen front lip and radiator duct, Mugen wing, Mugen seat rails, Mugen Twin Loop, Mugen hood, a custom-modified Mugen roll cage that is so well integrated with the OEM interior that it looks like the plastics had been molded exclusively for the cage. His Mugen grill is properly painted with a black background to add extra dimensionality. His CAI draws air from behind the driver side opening on his Mugen lip.


“It’s the details,” he says. And he’s right. Because I also own an EP3, I can process the walkaround at the speed the details are hitting my ears. And I can also appreciate how rare these parts are. I’ve only seen a few of these Mugen pieces on one other car, and that’s the Mugen EP3 in the King Motorsports showroom.


Mel describes the stages of his car’s evolution as “Chapters.” He’s on Chapter 2 now. Chapter 3 involves adding Mugen MF10 17x8, Mugen brakes and Mugen seats. “With some luck and the help of King Motorsports, that will be the final chapter,” he declares. Something tells there will still be an amazing Chapter 4.


Parked next to Mel is Bill’s turbocharged 2003 Civic Si, equally stunning in the dedication and hard work put into it. You can tell these two have influenced each other and made each other’s builds better. Bill also has many of the same Mugen parts and JDM upgrades, but his build still feels distinct. He points out that his paint is actually a remixed, brighter version of Honda’s already vibrant Vision Blue Pearl. Now that he points it out, I’ll never be happy with Honda’s blue again. His version really is so much better.


Having followed Bill on Instagram I’ve seen that his day job is a woodworking magician, creating the HGTV-worthy kitchen and home remodels. That same craft and precision finds its way into his EP. My friend Julio points out the custom bracing for the motor mounts and the custom re-routed AC lines. They were so well done I didn’t even notice them. Overall there is a strong sense of restraint with Bill’s EP build. It feels curated, like he methodically chose only the best of the best parts and mods, the ones that would still be impressive and relevant decades later.


Parked next to Bill is Huy’s turbocharged 2003 RSX Type-S – aka REDRUM1. This car has all the shine of a Mugen show car fused with the raw functionality of a gutted and purpose-built race car. It sits right on the elusive line between show car and race car. Huy treats me to a guided walkaround, and I am floored. I find it hard to comprehend the amount of time, skill and resources that went into this vehicle.

Huy has an elusive perfect balance of finances + skill + taste that produces something masterful. If you only have finances + skill, you might go overboard on the mods. If you only have skill + taste, you probably restore a car to its original glory. If you have finances + taste, you go buy an NSX. But if you have all three – you build the DC5 elevated to what must be its perfect functional and aesthetic balance.


Like the artist he is, Huy tells me the build started with one thing – the desire to fit a specific set of wheels. To do that, he had the fenders masterfully pulled out and the whole car widened. Everything else flows from there. There is a reason Super Street called it “one of the best Honda builds to date!”


Huy brought two other cars with him, a white Mugen-equipped DC5 and a gorgeous green EK hatch. He tells me that the Autoart Mugen DC5 1:18 die-cast model was his inspiration for his white DC5, and I can see the similarities. It hits me that he’s actually creating big-scale, functional model kits, which in turn are replica of full scale cars. It is life imitating art imitating life. This loop produces impressive refinement in Huy’s hands.

Iron Sharpens Iron

It’s no coincidence that Mel, Bill and Huy are parked next to each other. They are friends outside the car show too, parking their beloved rides in each other’s home garages from time to time. These three friends have sharpened and pushed each other to create functional works of art.

**

More info:

Mel Diego’s 2003 Honda Civic Si
Instagram: @hur1cne@hov
http://www.superstreetonline.com/features/htup-1108-2003-honda-civic-si/

Bill Master’s 2003 Honda Civic Si
Instagram: @siborg_ep
http://www.superstreetonline.com/features/htup-1301-2003-honda-civic-si/

Huy Hoang’s 2003 Acura RSX Type-S
Instagram: @wiiizzer
http://www.superstreetonline.com/features/1510-turbocharged-mugen-2003-acura-rsx-type-s/

Full set of photos from Hondafest NW:
https://www.facebook.com/media/set/?set=a.10153475333141319.1073741856.110076751318&type=1&hc_location=ufi

Hondata K-PRO: Ordering, Unboxing & Installation


Earlier this year I purchased the K-PRO (version 3) engine computer tuning solution made by Hondata, Inc. This modified ECU would open up my 2002 Civic Si (EP3) to performance tuning. While there are a couple engine tuning solutions available for my car, the Hondata K-PRO is the most common and well-supported. I’ve seen King’s skillful dyno tuning and was looking forward to having some tuning done to make the most of my car’s modest modifications.


PURCHASE & CONVERSION

To prepare, I picked up an un-modified ECU for my EP3 -- the PNF version, which is the same as what comes with the EP3. I bought this ECU second hand, from a reputable seller. Placing the order with King Motorsports was easy. Scott
from King pointed me to a form to fill out and send in with my ECU to Hondata’s facility in Torrance, California. Scott had to fill in some paperwork on his end as well so that Hondata would be prepared for my ECU.

Once Hondata’s technician received my ECU, they tested that it functions properly. Then they open up the metal case and add their daughterboard to the main board. This new board is about a quarter the size of the main Honda board and fits snugly inside the case – allowing the ECU case cover to fit back on as it originally did. Hondata also cuts a small square opening into the side of the ECU case to allow for the USB port connection. As a final step, they closed the ECU back up, test it, and put a HONDATA sticker across the top of the case.

I also purchased a used laptop that runs Windows. I installed the free KManager software (http://www.hondata.com/downloads.html) from Hondata on it. The laptop and Hondata software will allow tuning of the K-PRO ECU via a USB cable. I reviewed Hondata’s installation and KManager tutorials online.


UNBOXING

A Fedex package arrived swiftly from Hondata. Inside the box:

* K-PRO ECU
* USB cable
* Serial input harness for data logging (I didn't need to hook this up for my needs)
* KManager software on CD (you can also download this online for free)
* Hondata license plate frame and stickers
* Printed materials and a note to relocated the ground strap on intake manifold


INSTALLATION

Installation was fairly straightforward. Here were my steps on my EP3 (your steps my be different):

1. Disconnect battery.
2. Remove the passenger side foot well trim panel. You should see the ECU. Carefully release and remove the harnesses leading to the ECU.
3. Bend or remove upper glove box “stoppers” to allow the glove box to swing completely open.
4. Use a 10mm socket to remove the 3 bolts holding the ECU in place. 1 bolt is behind the glove box, and 2 bolts can be removed from underneath the glove box.
5. You should now be able to remove the ECU.
6. Install your K-PRO ECU in place. Installation is reverse of the removal. Make sure the harnesses are securely clicked into place.
7. Before you close up the glove box, plug the USB cable into your K-PRO. I used a few zip ties to keep it from accidentally pulling out and let the rest of the USB cable rest inside the glove box.
8. Per the included note from Hondata, I relocated the battery ground strap from my intake manifold to the valve cover bolt. All that was required to do this was a 10mm socket. The existing ground strap is long enough for the relocation.
9. Reconnect the battery.
10. Turn the key to on (but do not start the engine).
11. Make sure your laptop has successfully installed KManager, and launch KManager. Then plug the USB cable into laptop. You can now upload one of the base maps provided by Hondata.
12. The next steps only apply if your K-PRO conversion was performed on a second hand ECU:
13. Using KManager, disable the immobilizer.
14. In order to have the immobilizer matched (progrmamed) to my ECU: I scheduled a service appointment at my local Honda dealer. My service advisor understood what a K-PRO is and what I was trying to accomplish. I drove to the dealer with the immobilizer disabled. Once there, I used my laptop to re-enable the immobilizer. This is an important step. If you don’t re-enable the immobilizer, the Honda tech’s equipment will not be able to locate and program your immobilizer.


FAQ

Q: Where can I get more information on the benefits and compatibility of the K-PRO system?

Hondata’s website has a lot of good information and is updated regularly:
http://www.hondata.com/kpro.html
http://hondata.com/media/kprotraining/k-propresentation.pdf

Q: Is the K-PRO only for heavily modified cars?

While the K-PRO conversion is well suited for turbo/ supercharger applications and K-series engine swaps, it can also help extract power from basic bolt-on parts such as a performance header, exhaust system and air intake.


Q: What is an immobilizer?

An immobilizer is an electronic security device installed by Honda that prevents the engine from starting unless the correctly paired/programmed key (with immobilizer chip) and ECU are present. It prevents a car from being stolen by a thief bringing his own generic key or ECU.

Q: Do I have to buy a 2nd ECU or can I just send the one in my car?

You can send the ECU that is currently in your car. There are pros and cons to doing that.


PROS: You won’t have to reprogram your immobilizer (assuming you want it enabled). And you can be certain the ECU is fully functional. There is also a cost savings since you won’t be buying a second ECU.


CONS: Your car will have a few days of down time since obviously your car will not be running while the ECU is being modified by Hondata. If you ever want to sell the K-Pro or return to a stock ECU, you will need to buy a stock ECU.


Hondata can also provide a brand new ECU at additional cost when you order. 


Q: What is the big deal about buying from an authorized Hondata dealer?

Simply put, buying from an authorized Hondata dealer like King Motorsports protects you. Hondata has issued a warning that there are counterfeit K-PRO ECUs in circulation:
http://www.hondata.com/kpro_counterfeit.html

In 2014 a Florida man was charged by the FBI for having Hondata devices reverse engineered, then built in China and sold as authentic. He generated approximately $58k in income with his scam, so you can only imagine how many fake Hondata devices he put into circulation.

Hondata also warns of a scammer from Texas named Daniel Sanchez who claims to be authorized to sell on behalf of Hondata but is not a Hondata dealer. He has also spread some misinformation about Hondata. More info:
http://www.hondata.com/sehablaauction.html

Q: What’s the difference between a Hondata Reflash and a K-PRO?

A Reflash is a reprogramming of your ECU by Hondata. Rather than installing a full daughter board into your ECU case, Hondata reprograms your ECU directly to extract more power with pre-determined changes such as altered cam timing and optimized fuel settings. The cost is significantly less than the full K-PRO conversion, but is not customizable for your car’s specific mods.

More info about the Reflash:
http://www.hondata.com/reflash.html

You can always upgrade from a Reflash to the full K-PRO at a later date.

Q: Can I upgrade to a newer version of K-PRO?

Hondata has been very good about consistently updating the K-PRO hardware and software systems. While the software updates are free, the hardware updates are not. Hondata has a program that will allow you to purchase an upgraded K-PRO conversion by sending in your working, older K-PRO ECU.

Q: What kind of laptop do I need to run KManager?

Right now nearly any Windows laptop or netbook will work, including older ones running Windows Vista or newer. A desktop computer will work too, but has obvious portability limitations. A Mac OS will work as well if you have a compatible Windows emulator. Some have even used certain models of the Windows Surface tablets (the ones that run the full Windows 8, not Windows 8 RT). I was able to buy a used Acer netbook from our company’s IT department for about $50. KManager does not take very much CPU power to run, so older laptops will work just fine so long as they meet the software’s minimum operating requirements.


***


King Motorsports is an authorized Hondata dealer. Buy with confidence online or by phone at (262) 522-7558:

http://www.kingmotorsports.com/advsearch.aspx?SearchTerm=hondata


***


VISUAL COMPARISON


Here is a side-by-side comparison of a stock ECU (left) and the K-PRO conversion (right):


Unboxing: Skunk2 Alpha Series Header for DC5/EP3


Over the years I've only added modest bolt-ons to improve the power output on my 2002 Civic Si (EP3) hatchback. My collection of bolt-ons includes a Mugen airbox, Mugen Twin Loop, RBC intake manifold and K-Pro. After a quick call with Scott at King Motorsports, I settled on his recommendation to go with the Skunk2 Racing Alpha Series header.


Scott said they've seen respectable gains from the Skunk2 header and the build quality gets his thumbs up. From what I've read online, the Alpha is essentially the same design as Skunk2's top-shelf MegaPower line, but at a lower price point thanks to some advanced manufacturing technology (and probably concessions on materials used).


General feedback I've read from owners is that people love this header. Fitment on K20A3/A2 is good, so long as it is done by a professional. Folks with a K24 swap may have to do a bit of magic with their front sway bars -- a common issue that affects all aftermarket header choices.


This is the first race header I've ever purchased. I had a lot of questions about what would be included out of the box, so for you fellow newbies out there, this post is for you. Keep in mind this is for the DC5/EP3 (Skunk2 part #412-05-1910) -- so your results may vary for other fitments.

The box itself is fairly sturdy and red and black graphics scream performance. This is one delivery you don't want to leave on your front porch overnight. For you married folks, this is a car part delivery that will be hard to hide, ha ha.


The header was wrapped in bubble wrap which provides reasonable protection during shipment. The entire contents of the box:

- Alpha series header
- adapter pipe
- donut gasket
- oxygen sensor defouler
- 2 front sway bar brackets - allows for side-to-side repositioning of the sway bar thanks to elongated mount openings.
- owner's kit - a black envelope that includes a Skunk2 brochure and registration card with serial number.
- Skunk2 Racing decal

Here are the front sway bar brackets, defouler and donut gasket:


Here is the adapter pipe:


Here is one of the 2 oxygen sensor bungs. Remove this bolt to install the oxygen sensor.:


Here is the second oxygen sensor bung. Remove bolt to install oxygen sensor or defouler.:


The top has an ALPHA badge and holographic sticker with serial number:


The underside has two ALPHA stamps near the hanger:


There is one more badge that says "FOR OFF ROAD USE ONLY. NEVER TO BE USED ON POLLUTION CONTROLLED VEHICLES" just downstream of the hanger:


Next up -- installation and dyno tuning!

See more Skunk2 Racing products at the King Motorsports online store!
http://www.kingmotorsports.com/m-43-skunk2-racing.aspx


Mugen iPhone 5 (5S) Cases


Protect your iPhone 5 (or 5S) in style with one of the new Mugen cases introduced in late 2013. The cases are streamlined, snap-on shells that provide protection for minor drops and scrapes. I got my hands on the Mugen kanji-version case and was really happy with the soft-touch, matte finish inside and out. By comparison, the Mugen case is a slimmer thickness than similar ones by InCase, but still feels rugged enough for many adventures to come. The case also features two tiny holes for you to thread a phone charm or strap to -- a feature that is distinctively Japanese.


The case feels great in your hand, with a velvet-like texture that isn't rubbery or cheap at all. Once snapped on to your phone it hugs the chamfered edges just right. The case will look especially nice on the space gray version of the iPhone 5S. This isn't just a generic case with a logo slapped on it -- it's a unique product created just for Mugen and carries all of the quality fit and finish you'd expect from a Mugen item!


Both versions of the iPhone 5 case are currently available on the King Motorsports online store.


MUGEN POWER kanji iPhone 5 Case: 90000-XYF-112B

MUGEN 16 iPhone 5 Case: 90000-XYF-112A

King Motorsports / Mugen EP3 Civic Si


For many of us who drive an EP3, we are proud to say that it's the King Motorsports example that inspired us to own and build one up in the first place. Debuted at SEMA 2003, this is the EP3 that more than a decade later still inspires EP3 builds all over the world. This 7th gen Civic was built by King Motorsports for American Honda.


The Nighthawk Black Pearl EP3 was based on the US-spec model and fitted with top shelf performance and body parts that showed what was possible to create from the relatively egg-shaped, minivan outline of the stock 02-05 Civic Si. In order to fit the Mugen front lip, the USDM bumper cover and rebar were replaced with JDM spec versions, which create more of a snub-nose effect in the front. The bumper was finished off with a carbon fiber radiator duct. The stock grille was replaced with a Mugen grille with JDM red badge and driver-side flared opening to allow for additional cooling to reach the Mugen air box. The iconic Mugen hood includes functioning engine bay ventilation.


The rear USDM bumper was also replaced with a shortened JDM version that allowed for the fitment of the Type-R rear lower valence. Type-R side skirts complete the lower body parts. An Mugen adjustable wing was modified for the USDM hatch and pulls out the body line in just the right places.

The changes on the pure performance side were even more significant. A DC5R motor, 6-speed transmission, Mugen ECU, the legendary Mugen twin loop exhaust... the build list goes on and on and is just incredible. It's no wonder the car has appeared in the pages of Car & Driver, Road & Track, Boost and was featured on Speed TV.


Here is the "press release" for the car:

Using Honda performance specialist Mugen's vast array of aftermarket high-performance parts, King Motorsports (the sole authorized North American distributor for Mugen Co., Ltd) has created the ultimate street performance Civic Si that maximizes the potential throughout every corner of the vehicle. Making its world debut at SEMA, the King Motorsports/Mugen Civic Si has a K20 DC5R engine and 6-speed transmission with a limited slip differential. The modified engine produces 240-horsepower.

Powertrain Modifications:

Japan Domestic Market (JDM) K20A DC5R engine
JDM DC5R six-speed close ratio transmission with limited slip
Mugen cold airbox
JDM DC5R exhaust manifold and down pipe
Mugen stainless steel twin-loop cat-back exhaust
Mugen ECU
Mugen low temp thermostat
Mugen hi-pressure radiator cap
Mugen reserve tank covers

Suspension Modifications:
Mugen N-1 coil-over adjustable suspension
Mugen 25mm rear stabilizer bar
JDM Civic Type-R front stabilizer bar
5 lug conversion with RSX Type-S brakes front and rear
Mugen Micro Mesh brake line set
Mugen MF-10 forged wheels 17x8 +45 bronze
Bridgestone S0-3 225/45 ZR 17 Tires
Rear adjustable upper control arms

Exterior Modifications:

JDM Civic Type-R front and rear bumpers
JDM Civic Type-R side skirt kit
JDM Civic Type-R rear bumper valance
Mugen carbon fiber aero hood
Mugen front spoiler
Mugen sport grill kit
Mugen carbon fiber radiator duct kit
Mugen adjustable rear wing

Interior Modifications:
Prototype Mugen digital guage cluster mounted in carbon fiber inset
Mugen S-1 bucket seat with Mugen seat rail kits
Mugen Sports Pedal Set
Mugen Race II steering wheel with Mugen hub adapter


If you are ever in Wisconsin, stop by the King Motorsports facility to see the EP3 in the showroom! Here are a few pics I took of it in summer 2010-- the EP3 is getting a quick detail and wax the day before Dyno Day 2010.


** Visit the King Motorsports online store for performance and aero parts for the 02-05 Civic Si (EP3) **

Interview: Chris Mitchell's 1993 Civic Si (EG) - Out of the Blue, Into the Gray


"My race car is greener than your Prius." That's the vinyl message you'd stare at if you happen to be stopped behind Chris Mitchell's purpose-built and daily-driven EG Civic Si. At least that's what you would have seen in 2012, when the car was still a bright blue color, courtesy of the previous owner. Chris just accepted the color, focusing his energy on correcting the mods he inherited. Then he moved on to making his own performance-oriented upgrades. Chris' EG is a home-grown example of function-before-form, and he knows his build is making its own statement in an increasingly noisy modified scene.

Here's Chris' EG at a local Cars & Coffee event in 2012:


Why are Moogs such bullies? :)


I caught up with Chris recently to talk shop.


Q: Tell us about your Civic.

A: I first bought my EG back in 2007 when I was looking for something reliable, fun, and good on gas. At that time I had just sold my 240SX, got out of drifting and was trying to focus on school at Oregon State University. It wasn’t ideal or what I was really looking for, but it was going to keep me out of drifting and met the criteria I set for a new car.

When I picked up the car it wasn’t in bad shape from the outside, minus the color -- and the previous owner decided that a stanced look was what he wanted… I did not haha.

As I mentioned before, what lead me to buying the car was that I needed something that fit my criteria. It didn’t hurt that Honda Civics are super cheap on insurance if you have a clean driving record, which I’m proud to say I still do.


Q: You said the EG had quite a few mods on it already that needed "correction" -- What did you do for a clean slate?

A: The color, the engine wiring, ride height and the “STANCED OUT YO!” look all had to go. It was at a ride height that was not functional for driving long distances, so the first changes were new tires, camber kit and a raised ride height. The engine wiring was janky as hell and had to be re-done in a number of areas. This was my first introduction to what import car life was like.


The car was blue, yes. It was probably the worst paint job I've ever seen, but originally it was buffed and didn't look too bad. After you get a little more involved with a new (to you) car, you start peeling back the onion layers seeing what the car really is. What sucked about it was that the original OEM green color looked great underneath, no blemishes. Original owner FAIL.

So from the photo you can see how Smurf'd out the car was... due to an unfortunate accident involving a young driver not paying attention while doing a u-turn at 2am, the car got re-painted "Graus-schwartz". This happens to be a favorite color for me off the 2010 Porsche 911 GT3 RS. I chose it because 1) it's easy to maintain, but 2) it's just a nice, crisp color. You can't over-do it too much because after all....it's just a Honda Civic! haha


Q: Tell us about your build philosophy and goals.

A: My build philosophy is really, “to each their own”. In the Honda community you’ve probably seen or heard every type of modification you can think of, which is fine; every owner sees or wants something different.

When building this car I took a lot of inspiration from Keiichi Tsuchiya, the Drift King and professional driver in Japan. His personal AE86 has to be the most 50/50, neutrally balanced car I could think of over the years, and I thought, "Why not build an EG to mimic that?" I think I’ll always try to build a neutral balanced car that corners as hard as it accelerates and brakes as well as it corners.


Q: Have you had the car dyno'd? What were the numbers?

A: I have had the car dyno’d and with its current configuration, it is sitting just shy of 160whp on a Dynocom Dynomometer.


Q: Future plans for the EG?

A: The future is uncertain for this car. I am in the process of acquiring a new car/ project, so this may turn into a track day/ weekend warrior permanently. If that does happen, there’s no doubt it’ll be compound charged and peak out around the 500whp range. Of course it’ll still have to grip as well as it accelerates so my aerodynamic toys will have to be developed.


Q: Mods you would recommend for other EG owners?

A: I say whatever makes you smile at the end of the day. If you want to have a catalog car and never drive it, so be it. If you love the track and want a ridiculous looking, but fast beast car, do it. The EG itself is a great chassis to build upon and done right, can hang with the best of them. I think suspension, brakes, and tires are the most important components if you’re dealing with a mild build, but want it to be competitive or fun. Everything else just gets out of hand and more complex as you go.


Q: Mods you would tell others to avoid?

A: Avoid spherical bearings for the street, haha. They say don’t do it; Don’t, unless you can afford replacing them frequently. I think another suggestion is that if you build an N/A D16Z6 or any D-series, be careful and do your homework before you get in too deep. It’s a costly engine to build past 120whp or so. It’s a lot of fun being unique and to turn heads, but there’s a lot of other more cost-effective options.


Q: What cars were in your past?

A: My first car was a 1996 Volvo 850 (I know, Grandma-car status) which I first tinkered with aero and suspension components. It felt like an aircraft carrier, but handled surprisingly well.

I also had a Nissan 240SX (S13) which I drifted for a bit before the engine let go. That was before I knew much about engine building. I’d like to build another S14 with a supercharger setup sometime down the road.


Q: What is your experience with autocross, track, etc? How does the EG handle?

A: I’ve been doing autocross for about five years now, going to different events in Southern Oregon. I’ve also participated in Time Attack and a few road rallies, placing first in class several times. Recently I’ve been crew chief for a local ChumpCar team and next season I’ll be racing in Vintage and NASA series.

The EG handles like it’s on rails. As long as you don’t over-do-it and leave the front end a little softer, it will not understeer and rotates like a RWD car; Honda knew what they were doing when they engineered that suspension system. I hear a lot of people who don’t exactly understand driving dynamics argue that a FWD car can never handle as well as a RWD or AWD, but I assure you, when done right, it’s sublime in the corners.


Q: Do you have a dream car?

A: Do I have a dream car.... hmmm. That's a tough one. I guess if money was no object, I'd love to own either a Ferrari F40 or a Koeneggsigg Agera R due to both cars being basically insane to drive. There might be other cars out there, but I enjoy a car that throws a curve ball at you from time to time. Maybe a little on the dangerous side? I'm a bit of an idiot in that department from what my friends have said. I'd love to drive a Ferrari 599 GTO simply because it's a handful, and the Ferrari test drivers mentioned it was impossible in the wet.....that's my kind of car. Whatever I build I don't want it to be another car you've seen before, there has to be a little extra magic, a dose of danger, and of course provide a thrill for the driver.


Q: I know you're active in the car community -- What roles/groups are you involved in? 

A: I’ve been very fortunate to know a lot of people within the racing and car culture in the Pacific Northwest. Being asked to help out a group or organization is something I love doing and I’ll try to keep doing it as long as I can.

ThatsSiiick.com
– Creative Director, Staff Photographer, Writer
NASA – Driver, Photographer
Porsche Club of America – Photographer
Audi Club Northwest – Photographer
NW-Built.com – Photographer
Northern Echelon – Staff Photographer
Sidedraught City – Driver, Online Manager, Writer, Photographer
Cascade Sports Car Club – Driver, Member
SCCA – Driver, Member
Red Door Meet – Designer, Staff Photographer, Member


Chris Mitchell's 1993 Honda Civic Si (EG):

Motor:
D16Z6
Eagle H-beam rods
Supertech High comp pistons 12:5:1
Supertech rings
ACL Race bearings
ARP Head studs
Bored out 75.5mm
P&P, 3 angle valve job, de-shroud, combustion chamber re-shape
Crower Ti springs, retainers, Honda valves
Bisimoto Level 3 Cam
Bisimoto cam gear
Buddy Club Spec II exhaust
Bisimoto V2 header
Custom TB velocity stack - intake
K&N filter
Walbro 255 fuel pump
Edelbrock inline fuel filter
Earls -6AN fuel lines/ fittings
B&M fuel gauge
Chipped P28 ECU running CHROME GOLD
NGK wires/ 7E plugs
Megan Racing radiator
Custom Radiator fan w/ shroud
ES motor mount inserts
Blackworks catch can system - AN fittings

Exterior:
2010 Porsche GT3 RS "Graus-schwarz" paint
Seibon carbon fiber hood
Rear Duckbill style spoiler
Porsche HID projector retrofit
Aerocatch flush hood pins
Mono-Blade wiper system
>TRACK DAY BUMPER:
Front bumper canards
lower air dam
lower splitter

Drivetrain:
ACT Xtreme sprung 6 puck clutch
ACT Xtreme pressure plate
Bisimoto 9lb flywheel
Wilwood 1" MC - Brake booster delete
S2000 CMC w/ custom lines
B&M spherical short shifter kit
Synchrotech Gearbox

Suspension:
Buddy Club N+ Spec coilovers
Skunk2 Pro-Series camber kit
Blox RLCA's - ES poly bushings
Front/ Rear tower brace - C-pillar brace
ASR rear subframe brace - 24mm rear swaybar
Honda 19mm front swaybar - ES poly bushings - ES poly endlinks
Aurora endlinks
Blackworks rear camber arms
Blox Extended balljoints
ES poly trailing arm bushings
BEAKS lower tie bar
Buddy Club upper mounts
Megan Racing 4 point chassis brace

Brakes/Tires:
Brembo Blanks (all 4)
Hawk HP+ pads (all 4)
Goodridge stainless steel lines
Toyo Proxes4 205/50/15 (ST), Toyo R1R 225/50/15 (TR)

Interior:
Sparco Monza steering wheel
NRG 2.0 quick-release
Custom 6" knurled shift knob
Custom carbon fiber switch plate
Gutted


** Visit the King Motorsports online store for performance and aero parts for your EG Civic. **

EP3 Mini-Meet in Washington State


This past Labor Day we gathered a few EP3 Civics together for a Pacific Northwest mini-meet.


Seven EP3 owners from the Portland and Tacoma/Seattle areas met in Castle Rock, WA for grub. Bellies full of pizza, we headed up WA-504 for the 52 mile trip to the Johnston Ridge Observatory overlooking Mt. St. Helens.


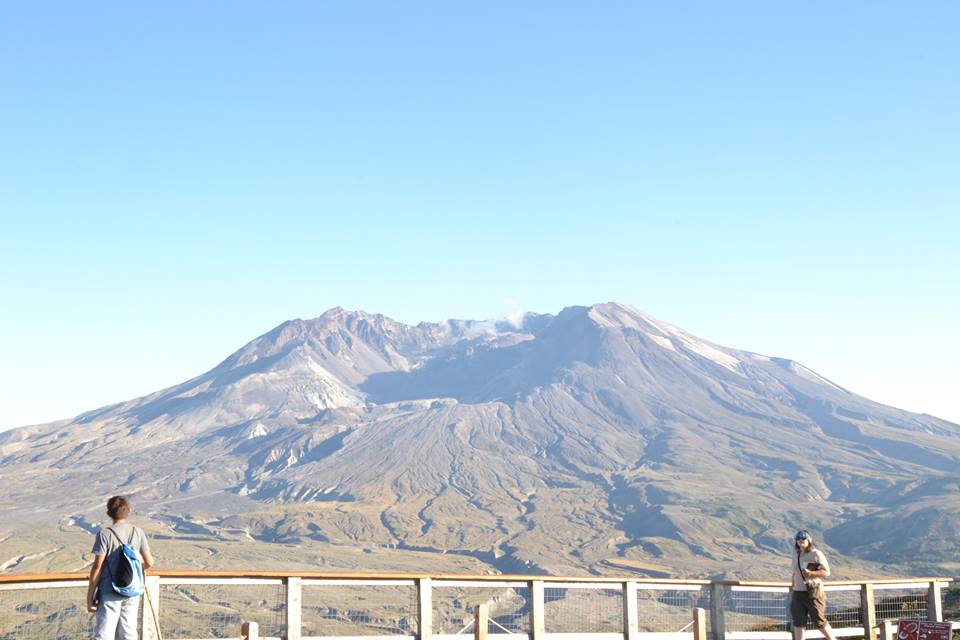
Those of us with gray hair will remember Mt. St. Helens as the active stratovolcano that blew its top in May of 1980. The eruption scorched 230 square miles of forest and was the deadliest and most economically destructive volcanic event in all of US history. 30 years later, Mt. St. Helens looks downright other-worldly; it's clear something massive, dangerous and powerful happened here. The landscape just looks wrong -- yet it makes a natural sense all its own. It is rare to see so much landscape changed in such a short time.


If I was a better writer I would make some kind of deeply insightful comparison linking the shifting modifications of this landscape to the changes we've seen to our own EP3s over the years. Or to the reputation of the EP3s, or of Honda... but I'll spare you!


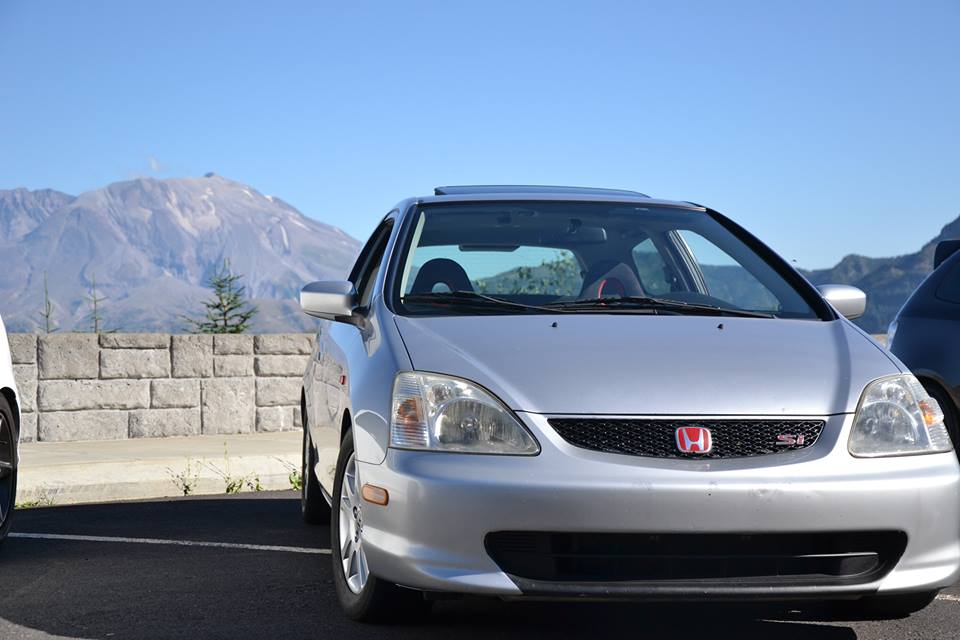
The Tacoma/Seattle guys roll up to our meeting point in Castle Rock. Julio leads the way, followed by Rick. John in the silver EP had intentionally popped the hood latch to give his motor a bit more cool air.


This is the 52-mile route we took from Castle Rock to the Johnston Ridge Observatory overlooking Mt. St. Helens.


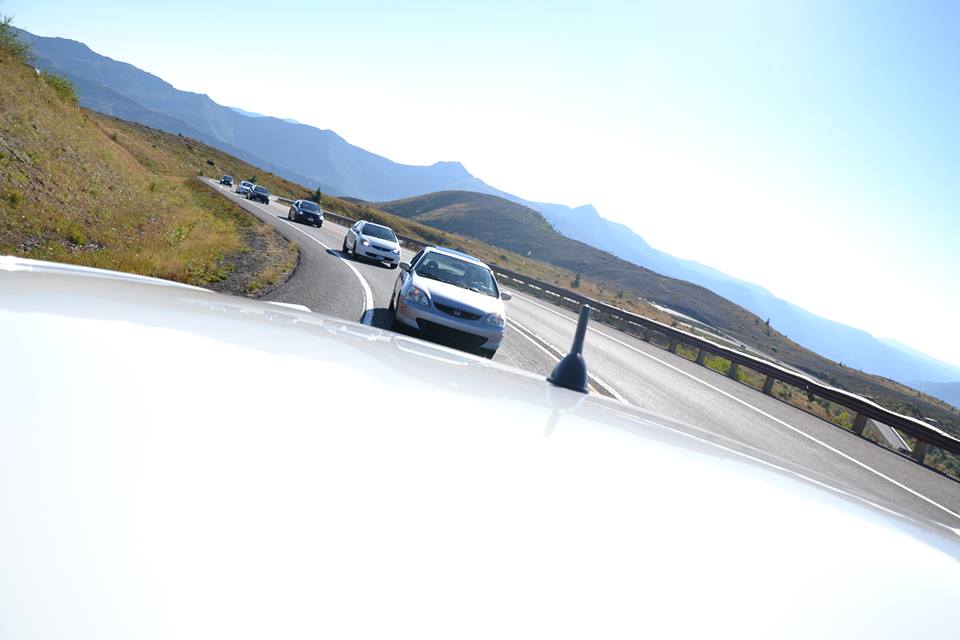
We made up a nice caravan of seven as we headed up the hill. Here is a great shot Dave somehow took out of his sunroof, while driving. He managed to get all seven of us in one shot!


Dave led up the pack in his Taffeta White Si, setting a good pace on his Buddy Club N+ coilovers and black-coated RSX rims. His HKS exhaust roars ahead on the road that will take us up the mountain past shaded valleys, expansive bridges and wide-open, forested vistas.


Behind him was John -- an OG EP owner in a Satin Silver Metallic sleeper he's owned since it had 25 miles on the odometer. He hasn't stopped driving it since. On the way to today's meet he clicks over to 214,000 miles. John has the rare privilege to pick between an EP3 and an Apex Blue Pearl S2000 Club Racer (CR) in his garage -- and tells us that of all the dozen or so Hondas he's owned, he will never be able to part ways with his EP3. He just loves it too much.


Next was Todd, a Portlander who has quietly modded his white EP for years and has only recently been meeting up with other EP owners. He's a lurker on the forums that we finally got to come out and play. I met him when I purchased his Mr. Alex front strut bar from him in a Target parking lot last year. He's holding his own as we dive into the corners.


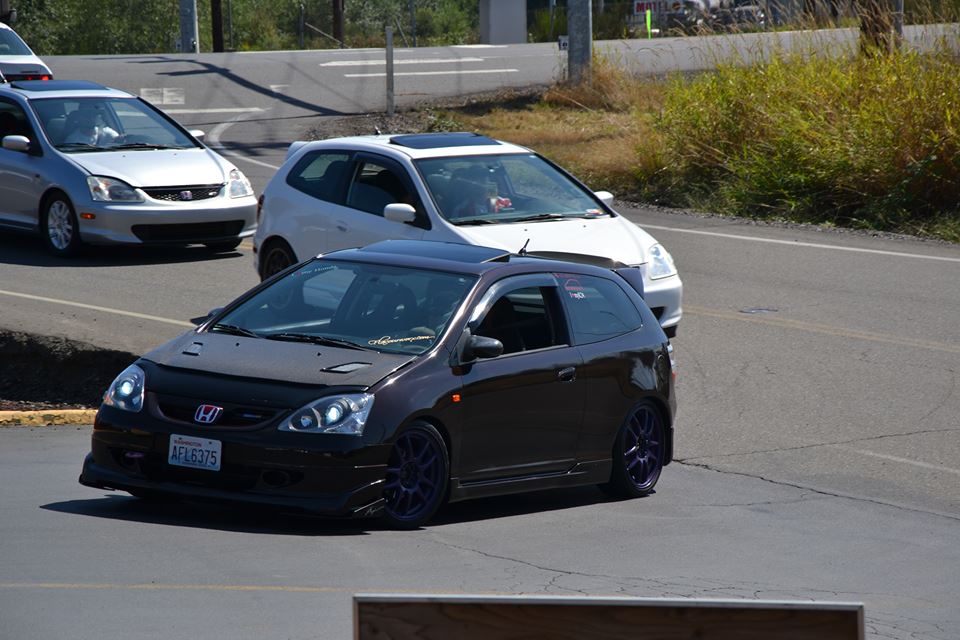
Behind him was Julio, driving our most modified EP of the day. Julio's ride has a custom metallic purple (root beer) paint job with genuine Mugen lip & grille on a JDM front end -- and a swapped motor. Actually I'm not sure how many motors he's had in this car. Maybe Julio has lost count too. His car has seen generous iterations of motors, suspensions, aero ... and survived an ordeal involving a turbo setup gone wrong. It's awesome to see that he stuck it out and has kept on modding.


Behind him is Brian, driving a Nighthawk Black Pearl EP on bronze 16" Konig rims with a Greddy exhaust. Springs drop it to an aggressive height. The car itself actually belongs to Dave's twin brother Andy (Yep, twin brothers with modded EP3s. That's how we do it in the PNW). The car is on loan for the day to Brian, who normally drives an S2000. Today he's driving Andy's EP so the car can join us for the drive, even if its owner couldn't.


Nearing the end of the caravan is Rick, with a white EP on bronze wheels with Mugen Sport Suspension. He's sporting a Volvo lip that looks amazing on his front bumper, giving it a nice chin that means business. A small German flag swings from his rear view mirror, a signal of his Bavarian lineage.


Bringing up the rear is me, in my black EP. I'm lamenting having left my Buddy Club suspension set on the softer side, but enjoying this chance to stretch my hatch's legs in a pack like this. It's a fun challenge to be the caboose in a seven-car line. I didn't realize just how much more information I would have to process, since I had a clear view of most of the caravan; Just as the leaders might be speeding up, others might be slowing down in a turn. Some might be tapping brakes to adjust following speed. My solution was to just hang back, to not follow too closely. It was like being the tail on an undulating Slinky, stretching and compressing in waves. I'd say I had one of the best views of the group -- not only did I get to enjoy the amazing scenery but also got to see all these clean EPs winding up these beautiful roads.


In a total coincidence, we actually passed a bone-stock, black EP3 headed the other direction. The driver didn't seem to know he had just passed seven of his biggest fans. Clearly not a fellow enthusiast!


Here we are at a scenic lookout point mid-way up the mountain. Mt. St. Helens is in the background.


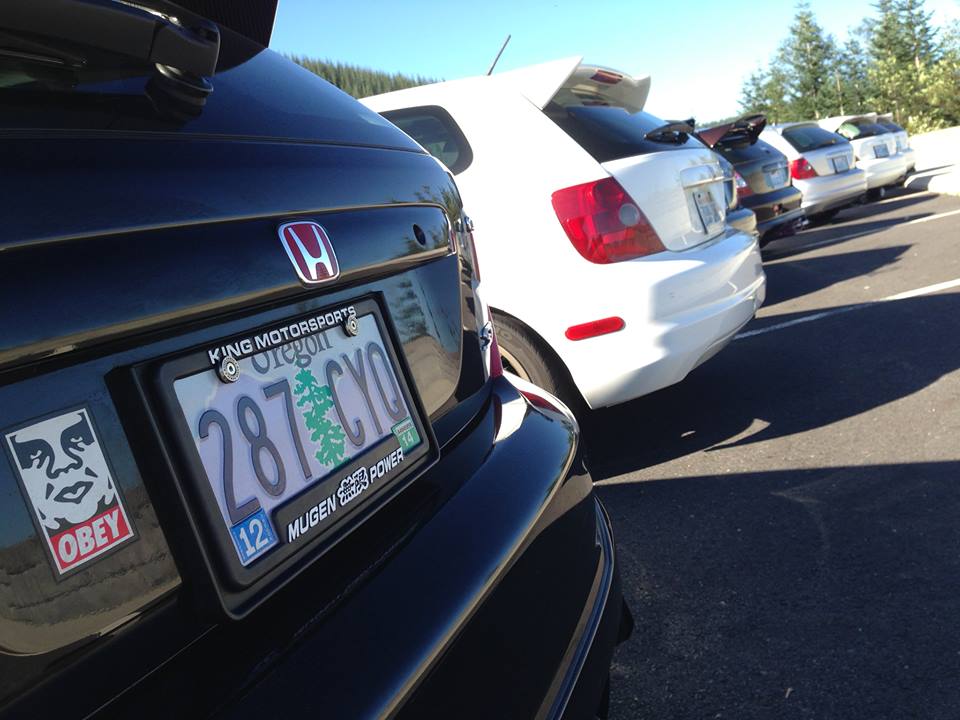
Sportin' the license plate frame of champions!


John's EP3, rocking the OEM 15" stockies and experimental plasti-dipped lower chin:


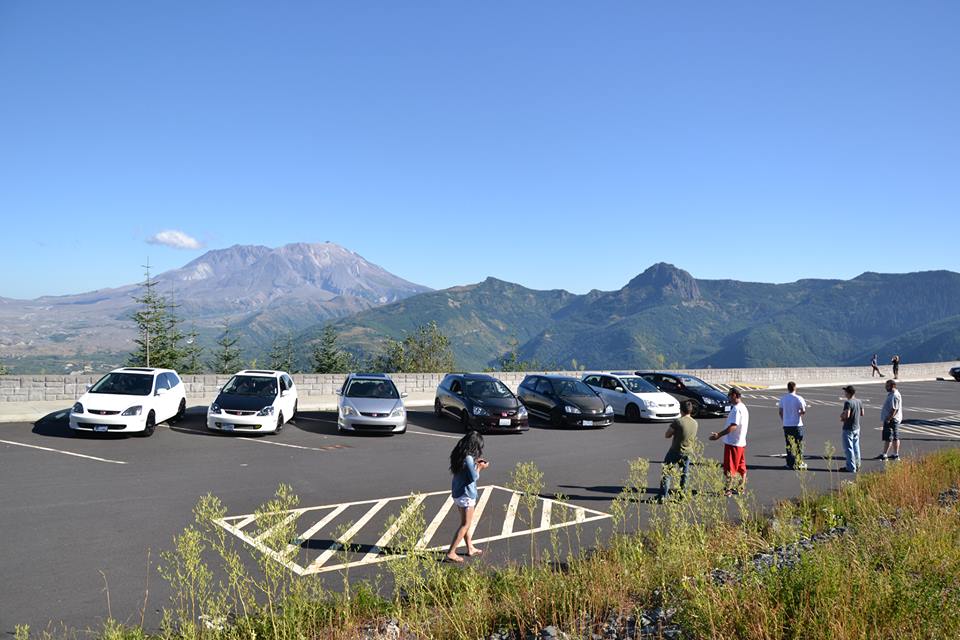
Reaching the observatory, we are treated to this alien landscape transformed by the dome-less Mt. St. Helens. Dave says the mountain lost 1000 feet of height in the eruption. The earth is already starting to push up a new mound in the crater that will one day be a new peak.


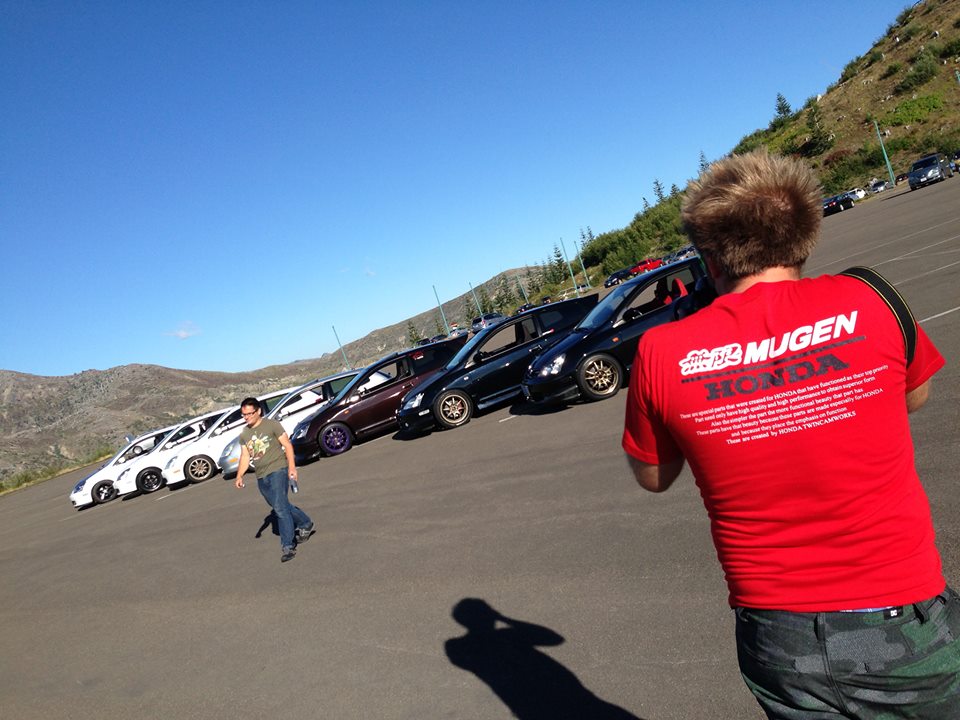
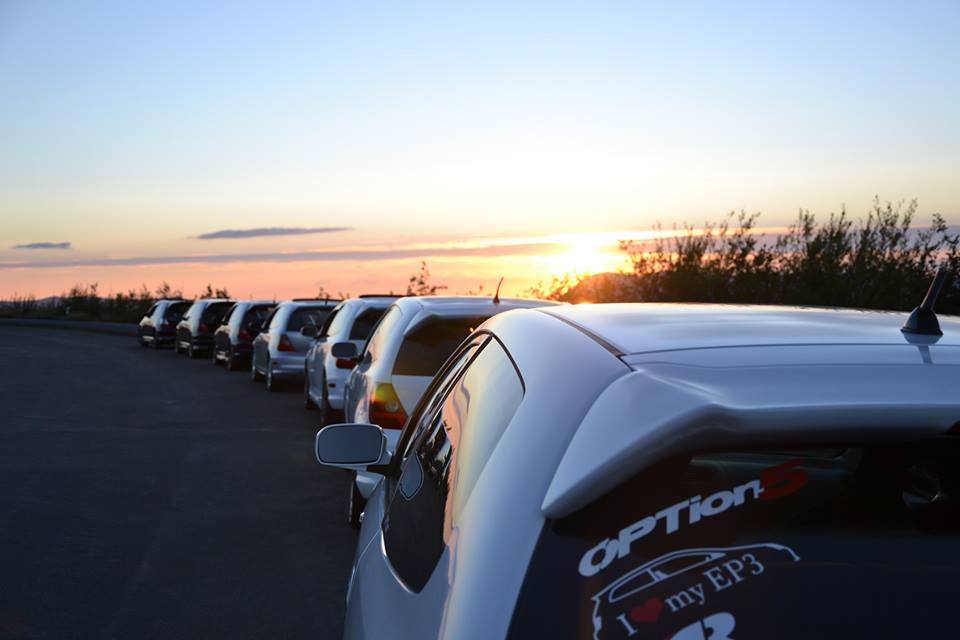
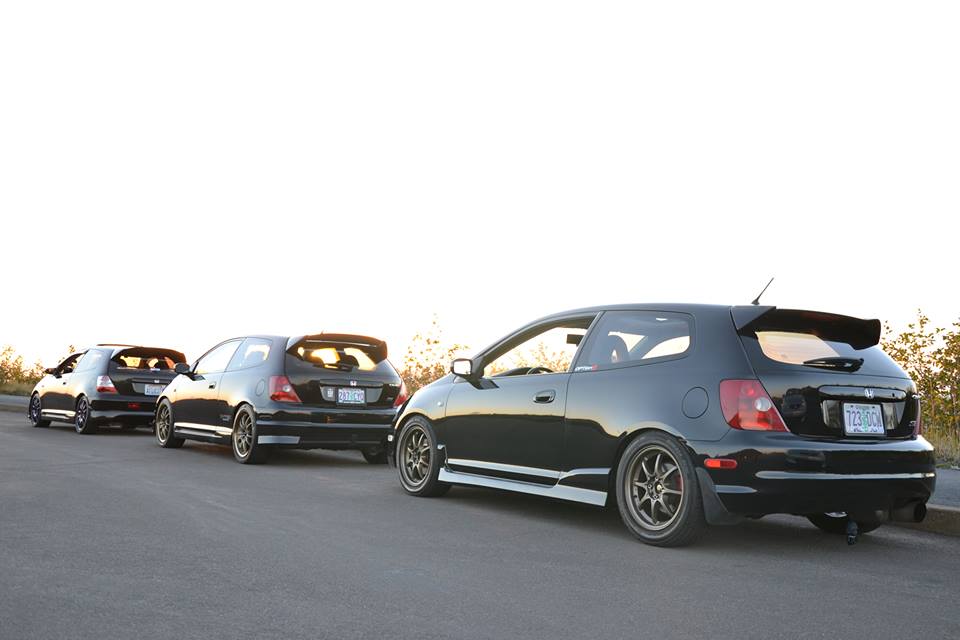
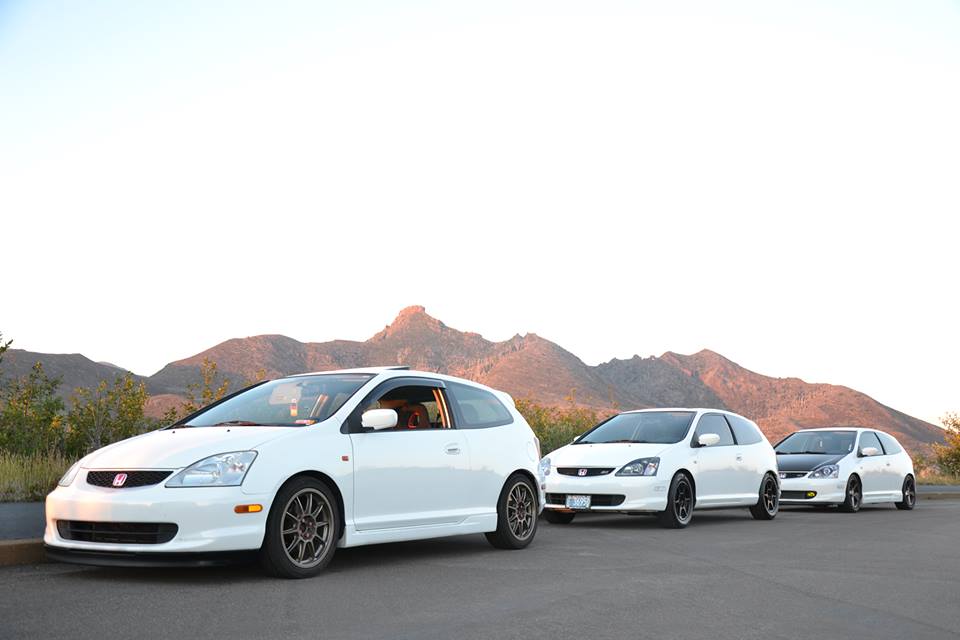
As the sun begins to set, we line our cars up for a final photo opp.


Below from left to right: Julio, Perry, Andy.


Below from left to right: Rick, Todd, Dave.


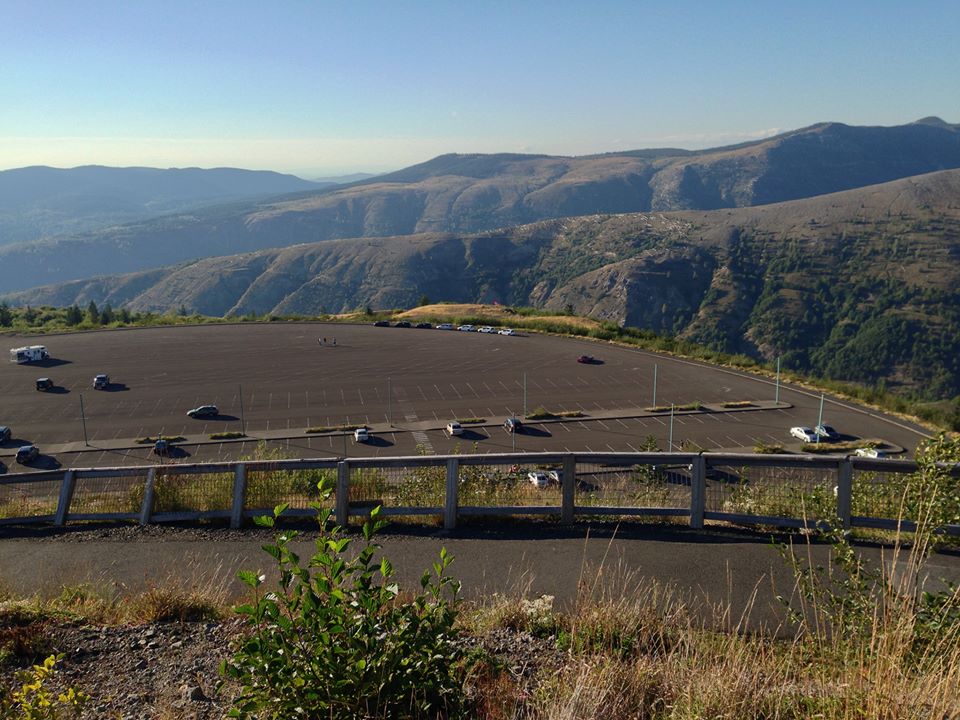
The parking lot for the observatory is massive. Our cars are lined up at the far end of the lot.


A closer look... can you spot the Prius in this lineup? Just kidding!


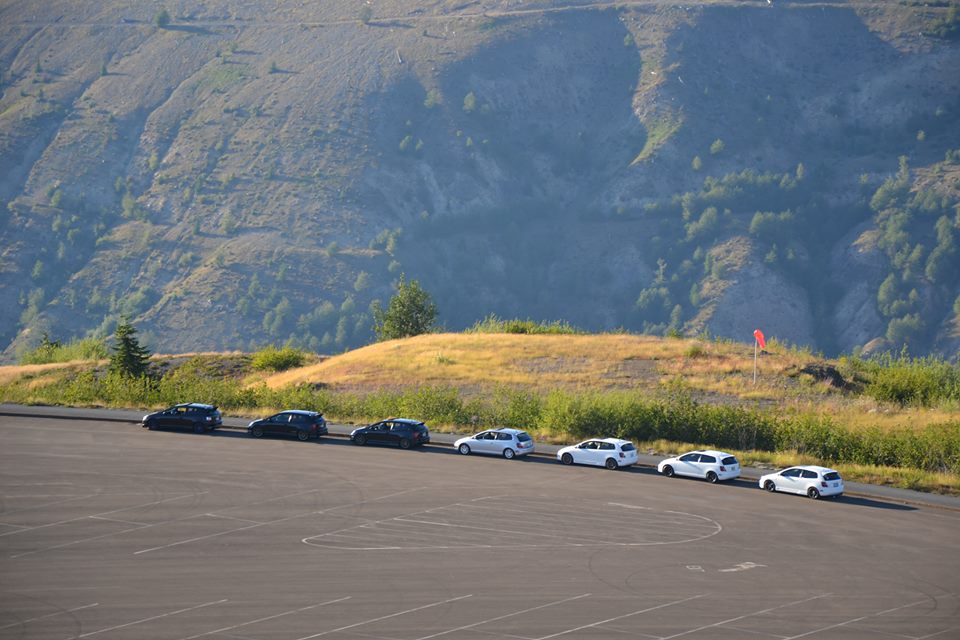
We decide to let the sun go down so it wouldn't blind us on the drive back.


The 2002-2005 Honda Civic Si hatchback never quite lived up to its overseas, beloved Type-R brothers. Out of the box it looked a bit like an egg, or perhaps a squat version of the Odyssey minivan. Pre-facelift, the car had tiny 15" rims. Despite these quirks, the EP3 provides ample opportunity for customization and dramatic improvements. The Recaro-made OEM seats, rally-style dash-mounted shifter and torque-blessed K-series are still a killer package that is hard to leave behind once you've driven an EP3. This last Stateside Si hatchback has just turned eleven years old and is being discovered and enjoyed by a new generation of Honda enthusiasts.


I'm looking forward to what the next decade of changes will bring for our EPs!


Photo credits: Dave O. and Perry W.


** Build Lists **


Dave's EP3
2004 Taffeta White
185,300 miles, owned since 2009
BuddyClub N+ suspension
HKS Hi-Power exhaust
DC Sports shorty header
BuddyClub Short Shifter
Tanabe strut bar
Neuspeed lower x-brace
HFP wing
Seibon CF hood
RSX wheels coated black - Dunlop Z1 Star Spec

Todd's EP3
2002 Taffeta White
87,000 miles, owned since 2003
AEM V2 intake
DC Sports shorty header
JP Performance mid-pipe
Neuspeed short shifter
Metal shifter bushings
15” Kosei K1s powder coated black
Bridgestone Potenzas RE960 205/60/15
Eibach Pro-kit
JDM rear sway bar with Energy Suspension bushings
HFP wing
DIY black headlight housings
Red/Black carbon fiber dash kit

Julio's EP3 (this is just a partial list!)
2004 Honda Rootbeer Metallic
84,200 miles, owned since 2006
K24A4
Hasport I/M Adapter Plate
Hondata I/M Gasket
RSX-S Injectors
K-Pro
DC Sport Shorty
HKS Hi-Power exhaust
C/F Spark Plug Cover and I/M Cover
Corsport Aluminum Shifter Cable Bushings
Corsports Aluminum Shifter Base Bushings
J's Racing Engine Torque Dampener
Buddy Club Short Shifter
JDM 04-05 Projectors w/ 8K HID kit
JDM 04-05 Taillights
JDM Front Bumper
Authentic 04-05 Mugen Lip
Authentic 04-05 Mugen Grille
ARC EK9 Splitters
JDM Rear Bumper and Lip
Benen Rear Tow Hook
Burnt Titanium Mugen Emblems
C/F Mugen Replica Hood
C/F Hatch
C/F Mugen Replica Wing
C/F Spoon Replica Mirrors
OEM Hood Bra
JDM Rear Rebar Mod
EDM DC2 Rear Foglight
Work Emotions CR-KAI (17x7)
Toyo Proxes 4 (205-40-17)
H&R 2" Lowering Springs
KYB Shocks
Corsport C-Pillar Bar
Corsport Rear Strut Bar
Corsport Adjustable Sway Bar Links
Omni Rear LCA's
Hardrace RCA's
Beaks Lower Tie Bar
DC-5 Rear Sway Bar
EM2 Front Sway Bar

Andy's EP3
2003 Nighthawk Black Pearl
92,500 miles, owned since 2006
Tokiko Blues with Neuspeed springs
Greddy EVO 2 exhaust
Injen short ram air intake
DC Sports Titanium strut bar
Neuspeed lower x-brace
HFP wing
HFP Side skirts
Fiber Images CF hood
Konig Helium wheels - Dunlop DZ101

Rick's EP3
2002 Taffeta White
130,000 miles, owned since 2008
17" Rota Tarmac II
Mugen Showa Sports Suspension
04-05 OEM side skirts
OEM JDM Type-R window visors
OEM hood bra (recently stolen but being replaced)
Custom catback exhaust
Short ram intake
OEM JDM RSX side markers (wired into parking lights)
HFP wing
Volvo front valance retrofit front lip

Perry's EP3
2002 Nighthawk Black Pearl
52,000 miles, original owner
BuddyClub N+ suspension
5-lug conversion (from 2003 RSX Type-S)
Mugen MF-10 17x7.5
AEM V2 intake
Greddy EVO 2 exhaust
Seats from JDM Integra Type-R DC5
EDM Type-R headlights with Morimoto projectors
Mugen grill
Replica carbon fiber Mugen wing
Carbon fiber front lip spoiler (Type-R style)
HFP rear lip


** Visit the King Motorsports store for parts for the EP3, including genuine Mugen bits **


Suki the CRX: Brian B's Clean 2nd Gen Build


This weekend I stopped by my local Autozone to return some parts. As I pulled into the parking lot, this red beauty was the only car in front of the store. I swear there was a golden beam of God-light piercing through the Pacific Northwest cloud cover, shining directly on to this JDM wonder. I heard angels singing; somewhere in the world, blind people were seeing for the first time. It was an Autozone Miracle.


I found the owner inside -- his name is Brian B. and he was more than happy to talk about his ride. I knew immediately he had a story behind this very clean second gen CRX which he affectionately calls "Suki."


Brian was more than happy to share -- and it's clear there was a lot of love put into this CRX. Love, combined with a few rear-ender heartaches that he persisted through. Here's his story in his own words:


****


My dad first got a CRX when I was 6 years old. I remember fond times of him taking me around town and on long road trips in that car. Since then, I wanted a CRX of my own.


My dad called me up early 2006 and told me he had a friend that had an abandoned one located on his property. I inquired the story about the car, what year it was (since I wanted a second gen) and what color it was. He told me he had no idea about the details on the car, except for the fact that the previous owner drove it out on to his friends property and got out of the car and killed himself. I was reluctant to pick it up after hearing such a horrific story. He decided to pick it up and possibly flip the car after he did the maintenance work. He sent me photos of the car after he received it and I became very interested. A Rio Red 1988 Honda CRX DX.


I purchased it from him for $1,000, which is cheaper than any of the mods I later did to the car. At first I drove it around as a daily driver, just enjoying having a car I have longed for. After a year's time, I became bored with the stock d15b2. I had the itch for more horsepower. I started saving as much money as I could while still attending college. After a year and a half of owning the car, I had the money ready to start my motor swap and my first set of suspension parts. I decided on the B16a because I felt it fit the chassis and style I was going for since it came that way from Japan. I mistakenly cheaped out on suspension and went with Megan Racing coilovers and KYB AGX. This was reversed years later.


I spent a month swapping the motor in along with a minor wire tuck. The big hurdle was modifying the stock Japanese harness from the B16a to work with the stock DX harness, since the old harness was tired and brittle. I wanted most of the Japanese harness to look untouched. I tucked the fuse box to right above the ECU on the passenger's side and tucked both headlight harnesses. I was starting to make some progress with the car.


One advantage to being a poor college student with a car project is funds are limited. Now that might sound odd, but it makes you think multiple times before you hastily make a purchase on a part for style or performance. This gave me time to figure out all I wanted to do to the car, without making it look over the top or so similar to the rest.


My uncle (a frame puller at a body shop in Kennewick, WA) offer to paint my Rio Pink / faded car as long as I helped pay for supplies. I would be stupid not to agree. It was really easy to get it started and place the primer on, but the downside was is getting the time for him to finish up the car. Especially since I lived in Boise, Idaho at the time. The car stayed in its primer state for one whole year before going under the gun.


Two weeks before heading up to my uncle's for the paint, I was rear ended by a semi at a traffic light. His excuse was that he couldn't see me and forgot I was there. This is after he hit my rear bumper 5 times before stopping.


Luckily, this is what my Uncle did for a living, so it was no big deal to pull it out.

Car was then painted and all of the pieces put back together:


I had the itch to make it look as OEM/USDM as possible...


A few weeks away was a local car show called Shakotan Matsuri (Lowered Car Festival). I felt I was all ready for it, and then I was rear ended by my roommate's sister.


I spent another year waiting for insurance money and the time to get this damaged fixed. I also picked up a new set of wheels, which still happen to be my current wheels. These were originally going to be a temporary solution until I could afford a rebuilt set of BBS RSs or a real set of Work Equip 03, but then ended up staying with the car a lot longer than I wanted them to be.


One of my buddies gave me this old (but now very popular) 5 panel Wink mirror back in 2008. I like to think I was on the cusp of everyone and their moms' owning one.


Once I finally got the the rear end fixed again, I decided to upgrade the tail lights to the 90-91 EDM tail lights with the EDM center piece with fog light. This means the fog light is on the driver's side, rather than the passenger side like the JDM fogs.


Mind you this project car was also my daily driver throughout all of this.


Finally got around to purchasing the Koni Yellows + Ground Control sleeves with top hats.


Went out with my friend and his Fit for a photo shoot.


Coming up to the more recent mods, I decided that the stock bushings were old and tired as well with over 220,000 miles on them, so I spent the winter of 2010 replacing everything.

I finally got the car to a nice spot. It was the perfect blend of daily driver and tough machine that I always wanted. Since 2011, not much has changed on the car. I went back to a Broadway convex mirror because I was tired of seeing the Wink 5 panels everywhere. Future long-term plans include Hondata tuning, more aggressive cams, REAL wheels, Bride racing seat and harness bar, and a Nardi Racing woodgrain steering wheel with quick release hub.


More of this shoot here: http://www.flickr.com/photos/nateshrum/sets/72157628388718047/

Parts List:

B16a from Hmotorsonline
Prelude LMAs
Si steering rack
Hasport Motor Mounts
Hasport Shift Linkage
2.5 inch cat back with magnaflow exhaust and dual tip
Koni Yellows + Ground Control sleeves and Ground Control top hats
Complete bushing overhaul
ODB1 conversion (With Ostrich chip emulator)
Si interior
EDM flush wing
EDM tail lights and center fog light
GT Styling Solarwing II
DA Integra Front and Rear disc brake swap
OEM VW MK3 VR6 Euro lip


****


** Thanks Brian for sharing this awesome build and pictures with us!! **


You can find a full range of parts for the first and second gen CRX at the King Motorsports store!

https://www.kingmotorsports.com/s-86-crx.aspx

Mugen & King Nostalgia Displays for Dyno Day 2013

It was time for my annual pilgrimage from Oregon to Wisconsin for the 2013 Dyno Day. I arrived about a day early to help with preparations. This year, Scott had a special project for me: convert the 3 glass showcases in the King showroom into a mini-display of Mugen and King nostalgia items that might be interesting to Dyno Day attendees. "No problem," I thought. How hard could that be?

Turns out it was quite a challenge! This is King Motorsports, and this was Scott. King has worked with Mugen for over 30+ years -- so the amount of items Scott had on hand was overwhelming. The challenge became one of editing -- the hardest decisions were choosing what to leave out!

First up, Scott showed me a stack of 80s and 90s Mugen brochures in his office. Mixed in were original product and vehicle photographs from catalog mockups. I laid out a fraction of the brochures in that first stack, taking it all in:


Honestly I wanted to scan every single page of every brochure and catalog. But my guess is that would have taken about a month for an intern to complete if they worked full time. I was able to snap a few quick pics of a few apparel/accessory pages with items I had never seen before. These pages are from one of the book-thick annual Mugen catalogs:


He had several other drawers full of original Mugen brochures for wheels, brakes, seats, steering wheels, suspension, EG/EK/EF Civics, Integras, S2000, Accord and NSX. Even some product brochures for JDM-only cars. Basically this was the mother load of materials for Mugen brochure enthusiasts.

I found a hand-assembled photo book of the aero parts installed on the prototype Mugen S2000. I had seen a few of these pics before in the Mugen S2000 blog post, but really liked this unique pic demonstrating the strength of Mugen's hood:


As if that wasn't enough, Scott also had a few bins of other treasures in storage to show me. He had shirts, shoes, lanyard, key holder and a necktie from the Mugen Honda F1 Collection.


"Excellent for MEN": Look closely at the necktie to see the black-on-black MUGEN logos.


A super-special addition to the display were these amazing F1 valve covers sent to Scott by Mugen Japan -- these two priceless valve covers were still in the bubble wrap. It was the first time that Scott had opened up these V10 beauties! In the picture below, the upper cover is from the 1997 MF-301HB; beneath is a cover from the 1996 MF-301HA (you can see more of these valve covers and their specs in the "Mugen Cover Art" blog post).


After a few hours, I had the glass showcases cleared out and had started filling them with Mugen and King nostalgia. Originally I thought about a nice, orderly display with items laid out with plenty of breathing room (ala The Smithsonian) -- but quickly realized that would not work. There was just too much good stuff to fit in there. So I took the visual-overload approach!


By day's end the displays were pretty much filled to the brim. Here are the showcases in their final form - ready for the Dyno Day attendees!


Here's a closer look at Showcase #1!


Here's a closer look at Showcase #2!


Check out that newspaper-sized Mugen brochure that says BLOOD OF RACING on it -- it's actually for the NR-10 and NR-10R racing wheels. This promo was a major departure from any print designs Mugen had done up to that point (or since), featuring brooding fashion models posed next to Mugen wheels. The end result was a brochure that was more Abercrombie & Fitch then the Mugen we know today. Inside, the copy is equally inappropriate-- stating that the wheels are great for "street racing". You'll never see a Mugen promo like this one again (we hope)!


These are print elements for King Motorsports very first parts catalog, featuring Mugen parts. The catalog was assembled before the days of Photoshop, Indesign or even QuarkXpress. These were assembled by hand with prints, film, scissors and glue!


Can you spot the Mugen umbrella in this pic below? How about the brochure for the Mugen S2000 prototype?


In the pic below (lower left) is a handmade binder provided by Mugen to its dealers. Within it are photos and specs of their parts lineup with suggested retail prices. No surprise that some of the parts are still selling for the same price (or more) 30 years later. Next to it is a page from a corporate Honda employee magazine describing an event where the Mugen-tuned CRX and race cars were brought out for employees to enjoy!


In the lower right is the Mugen parts brochure for the first-gen Integra 3-door and 5-door!


A major milestone for King Motorsports was when it became Mugen's authorized parts distributor for North America. In the picture below is a letter from Mugen explaining that all future orders within North America should go through King Motorsports. Next to it is King's first flyer announcing their new status. Scott said he remembered going to races and slipping these flyers under the wipers of every Honda he could find!


The cool little 1:43 scale die-cast Civic comes from Scott's personal collection. It sits on an envelope that delivered some of the first Mugen Civic EG parts catalogs to the USA.


Below is a early, redlined draft of King's history that would eventually find its way into King's literature and website. Next to it is one of the "What is MUGEN?" pieces created in the 80s to help introduce the American enthusiasts to Mugen.


Below are correspondence from Mugen Japan from 1990 regarding the limited nature of the fiberglass rear wing kit for Integra and the introduction of 2 new Mugen steering wheels.


More pages from the dealer binder with detailed specifications of available performance and aero parts for Civic, Integra and CRX.


In a stack of old faxes I found this note from Scott to Mugen asking questions about the N-1 suspension. It's clear that the collaboration between the two companies runs quite deep!


And finally, here's a closer look at Showcase #3:


Very cool "What is Mugen" promo literature from the mid 80's plus a Mugen Time Machine watch among other goodies! Can you spot the Mugen folding hand fans? Of all the displays that were assembled, this one actually has the most items that are currently available for mere mortals to purchase. Sadly that awesome mug is not one of them!


This empty container of genuine Mugen performance engine oil is one of my favorite Mugen package designs. Many Dyno Day attendees were drooling over the discontinued black Mugen t-shirt in the lower right of this picture.


Crash lid worn by Bob Endicott for the 2005 SCCA World Challenge (King/Mugen RSX) season and Mugen F1 victory momentos... It's very likely that Dyno Day attendees were the first and last people to ever see these items on display!


I have to give Scott a huge thanks for letting me raid his office and private collections to assemble these displays. We really hoped the Dyno Day folks enjoyed seeing these historic and rare items!


We'll see you at Dyno Day 2014!


Gallery: King Motorsports Dyno Day Shirts

With King's next Dyno Day less than a month away, I thought it might be fun to take a look back at the event shirt designs. Each year of the event, King has designed and printed event T-shirts for each attendee.


In recent years, we began smaller runs of specially-designed shirts for the Event Staff. Separate shirts would make it easier for attendees to find King staff on the day of the event.


Here's a look!


Dyno Day 2009:


This shirt was designed by my predecessor, Jude Z., who was also King's in-house designer for many years. This shirt was black and featured the RSX Challenge car tightly strapped down on King's dyno. I've never seen one of these shirts in person but would love to!


Dyno Day 2010:


2010's Dyno Day was the first event I worked on with King. The first thing I tackled was a logo for the event. I drew inspiration from King's dyno bay, which has a bright yellow safety zone painted around it.


That yellow shape safety zone became the foundation for the Dyno Day logo. I separated out the "2010" so it would be easy to swap out from year to year. The back of the shirt included a Mugen-equipped S2000 in clean vector art.


Some trivia... one of the early versions of this shirt had the dyno positioned incorrectly under the front wheels. D'oh! So glad we caught that before going to print!


We also designed a Staff version of the shirt for the year, which was to be printed on a red shirt. Unfortunately our shirt printer didn't have them printed in time for the event, so sadly this design never saw the light of day.


Dyno Day 2011:


For the next year, we decided to do a brighter shirt. The front includes the King #64 Grand Am car and some of the chassis codes you'll find in the King facility on any given day. Unlike the previous year, we chose not to feature a single car. From a design perspective, a challenge for auto event shirts is what vehicle (if any) to put on the shirt. You can put a car on the shirt, but it should have significant meaning to the enthusiasts or to the event. Or you can put an ensemble of cars on the shirt, but that quickly makes for a cluttered shirt. Or you can stylize the car, so it isn't so immediately recognizable as a certain model. Or you can leave cars off the shirt altogether.


Close up. Can you spot your own chassis code?


This year we were able to get the Staff version of the shirt printed up. The logo was re-used, but this time in red.


Dyno Day 2012:


This was a very special Dyno Day. As in previous years, Mugen representatives flew out from Tokyo to show off new products and meet enthusiasts. But in 2012, Mugen shipped the Mugen CR-Z: RR concept car from Japan to King's shop in Wisconsin -- this was one of the handful of times that a Mugen concept car had ever made this 6200 mile journey. This orange beauty had to be our color theme this year. I drew a vector version of the CR-Z: RR for the front, and we added the Mugen logo for the first time on a Dyno Day shirt.


Here's the Staff version of the shirt:


Dyno Day 2013:


This year's theme is "Honda Nostalgia," which we've defined loosely as pre-EG6 era vehicles. King designed and built some of the very first Honda race cars in the USA, and we wanted to celebrate the engineering and simplicity of those early Honda models. The front of the shirt includes one of my favorite photos of the King-built GT5 Civic race car. I felt this year needed a new version of the Dyno Day logo to better fit with the nostalgia (1970's) theme. These vintage photographs are so awesome I was tempted to slap the photo alone on the shirt -- no logos or anything else -- and call it a day. :)


The back of the shirt includes an awesome photo of the GT4 Civic. I always wanted to work MILWAUKEE, WISCONSIN into the shirt and was able to this year.


I split out the car into a triptych to make the overall design vertical, and to give the sense of speed to the GT5 Civic -- as though it was moving so fast it could barely be photographed.


Here's a preview of the Staff version of the shirt for this year.


If you've missed out on any of these shirts, the event Attendee shirt is usually available for sale on the King website after the event. The best way to get one is to sign up and join us for the event! Hope to see you there!