The S600: Honda's Ingenious Roadster

The following article comes to us via King customer Andy Thompson - thanks Andy for this deep dive into a Honda classic!

****

Honda S600 Coupe

Honda has historically produced some of the most intriguing small sporty cars: the CR-X, Beat, and City Turbo to name a few. I’d like to take a step back and look at the car that started the trend, the Honda S600. I have grown a great appreciation for this car and will focus on some of the closer details that make this car so special.

Honda S600 Trifold Brochure

In a time where British and Italian companies such as MG, Triumph and Fiat were the primary producers of roadsters, Honda dared to enter the competition with almost no history in automotive design besides the Honda T360. Although the first actual car produced by Honda was the S360 -- unveiled on June 5th, 1962 -- it was never actually put into production due to lack of power. The S500 followed very shortly after in 1963 as a full production model. Although these preceded the S600, I will focus specifically on the S600 -- produced between 1964 and 1966 -- as it was the first majorly successful automobile by Honda.

Chassis

Honda S600 Chassis Cutaway

Roadsters of the 1960s were completely different vehicles than what we know of as a car today. The S600 consisted of a lightweight steel unibody with almost no safety features. Vehicles of this time hardly ever used plastic body panels. This roadster’s delicate chrome bumpers wrapped tightly around the chassis. The slightly arched rear quarter panels offered just enough contour, without disrupting a functional shape. This design style was found on other roadsters of the time and is quite pronounced in the popular Triumph Spitfire.

The S600 was not designed to be the fastest car of the time, but instead to offer the joy of driving in what has been called a motorcycle in car form. The convertible top offered the option to enjoy the world around the driver. The small body was similar to other roadsters of the time, such as the MG Midget. This popular style pushed the focus of automotive travel towards driving and experiencing the car, rather than just getting to a destination.

The S600 was offered as a traditional roadster as well as a “coupe” in standard and SM trim levels. Having various body styling and trim options is somewhat expected in today’s age -- but in the 60s, it was quite rare!

The concept of converting a performance-oriented roadster into a hard top fast back variant gave birth to a styling design that can today be referred to as a shooting brake. Shooting brakes are an uncommon but intriguing body style, as they add a sort of unbalanced complexity to the rear region of an otherwise streamline styled roadster. With this they bring a sort of exotic shape which offers better aerodynamics and generally allows the manufacture to extrude the quarter panels out far past the rear quarter windows.

Shooting brake cars never took the spotlight as only 1,800 S600 coupes were produced as compared to 11,284 convertibles. Similar sales trends can be seen between the Triumph Spitfire and its coupe counterpart the GT6. Honda didn’t pay any less attention to the coupe, as it offered the “SM” trim line to both body styles.

Honda S600 Coupe

Engine

Honda engines are known for their efficiency through such small displacement. The S600’s 606cc engine was no exception. The engine consisted of a DOHC, all aluminum, water-cooled, quad Keihin carb, inline four producing 57 hp. Almost 100 HP per liter! This sounds quite familiar to what Honda has become known to produce, and was quite an accomplishment for 1964 as other competing cars were using much larger displacement engines such as the 1.8 liter found in the MG B and the 2.1 liter engine found in the Triumph TR4.

It goes without saying that for Honda to produce enough horsepower out of an engine one-third the size of its competition, it had to rev. In this case, the magic number was 8500 rpm. Which continued to a redline of 9500 rpm.

In order to keep the hood low, the engine was designed to sit in the bay at an extreme slant. I have included a diagram of the similar S800 engine to show how pronounced this slant is. This slant is similar to that of a four cylinder motorcycle.

Honda S800 Engine Diagram

Drivetrain

The drivetrain may very well be my favorite part of this little car. Like other roadsters of the time, the S600 consisted of a front engine, rear wheel drive platform equipped with a four-speed transmission. In order to achieve power to the wheels out of such a small engine, they chose to use a 6.42:1 final drive -- extremely short gearing. Short enough to cause complaints of seeing 7000 rpm cruising at 70 mph on the freeway and causing quite a bit of noise. Keep in mind this car was originally designed for the tight city streets of Japan.

In the 60s, many automotive manufactures were tinkering with ways to offer independent rear suspension in their performance vehicles instead of a traditional solid rear axle. At the time, the constant velocity joints found in modern axles were very uncommon.

Honda had a solution. Instead of placing the rear transfer case in parallel with the rear wheels. They set it forward in line with the hinge point of the rear trailing arms. The driveshaft would turn into the transfer case and two straight shafts exited the case on either side. A chain drive system connected the exit shafts to the rear wheels. Thus allowing for a fully independent suspension with no constant velocity joints. This system is very similar to how a motorcycle transfers power to the rear wheel, but applied to a car. I have always thought this to be an amazing adaption of design and quite ingenious for the time. This mechanical genius makes the S chassis unique to the rest.

Honda S600 Drivetrain

Complimenting the fully independent suspension was a very modern spring-on-strut shock absorber system. The rear shock were mounted at a drastic angle, moving the suspension lower and yielding more trunk space.

Honda S600 Suspension

The S600 is a beautiful little machine that really shows that exotic ideas can be incorporated into an intriguing package. Although it is said that Honda never turned a profit off their early sports cars, they set a foundation of what is expected out of a small, sporty Japanese sports car: Light weight, proper handling, and a flexible high revving engine. The original S Chassis truly is a machine of another time.

Honda S600 S500 Ad

CR-Z Brake Upgrade with DC5/RSX Calipers

At King we love adding performance to the CR-Z. We even had the one-of-a-king Mugen CR-Z: RR Concept Vehicle shipped out from Tokyo for our 2012 Dyno Day.

In our shop recently: We made this CR-Z go fast with an HPD supercharger. Now it's time to make it stop fast as well! On go a pair of rebuilt RSX calipers, Powerslot rotors and Hawk HP+ pads. Rotor size goes from the stock 10.3" to 11.81" with the RSX rotors. Now it stops as well as it goes!!! This is a great upgrade for any CR-Z.


Fakespotting: Mugen Formula Head Cover 12310-XF0-K1S0

The following post comes to us courtesy of Mugen aficionado Jerimiah Styles!

== ==


In this installment of Fakespotting I discuss the discontinued Mugen Formula Head Cover for B Series VTEC DOHC engines found in the Integra, Civic, CRX and others.

Mugen Formula Head Cover: 12310-XF0-K1S0

These aluminum engine head covers are manufactured individually using sand casts in the same way as covers for Mugen Formula engines. The genuine cover comes with a new gasket kit, shortened studs for the center four bolts of the cover, a fresh new tube of Hondabond, brand new washers, and printed Japanese instructions.


The Mugen letters are stretched across the length of the bottom two bolt holes (the 'N' begins at the hole) and the high quality of the aluminum is as gorgeous as a Rolex watch!

Next we have the fake head cover. The first obvious difference between the two is the Mugen lettering, it's not quite as stretched out (less "italic" or slanted) -- a different font if you will. The finish on the lettering is polished, as opposed to the brushed look of the authentic Mugen cover. Below is the fake:


The quickest way to spot a fake: Compare where the start of the letter N in MUGEN lines up to the bolt hole above it:


A closer look at the kanji is another sign; smooth, well-defined edges and the fine craftsmanship of genuine Mugen products is evident here. I count a total of eight bumps at the bottom of the genuine Mugen kanji.


The fake cover's kanji is far more angular and less defined. I counted seven bumps, not the eight of the genuine one. A closer look shows a polished finish which is more susceptible to oxidation and discoloration as opposed to the superior quality of the Mugen piece.


A look underneath the authentic cover looks like something you would expect to see on an F1 race car. The baffles are screwed in place and the product is clean enough to eat off of.


Underneath the replica it's an entirely different story. The baffle is riveted on, and the center piece is a different color, not the bronze color of the real one. Notice the included printed yellow WARNING insert? It instructs the unlucky owner to wash the inside of the cover before installing because METAL SHARDS MAY BE PRESENT-- potentially causing damage to your VTEC engine!


The packaging really needs no explanation. Here's the genuine box:


And the box for the fake:


On the side of the box, you'll see various color options. Replica valve covers were available in multiple colors, not something Mugen offered.


A very rare look at the installation instructions from the genuine packaging. (Front)


(back)


Why does it matter?

Replica parts made with inferior materials could potentially warp, resulting in an improper seal to the head and causing oil leakage. The possibility of metal shavings being inside of the fake cover is another very dangerous hazard to your engine-- one that could ultimately lead to some very expensive damage down the road.

Knowing what you're looking for when purchasing a Mugen Formula Head Cover is important. These are now discontinued and can no longer be purchased new from an authorized dealer such as King Motorsports. Finding them with the original packaging is becoming harder and harder. It's not uncommon for these head covers to fetch a premium, and there are sharks out there trying to sell fakes for those prices. Know what you're looking for and you can save yourself from a potential scam.

Fakespotting: Mugen Sports Pedal Kit 46545-XG5-K2S0

The following post comes to us courtesy of Mugen aficionado Jerimiah Styles!

== ==

The Mugen sport pedal kit is one of the more commonly replicated parts found on the market today. Let's go over some tell tale signs to identify real from fake. In this post we'll look at a specific pedal kit that is available for the CRX, Del Sol, '90-'05 Civic, Integra, RSX, TSX and a few more. Suffice it to say this is a very common pedal kit:

Mugen Sports Pedal Kit (MT): 46545-XG5-K2S0

We'll start with the authentic Mugen kit. Notice the orange tape on the clutch and brake pedals and white tape on the gas pedal. The high quality of the aluminum is also a sign that you have a genuine Mugen product. Notice the Mugen logo on the brake/cluth is a single line with kanji and MUGEN.


Now, let us compare the replica version. Red tape has replaced the orange, and we have a finish on these that is noticeably different than the genuine Mugen set. You will also notice that the logo is different on the brake/clutch -- kanji is stacked above MUGEN -- however this does not determine authenticity. The older sets of genuine Mugen sport pedals did indeed have this insignia on them. They are referred to by some as first generation sport pedal kits, highly sought after by Mugen collectors.


A look at the authentic Mugen accelerator pedal shows the high quality of the aluminum.


A look at the back of the replica accelerator pedal shows the difference in quality and tell tale red tape of the replicas (versus white tape on the genuine). The overall shape of the fake pedal is more jagged and slightly larger. The fake pedal does not install the same as the Mugen -- which is riveted or screwed on. Keep in mind the fake is a brand new, out of the box set -- far from the craftsmanship of its authentic counterpart.


Next let's look at the Mugen brake and clutch pedal (these two Mugen pedals appear to be identical). Again the orange tape and the part number is on the bottom of the real ones.

Now the replica. There's that red tape again, and notice the lack of part number and "Made in Japan" stamp.


This particular kit was available in the two types of packaging you see below (which are both genuine). The clear window box is the most commonly seen replica package. Some replica packages even include a photocopy of the genuine installation instructions, making them even harder to spot. Since the replica packages so closely resemble the genuine ones, the best way to tell fake from real will be to inspect the pedals themselves.

The cardboard box version was available via Honda dealers and has a different part number (but is the same kit).


== ==


Why does it matter?


Replica pedals are known to come apart due to inferior manufacturing and materials. This is extremely dangerous and can cause slippage on the pedal -- or worse -- interfere with pedal operation. Imagine not being able to press the brake pedal because the accelerator cover is lodged behind it!


Want to make sure you get genuine pedals that won't fall apart on you? Buy from an authorized Mugen dealer like King Motorsports.

http://www.kingmotorsports.com/p-225-mugen-sports-pedal-kit-mt.aspx


Thanks again to Jerimiah for his insight and we look forward to more posts from him!


** UPDATE **

Since we published this post, we've had some questions about the variations within the genuine Mugen pedals. Over time, Mugen improved and modified their manufacturing process and the design of the pedals. Enthusiasts have identified three distinct "generations" of pedals: Gen 1, Gen 1.5, and Gen 2. Below is a comparison chart that helps identify the various generations of genuine Mugen pedals.


Genuine Mugen Sport Pedal Generation Comparison

Mugen Official Company Profile Sheet Circa Early 1980s

Right-click to see this sheet at full size!


The text:

MUGEN POWER
HONDA POWER SPECIALIST

President:
Hirotoshi Honda
Son of Dr. Soichiro Honda well known. Industrial designer and racing car builder.

Chief design & mechanic:
Masao Kimura
Formerly with Honda racing service center Co., Ltd. Builder of over 15 different racing cars & racing motorcycles. Winner of a total of over 50 races.

Capital stock ¥ 80,000,000
Established March 1973
Land area 6,600m²
Plant space 2,700m²
No. employee 80

We specialize primarily in the design, manufacture, testing and sales of motor sports parts and special racing machine (motorcycle and automobile, both 2cycle and 4cycle) for the Honda manufactured products, and participation in the various races with our products.


Mugen products manufactured by highly skilled personnel with the most up-to-date equipment and developed from extensive research, long experience and rigid testing under many years of gruelling races are used widely by both professionals and general enthusiasts throughout the world.


Hondata K-PRO: Ordering, Unboxing & Installation


Earlier this year I purchased the K-PRO (version 3) engine computer tuning solution made by Hondata, Inc. This modified ECU would open up my 2002 Civic Si (EP3) to performance tuning. While there are a couple engine tuning solutions available for my car, the Hondata K-PRO is the most common and well-supported. I’ve seen King’s skillful dyno tuning and was looking forward to having some tuning done to make the most of my car’s modest modifications.


PURCHASE & CONVERSION

To prepare, I picked up an un-modified ECU for my EP3 -- the PNF version, which is the same as what comes with the EP3. I bought this ECU second hand, from a reputable seller. Placing the order with King Motorsports was easy. Scott
from King pointed me to a form to fill out and send in with my ECU to Hondata’s facility in Torrance, California. Scott had to fill in some paperwork on his end as well so that Hondata would be prepared for my ECU.

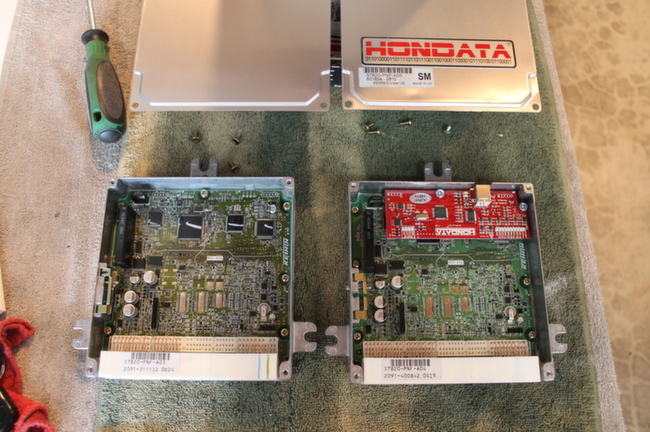
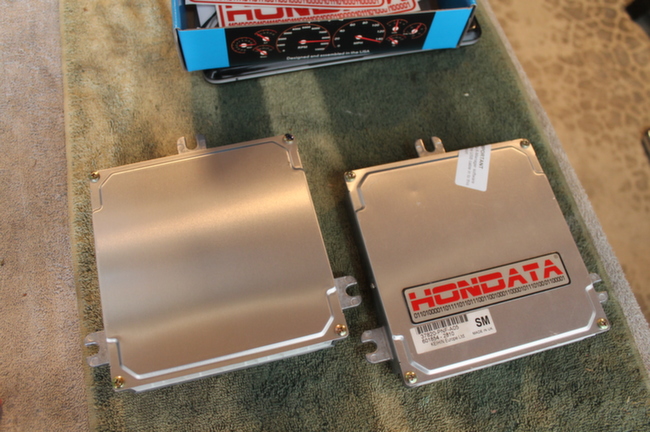
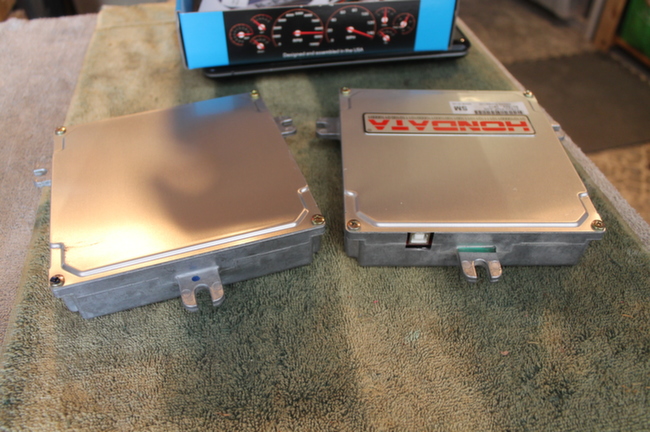
Once Hondata’s technician received my ECU, they tested that it functions properly. Then they open up the metal case and add their daughterboard to the main board. This new board is about a quarter the size of the main Honda board and fits snugly inside the case – allowing the ECU case cover to fit back on as it originally did. Hondata also cuts a small square opening into the side of the ECU case to allow for the USB port connection. As a final step, they closed the ECU back up, test it, and put a HONDATA sticker across the top of the case.

I also purchased a used laptop that runs Windows. I installed the free KManager software (http://www.hondata.com/downloads.html) from Hondata on it. The laptop and Hondata software will allow tuning of the K-PRO ECU via a USB cable. I reviewed Hondata’s installation and KManager tutorials online.


UNBOXING

A Fedex package arrived swiftly from Hondata. Inside the box:

* K-PRO ECU
* USB cable
* Serial input harness for data logging (I didn't need to hook this up for my needs)
* KManager software on CD (you can also download this online for free)
* Hondata license plate frame and stickers
* Printed materials and a note to relocated the ground strap on intake manifold


INSTALLATION

Installation was fairly straightforward. Here were my steps on my EP3 (your steps my be different):

1. Disconnect battery.
2. Remove the passenger side foot well trim panel. You should see the ECU. Carefully release and remove the harnesses leading to the ECU.
3. Bend or remove upper glove box “stoppers” to allow the glove box to swing completely open.
4. Use a 10mm socket to remove the 3 bolts holding the ECU in place. 1 bolt is behind the glove box, and 2 bolts can be removed from underneath the glove box.
5. You should now be able to remove the ECU.
6. Install your K-PRO ECU in place. Installation is reverse of the removal. Make sure the harnesses are securely clicked into place.
7. Before you close up the glove box, plug the USB cable into your K-PRO. I used a few zip ties to keep it from accidentally pulling out and let the rest of the USB cable rest inside the glove box.
8. Per the included note from Hondata, I relocated the battery ground strap from my intake manifold to the valve cover bolt. All that was required to do this was a 10mm socket. The existing ground strap is long enough for the relocation.
9. Reconnect the battery.
10. Turn the key to on (but do not start the engine).
11. Make sure your laptop has successfully installed KManager, and launch KManager. Then plug the USB cable into laptop. You can now upload one of the base maps provided by Hondata.
12. The next steps only apply if your K-PRO conversion was performed on a second hand ECU:
13. Using KManager, disable the immobilizer.
14. In order to have the immobilizer matched (progrmamed) to my ECU: I scheduled a service appointment at my local Honda dealer. My service advisor understood what a K-PRO is and what I was trying to accomplish. I drove to the dealer with the immobilizer disabled. Once there, I used my laptop to re-enable the immobilizer. This is an important step. If you don’t re-enable the immobilizer, the Honda tech’s equipment will not be able to locate and program your immobilizer.


FAQ

Q: Where can I get more information on the benefits and compatibility of the K-PRO system?

Hondata’s website has a lot of good information and is updated regularly:
http://www.hondata.com/kpro.html
http://hondata.com/media/kprotraining/k-propresentation.pdf

Q: Is the K-PRO only for heavily modified cars?

While the K-PRO conversion is well suited for turbo/ supercharger applications and K-series engine swaps, it can also help extract power from basic bolt-on parts such as a performance header, exhaust system and air intake.


Q: What is an immobilizer?

An immobilizer is an electronic security device installed by Honda that prevents the engine from starting unless the correctly paired/programmed key (with immobilizer chip) and ECU are present. It prevents a car from being stolen by a thief bringing his own generic key or ECU.

Q: Do I have to buy a 2nd ECU or can I just send the one in my car?

You can send the ECU that is currently in your car. There are pros and cons to doing that.


PROS: You won’t have to reprogram your immobilizer (assuming you want it enabled). And you can be certain the ECU is fully functional. There is also a cost savings since you won’t be buying a second ECU.


CONS: Your car will have a few days of down time since obviously your car will not be running while the ECU is being modified by Hondata. If you ever want to sell the K-Pro or return to a stock ECU, you will need to buy a stock ECU.


Hondata can also provide a brand new ECU at additional cost when you order. 


Q: What is the big deal about buying from an authorized Hondata dealer?

Simply put, buying from an authorized Hondata dealer like King Motorsports protects you. Hondata has issued a warning that there are counterfeit K-PRO ECUs in circulation:
http://www.hondata.com/kpro_counterfeit.html

In 2014 a Florida man was charged by the FBI for having Hondata devices reverse engineered, then built in China and sold as authentic. He generated approximately $58k in income with his scam, so you can only imagine how many fake Hondata devices he put into circulation.

Hondata also warns of a scammer from Texas named Daniel Sanchez who claims to be authorized to sell on behalf of Hondata but is not a Hondata dealer. He has also spread some misinformation about Hondata. More info:
http://www.hondata.com/sehablaauction.html

Q: What’s the difference between a Hondata Reflash and a K-PRO?

A Reflash is a reprogramming of your ECU by Hondata. Rather than installing a full daughter board into your ECU case, Hondata reprograms your ECU directly to extract more power with pre-determined changes such as altered cam timing and optimized fuel settings. The cost is significantly less than the full K-PRO conversion, but is not customizable for your car’s specific mods.

More info about the Reflash:
http://www.hondata.com/reflash.html

You can always upgrade from a Reflash to the full K-PRO at a later date.

Q: Can I upgrade to a newer version of K-PRO?

Hondata has been very good about consistently updating the K-PRO hardware and software systems. While the software updates are free, the hardware updates are not. Hondata has a program that will allow you to purchase an upgraded K-PRO conversion by sending in your working, older K-PRO ECU.

Q: What kind of laptop do I need to run KManager?

Right now nearly any Windows laptop or netbook will work, including older ones running Windows Vista or newer. A desktop computer will work too, but has obvious portability limitations. A Mac OS will work as well if you have a compatible Windows emulator. Some have even used certain models of the Windows Surface tablets (the ones that run the full Windows 8, not Windows 8 RT). I was able to buy a used Acer netbook from our company’s IT department for about $50. KManager does not take very much CPU power to run, so older laptops will work just fine so long as they meet the software’s minimum operating requirements.


***


King Motorsports is an authorized Hondata dealer. Buy with confidence online or by phone at (262) 522-7558:

http://www.kingmotorsports.com/advsearch.aspx?SearchTerm=hondata


***


VISUAL COMPARISON


Here is a side-by-side comparison of a stock ECU (left) and the K-PRO conversion (right):


In the Shop: Custom Fab Roll Bar for DC2-R


This week we wrapped up custom fabrication on a roll bar for an Integra Type-R (DC2-R).

The goal was a safe and strong roll bar with minimal cutting to the original interior. The roll bar is bolt-in, so removal won't be a headache (unbolt, replace a few plastic trim panels, and we're back to stock).

Specs: 1.5 x .120 DOM, TIG welded and powder coated semi gloss black. The finished result looks factory!


King Motorsports can fabricate top-shelf custom roll bars, cages and more for your Honda or Acura -- give us a call at 262.522.7558!

http://www.kingmotorsports.com/c-242-fabrication.aspx

VTEC Just Caked In Yo!


Last week King Motorsports fan Chris M. sent us the above Honda-inspired cake that he scored for his 30th birthday. That Facebook post cooked up a fantastic buffet of other Honda-themed cakes! You're in luck, we're serving up a slice of VTEC sweets!

Dustin K's 17th birthday: A faithful replica of his 94 Civic DX coupe with an EX/Si swap! Complete with grille and even wiper blades.


 Exhaust and red/clear tail lights!


 Dustin K also took a bite out of his 95 Civic DX hatchback with a 97-spec JDM ITR swap, painted EBP!


 Is that a Wisconsin license plate?


Dave B shared this EK9 wedding cake! Complete with amber side marker lights, pink trim and Type-R badging!


The cake came with its own mechanic maybe?


Back to Dustin K. Here's his S2000 which he chomped down for his 22nd birthday.


His Honda cake master has really improved over the years! Check out the red Honda badge, clean black seams and metallic blue exhaust tips!


 Stephanie M made this Bisimoto wagovan completely by hand, by herself! Nothing premade, she says!


What do you get Hondapro Jason for his birthday?


 Nathan G's wife surprised him with this beauty complete with spark plug wires!


 Here's a contribution from Simon P, who's grandma is texting her girlfriends a pic of his 30th birthday Integra. CarCake 624 is just about to cross the Finish Line!


Peter F's Honda has red wheels, a very small sunroof, plenty of roof-mounted air diverters, and is about to run over the Maytag Repairman.


Brandon C whipped this DC5 up for a friend and in true DIY fashion this was his first attempt at anything cake-related! Remember kids that a Ding Dong is never a proper substitute for jack stands!


Dustin K's Honda cake legacy also stretches back to his 18th, a milestone that included this frighteningly precise model of a Civic coupe with 5-spoke wheels and flame decals.


Joe K got himself a cake with Volk TE37s!


High school included this amazing CRX with swapped LS motor for Ryan P and Dustin K.


 Tyler K's wife crafted up this tasty valve cover for his 26th birthday!


Who you gonna call to get one of these fantastic cakes? Dustin K reaches out to the Cake Master Michael K, pictured below on the left!


Stephanie M hand-built this B series motor completely out of edible dough -- she says it tasted like a giant sugar cookie!


Alain M's 30th was powered by this amazing Honda tribute with an unusually short spark plug cover. Feast your eyes on that ornate oil fill cap!


Have a Honda-themed cake to share? Visit and contribute to the gallery on the King Motorsports Facebook thread!

Mugen Power 16 Coffee Mug


You have plenty of go-fast parts for your car, but what about your body? Mugen has a nifty solution to your coffee and caffeine fluid delivery system in the form of this ceramic Mugen mug.


This mug is glossy black with pearlescent-white graphics of the circular MUGEN POWER 16 badge and Mugen logo beneath. The graphics appear on both side of the mug so you can enjoy them in both left-hand drink (LHD) or right-hand drink (RHD) setups.


The mug measures about 2.5 Mugen lug nuts tall, and has a fluid capacity of 250 milliliters (about 8.5 ounces). It's on the smaller side compared to what we might be used to Stateside, giving you ample opportunity to really savor that precious beverage. The mug comes in a white gift box with Mugen logo. A perfect gift for yourself or your favorite Mugen fan!

Currently available at the King Motorsports online store (released late 2013):
http://www.kingmotorsports.com/p-4386-mugen16-coffee-mug-cup.aspx

90000-XYF-140A


Mugen iPhone 5 (5S) Cases


Protect your iPhone 5 (or 5S) in style with one of the new Mugen cases introduced in late 2013. The cases are streamlined, snap-on shells that provide protection for minor drops and scrapes. I got my hands on the Mugen kanji-version case and was really happy with the soft-touch, matte finish inside and out. By comparison, the Mugen case is a slimmer thickness than similar ones by InCase, but still feels rugged enough for many adventures to come. The case also features two tiny holes for you to thread a phone charm or strap to -- a feature that is distinctively Japanese.


The case feels great in your hand, with a velvet-like texture that isn't rubbery or cheap at all. Once snapped on to your phone it hugs the chamfered edges just right. The case will look especially nice on the space gray version of the iPhone 5S. This isn't just a generic case with a logo slapped on it -- it's a unique product created just for Mugen and carries all of the quality fit and finish you'd expect from a Mugen item!


Both versions of the iPhone 5 case are currently available on the King Motorsports online store.


MUGEN POWER kanji iPhone 5 Case: 90000-XYF-112B

MUGEN 16 iPhone 5 Case: 90000-XYF-112A